
Affiliate link disclosure – The BMW Repair Guide uses affiliate links in their site. For more information on affiliate links, please click here.
Repair Summary
The following article gives detailed instructions on replacing the rear trailing arm bushings on a BMW E36 3 series car. Even though we have used a 1996 BMW M3 to perform this installation, this article can be applied to any 1990-1998 BMW E36 vehicle with minor modifications.
See all vehicles this article applies to
E36 3 Series 316i
E36 3 Series 318is
E36 3 Series M3
E36 3 Series 320i
E36 3 Series 325i
E36 3 Series 325is
E36 3 Series 323i
E36 3 Series 328i
E36 3 Series 318i
E36 3 Series 323i 2.4
E36 3 Series 325td
E36 3 Series 325tds
E36 3 Series 318tds
E36 3 Series 316i 1.6
E36 3 Series 323ti
E36 3 Series 318ti
E36 3 Series 316g
E36 3 Series 316i 1.9
Replacing the Rear Trailing Arm Bushings on your BMW E36 may help solve a variety of issues, including bad alignment and poor handling.
As we have discussed in previous articles, one of the most overlooked maintenance areas in our cars is suspension. Let's face it, most of us like to have fun and really drive our BMWs. Taking corners fast, "testing" our acceleration, and pushing the handling boundaries of our Bimmers is...well, why we drive Bimmers. But over time, even normal driving can take its toll on heavily loaded suspension parts, causing worn or cracked bushings, poor handling, and a decrease in performance. One of the most common suspension parts that are susceptible to failure due to a lack of maintenance is the Rear Trailing Arm Bushings or RTABS.
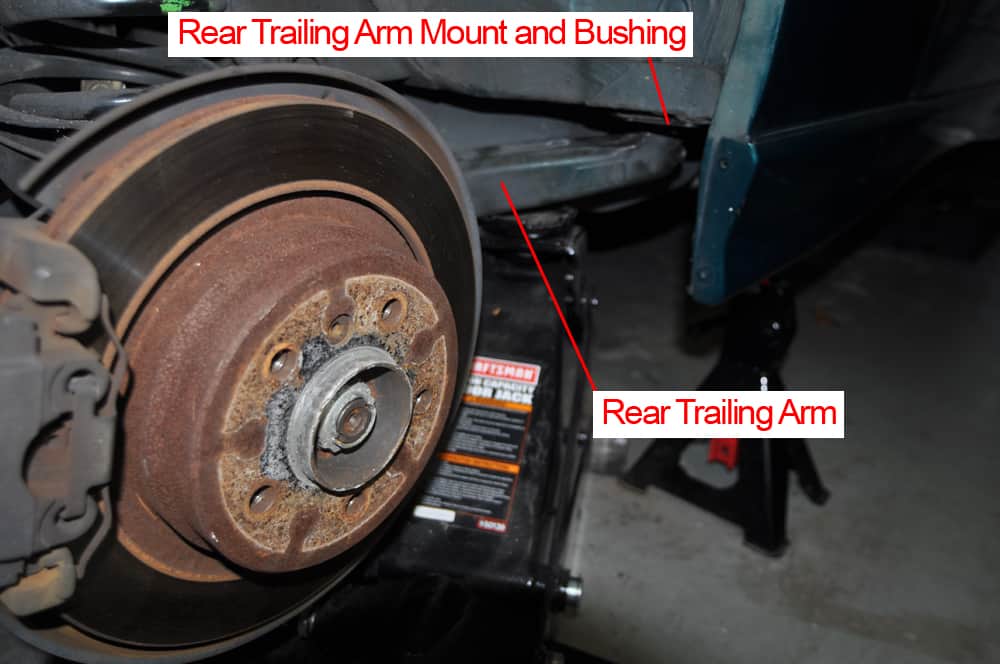
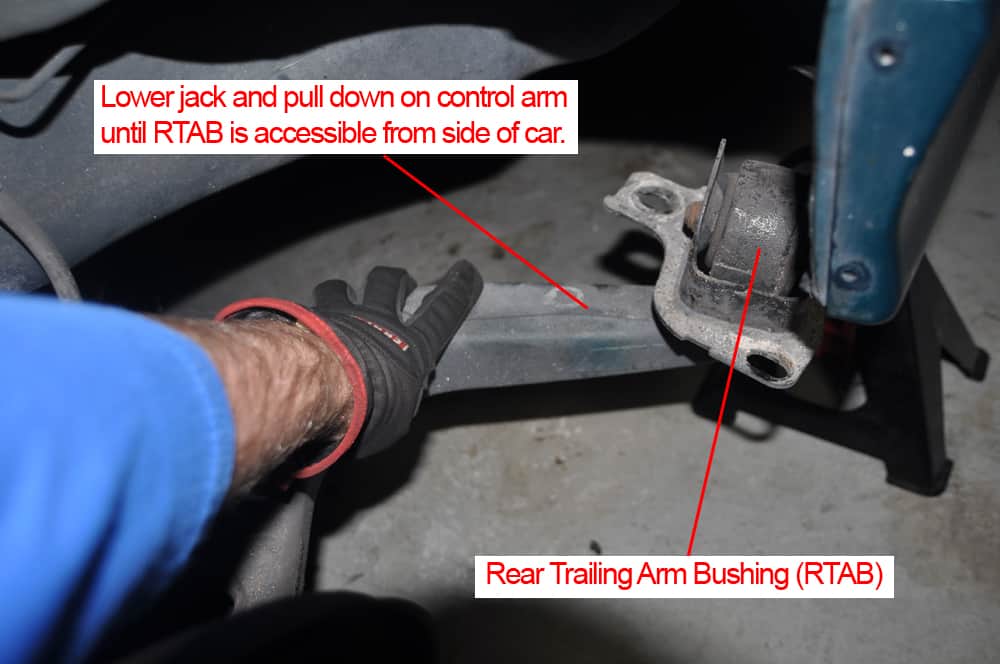
To learn why the rear trailing arm bushings (RTABs) fail, you need to understand what the rear trailing arm does. In simple terms, the rear trailing arm connects and braces the rear axle to the chassis. It creates a strong reinforcement by connecting the axle to the frame, stabilizing it against the longitudinal forces and keeping the rear wheels on their correct axis. Since the axle moves up and down, the trailing arm also needs to be hinged where it is connected to the chassis. This hinged point of connection between the trailing arm and the frame is where the RTABs are located. The RTABs cushion and soften the movement of the rear suspension while keeping the rear wheels on their correct axis.

Over time, the RTABs can become worn and/or cracked due to the constant load they are under causing issues such as:
- The car feels "loose" in the rear end, especially when taking turns.
- Clunking sounds when coming to a stop or accelerating.
- Alignment issues, especially when the brakes are applied.
- Abnormal wear on the rear tires.
A BMW E36 RTAB replacement is a fairly straightforward DIY repair and can be done while the trailing arms are connected to the car. There are a lot of DIY techniques online on how to remove RTABs (burning, drilling, etc), and even though we admire the clever innovation of these BMW enthusiasts, the BMW Repair Guide strongly recommends only using the correct BMW E36 RTAB removal/installation tool when doing this repair. We have provided a link to the proper tool below (see the tools and supplies section) for your convenience. Remember...the savings from doing the repair yourself greatly outweighs the price of the tool.
There are also a lot of choices when it comes to picking out replacement rear trailing arm bushings, depending on what kind of driving you plan on doing and whether the car will be used for street, track, or racing. For more information on selecting the correct BMW E36 RTAB, please read our article RTABs – Selecting the Correct Rear Trailing Arm Bushings for your BMW.
In this article, the BMW Repair Guide will be installing upgraded OEM bushings with limiters. These rubber bushings are about 20% stiffer than stock, and when combined with the limiters will provide the perfect balance of stiffness and comfort we want for combined street and track use. Please note that adding the limiters is optional and not necessary to complete this repair. Please also be aware that the installation of new performance bushings may be different than what is shown in this repair. Always follow the installation instructions provided with your new bushings.


If the video does not appear below, please click here to view
View the video version of this repair.
View the detailed parts diagram for this repair.
Includes detailed part diagrams, part numbers and links to purchase all of the required components needed to complete this repair.

Before starting this repair, you must have the following required parts.
BMW E36 M3
A common bushing to tear, causing a vehicle to "wander" while under heaving braking. Bushing used in forward position of the trailing arm.
Fits all E39 Models
This rear trailing-arm bushing limiter kit creates a stiffer rear suspension without sacrificing ride quality. Stock trailing arm bushings are known for failure, on both the E36 and E46 BMW chassis. This kit is a perfect upgrade from stock, as it reduces bushing deflection, dramatically increases bushing life, improves handling, and all without the harshness of
Fits all E39 Models
While your stock bushings do a great job of insulating the cabin from a rough ride, they do little to improve road feel, and can cause slop in the suspension, allowing for unwanted movement � especially after they wear out. These SuperPro suspension bushings do a great job of locating your suspension components and helping you to feel more connected to the driving experience, while more efficiently managing the movement of your suspension.
BMW E36 318i, 320i, 323i, 325i, 328i, M3
Powerflex Black Series bushings are the ultimate in track and race bushings. Powerflex is the number one selling suspension bushing manufacturer in Europe. Their experience with polyurethane bushing material and state-of-the art manufacturing techniques allows them to produce premium performance bushings, made to exact-fit standards.
BMW E36 318i, 320i, 323i, 325i, 328i, M3
The biggest difference between these new street application monoballs and the legendary Turner track version is the utilization of a high quality OE sealed bearing to keep contaminants out extending the life of the product.
Section 1 - Removing and Installing BMW E36 RTABs
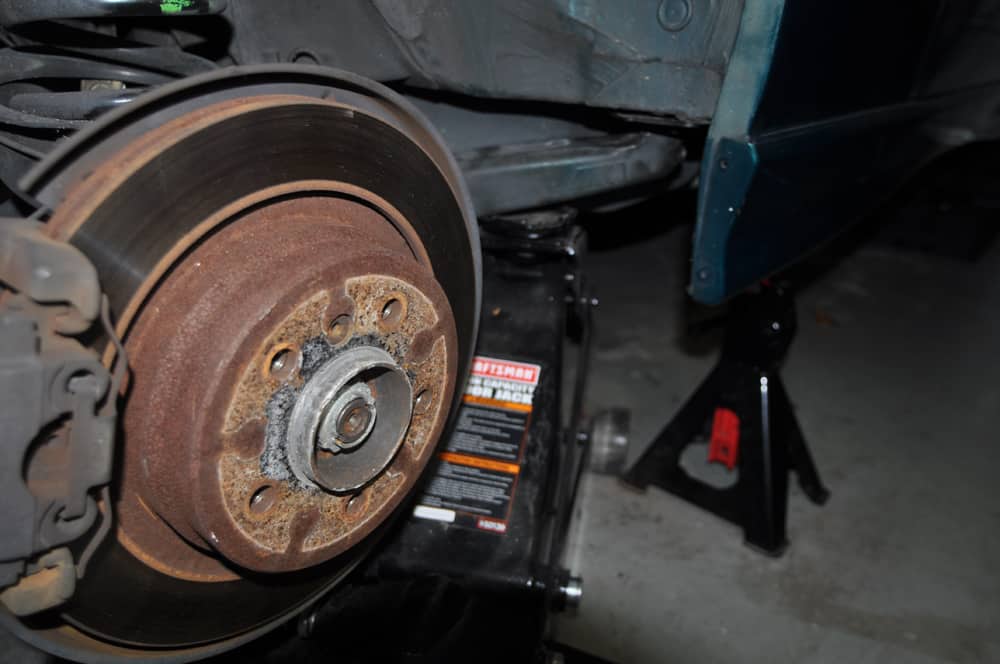
- Jack and support the rear of your vehicle using the jack stand method as shown in our article BMW Jacking and Supporting for Repairs and Maintenance.
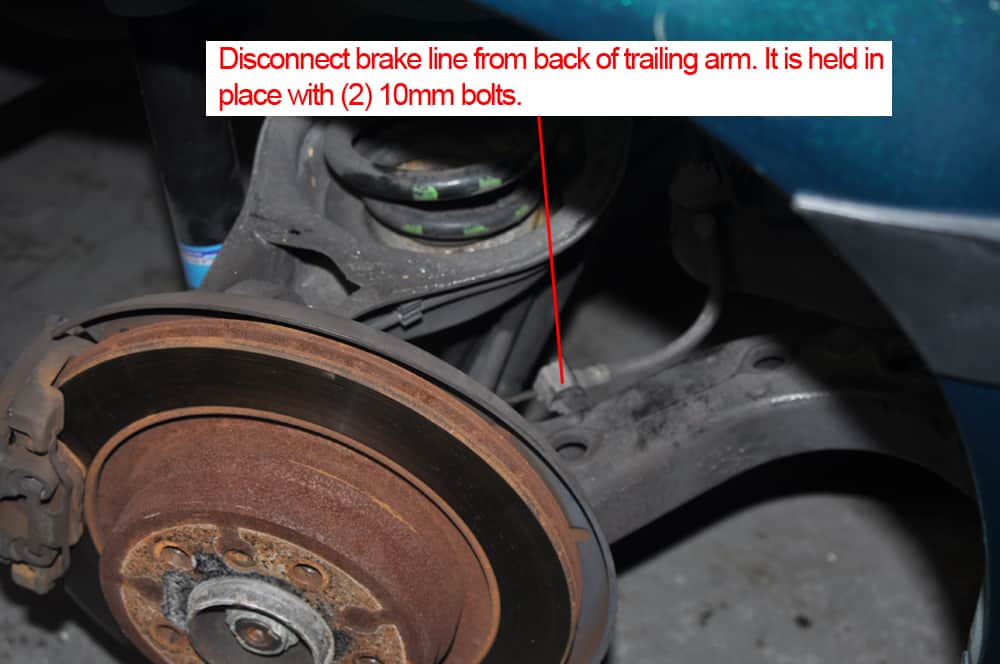
- Remove the two brake line bolts using a 10mm socket wrench. The brake line must be separated from control arm or it could be damaged during this repair.
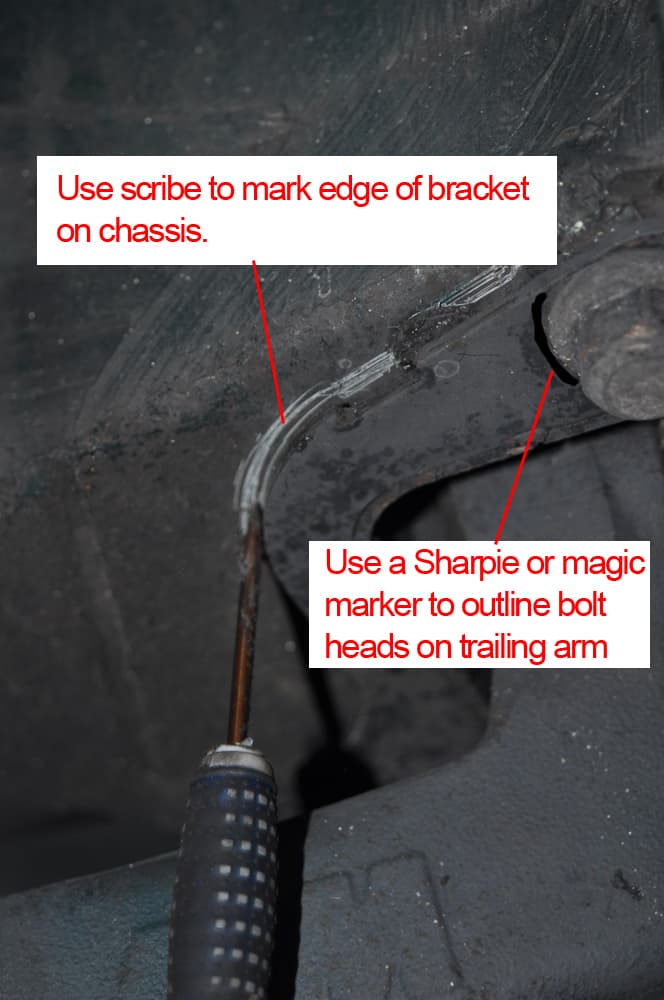
- Using a metal scribe, trace the outside of the rear trailing arm mount. Using a Sharpie or magic marker, trace the outside of the bolts heads on the mount.
- Position a floor jack under rear trailing arm and jack up to relieve pressure on rear trailing arm mount.
- Remove the three 18mm bolts securing the rear trailing arm mount to the frame. The bolts are torqued tight, so you will need to use either an air impact wrench or a breaker bar to get them loose.
- Release the jack lowering the control arm. You will need to pull down on the control arm until the rear trailing arm mount is accessible from the side of the car.
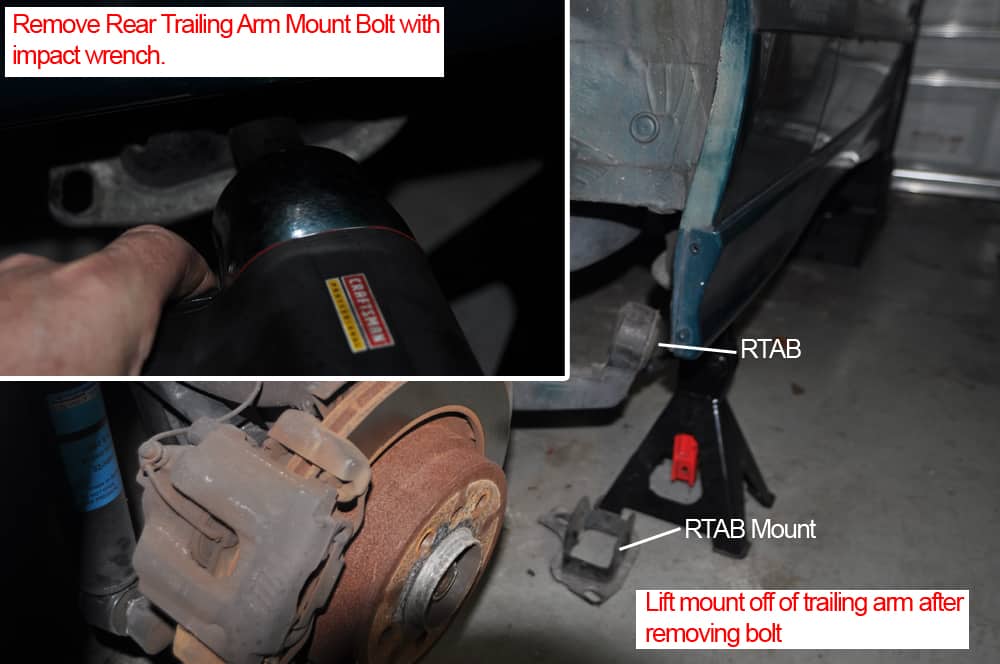
- Using an impact wrench and an 18mm impact socket, remove the rear trailing arm mount bolt and lift the rear trailing arm mount off of the rear trailing arm.
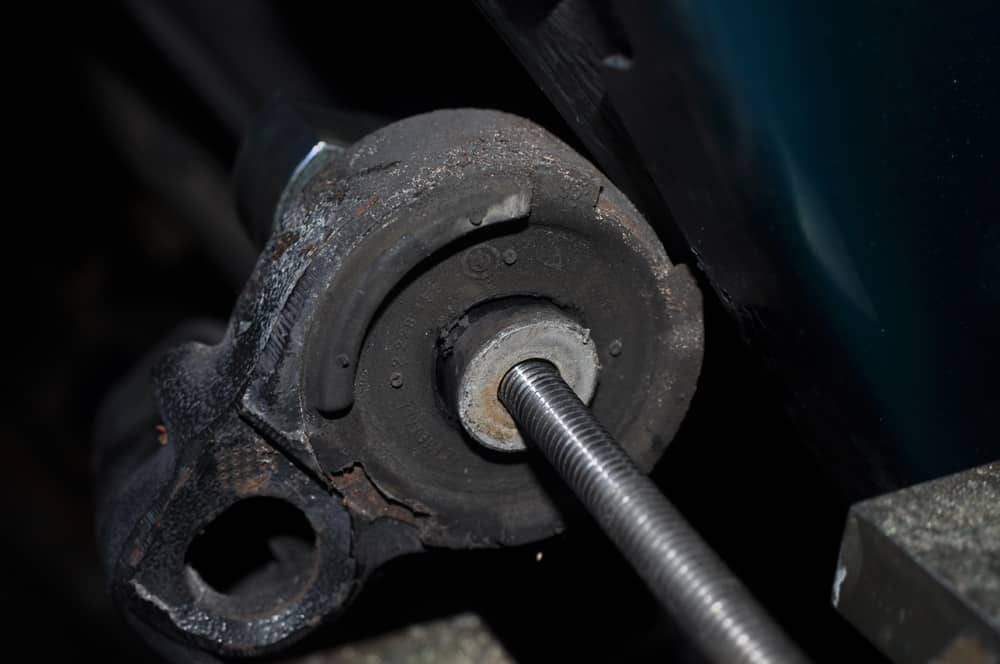
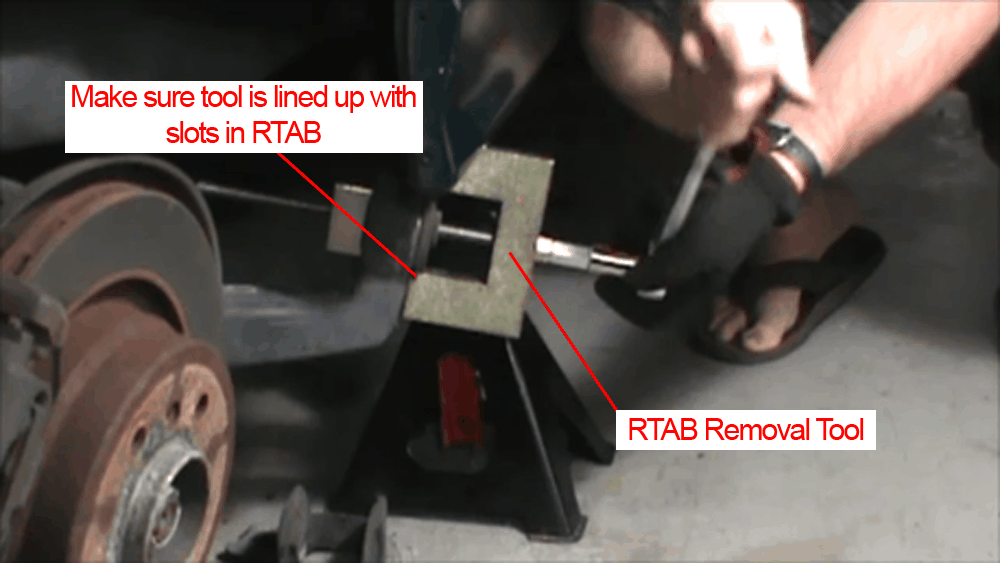
- Using the RTAB removal and installation tool, remove the existing bushing. ** Make sure the tool is square and the outside of the tool is lined up with the slots in the RTAB. If they are not lined up, the RTAB could bind breaking the tool).
 9. Clean inside of trailing arm where bushing was just removed with a high grit sandpaper and some brake cleaner. Be sure to remove any old corrosion and grease. Coat the inside with a thin layer of anti-sieze compound.
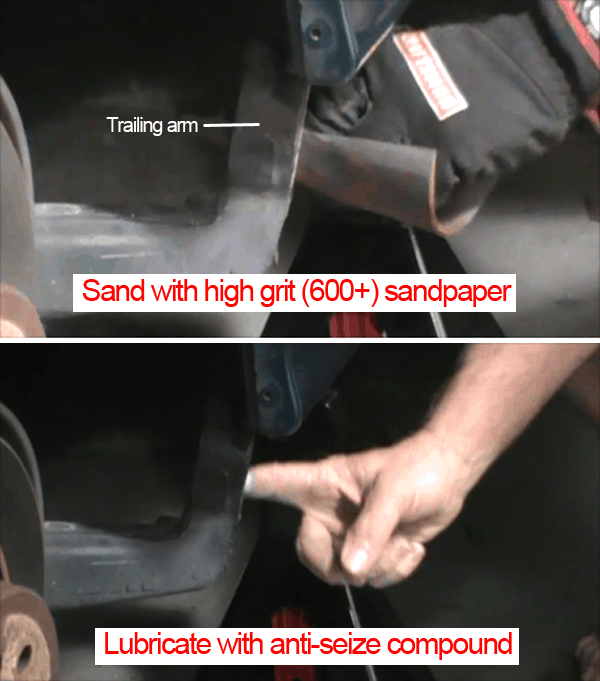 10. Reinstall new RTAB by reversing installation tool and pressing the bushing in the same direction it came out. **Important - trailing arm is tapered on one side (outside edge). If you are reinstalling OEM style rubber bushings, YOU MUST install them in the same direction that they were removed. Make sure RTAB installation tool is square with trailing arm when installing to prevent RTAB from binding.
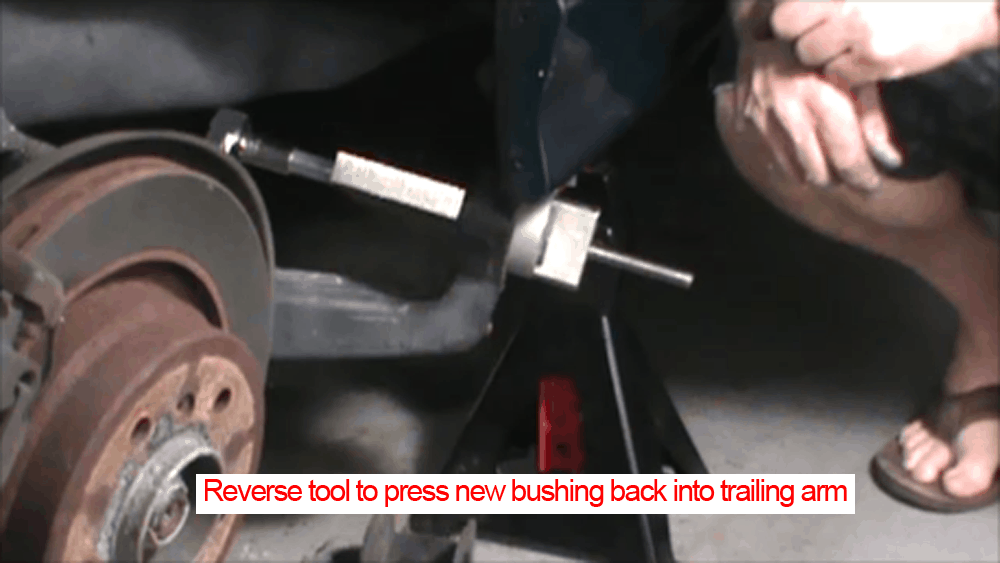 Here is a quick video showing steps 8-10 above:
 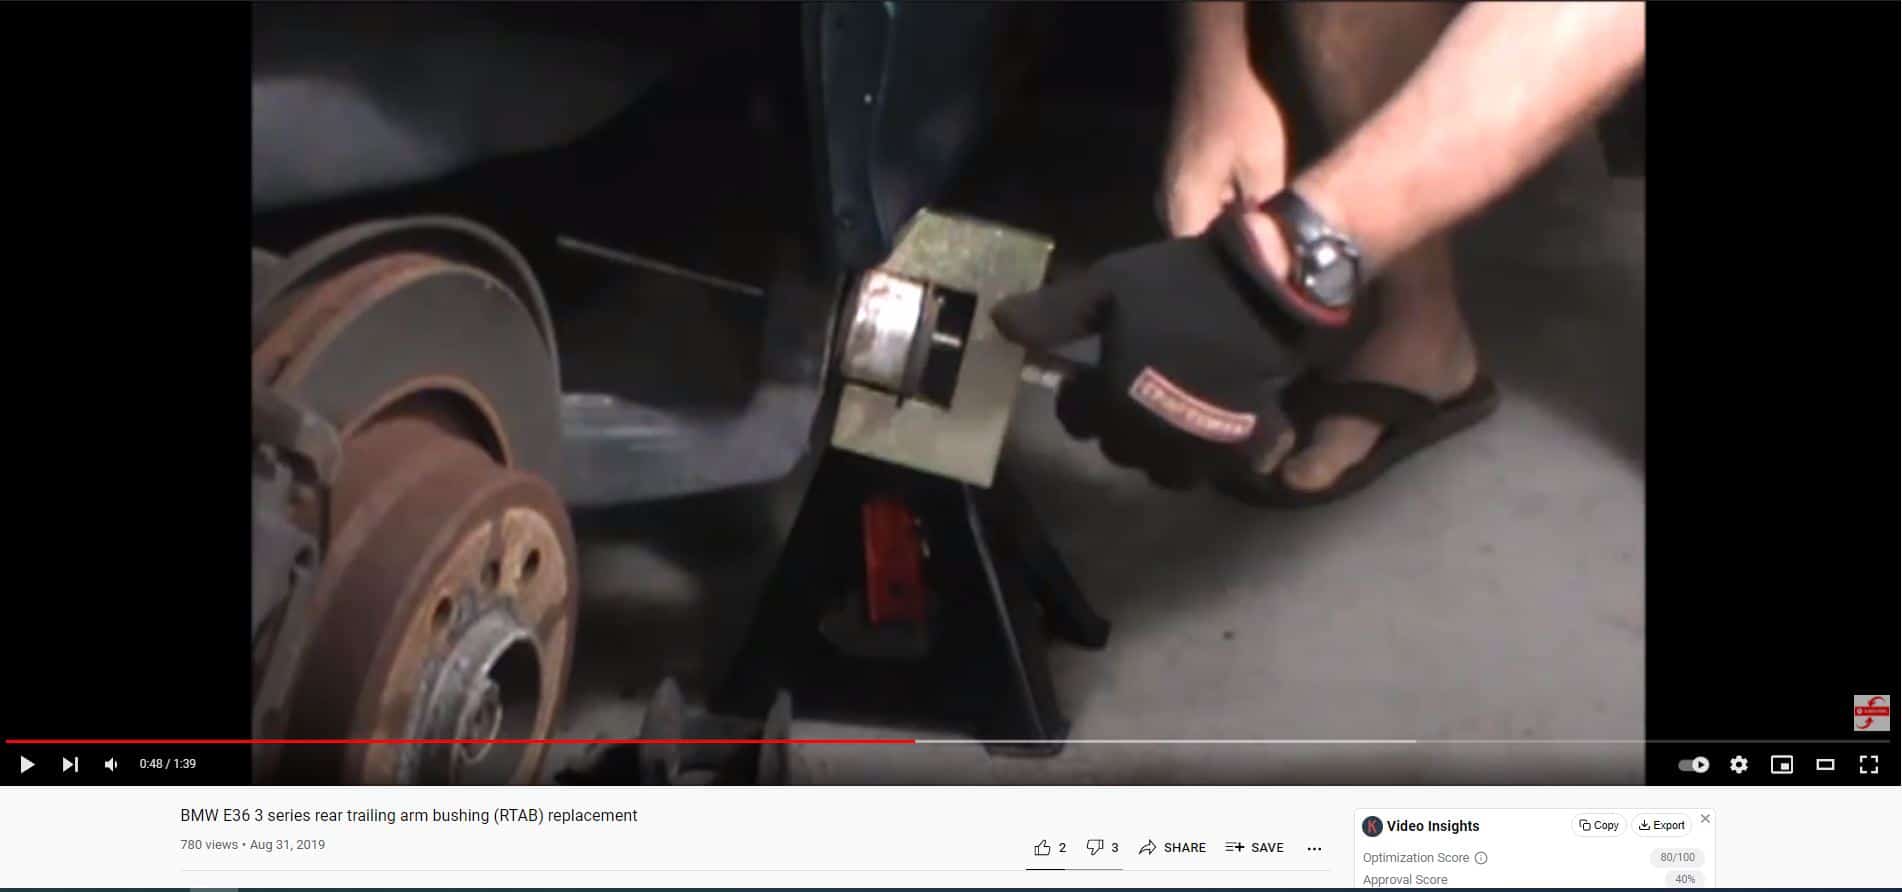 If you are not installing an RTAB limiter kit, skip the following instructions and proceed to Section 3 - Installing trailing arm mounts.
Section 2 - Optional Installation of BME E46 RTAB Limiters
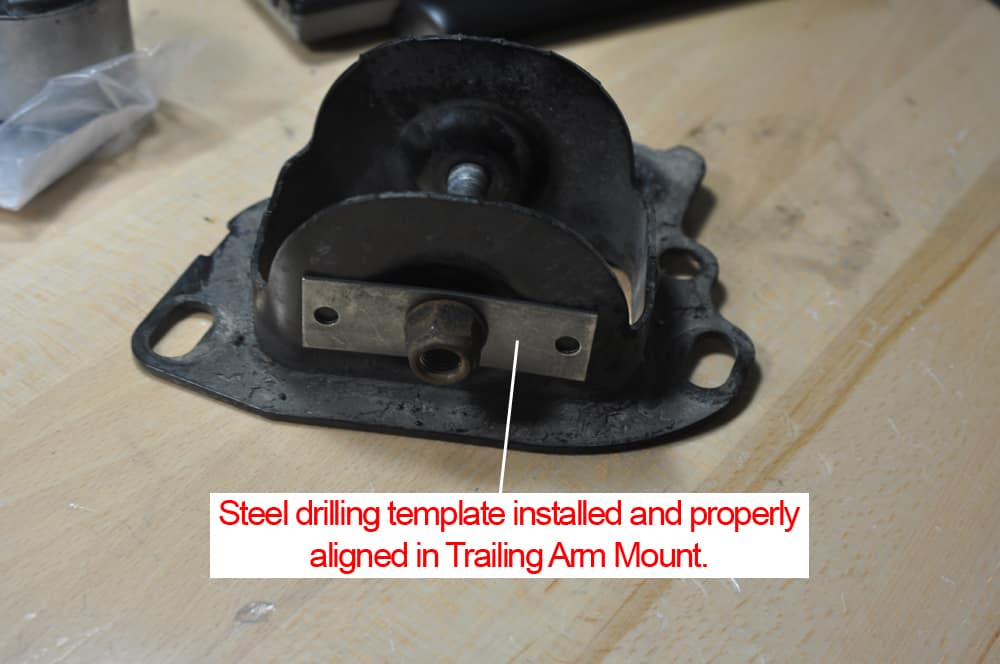
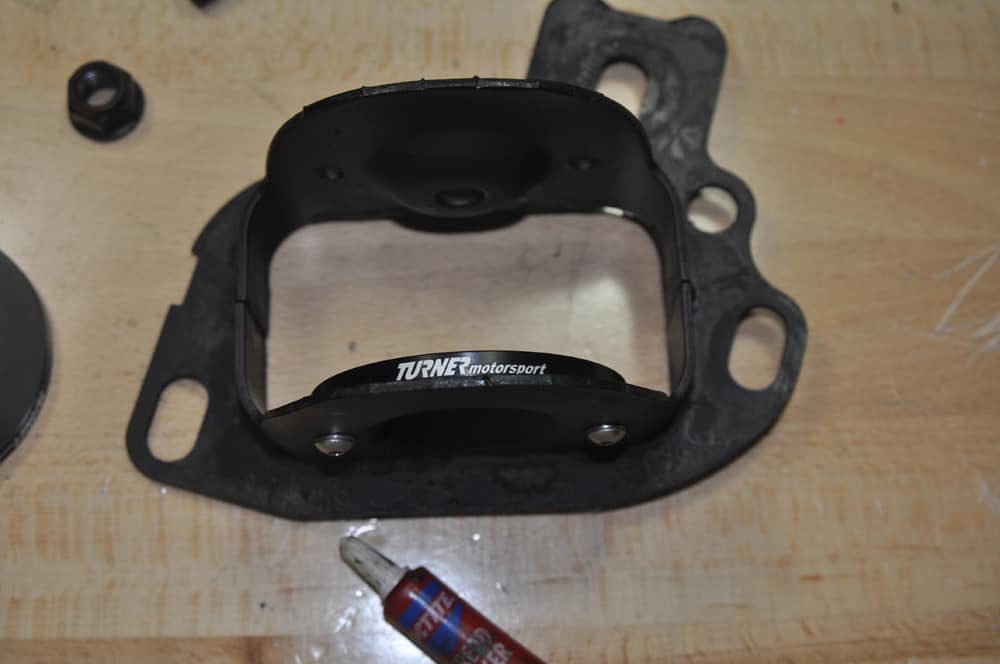
In this repair, we used the Turner Motorsports RTAB limiter kit. We like this kit because it not only comes with the plates but also includes all of the necessary hardware to install them (some kits only send the plates and no hardware). The Turner Motorsports kit also comes with a handy steel template for correctly drilling the mounting holes in the trailing arm mount. 
- Moving to a work bench, insert original bolt through center of trailing arm mount.
- Slide the drilling template (supplied with Turner Motorsports limiter kit) on end of bolt and slightly finger tighten nut. Adjust drilling template so it is centered and horizontal to bottom of trailing arm mount. When template is satisfactorily situated, firmly finger tighten nut.
- Using a ¼” bit, drill one template hole. Drop one of the supplied 5mm bolts in the drilled hole to keep the template on place, then drill the second template hole. Using a table vice to hold the mount while drilling really helps.
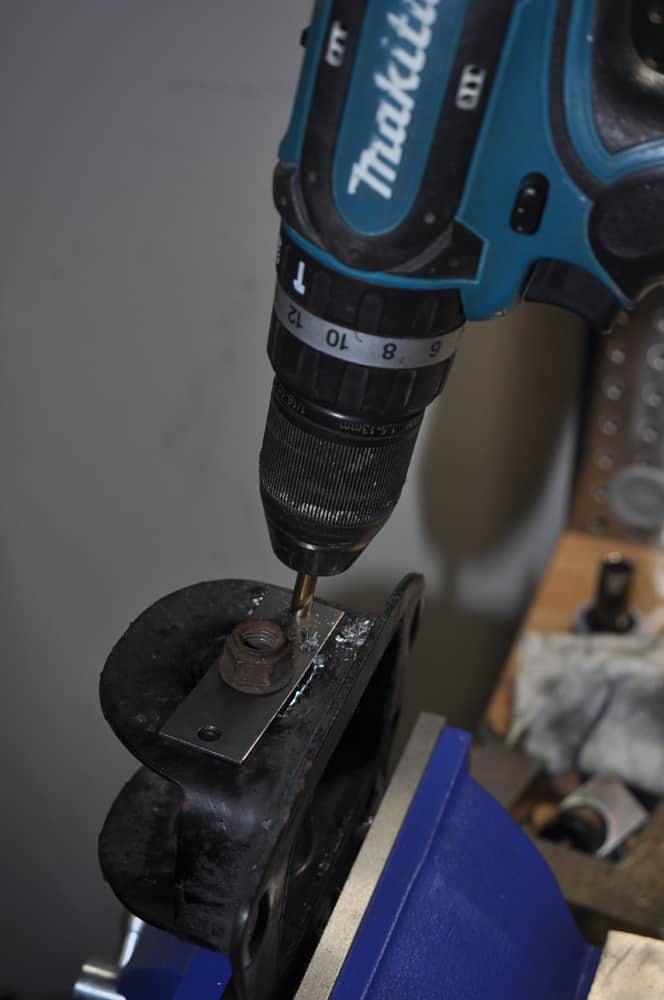
- Repeat step 3 on other side of trailing arm mount.
- Clean the holes with a small metal file, and spot paint all four holes with two coats of flat black paint to prevent future corrosion. Let dry thoroughly.
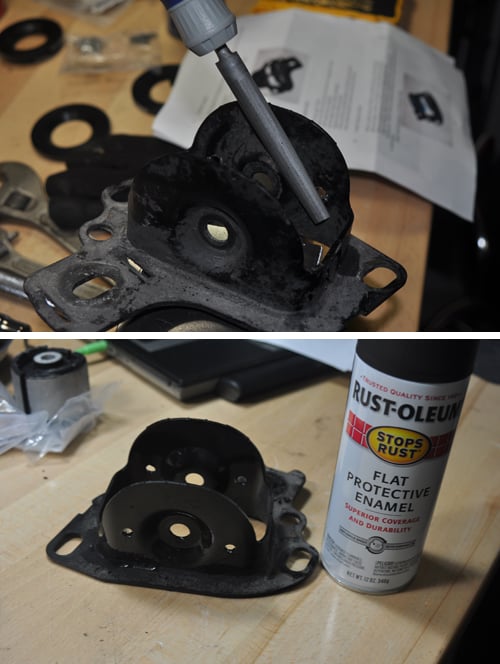
- Using supplied 5mm bolts and washers, mount the limiter plates inside trailing arm mount. Use Loctite Red (or equivalent) on bolt threads and tighten securely.
Section 3 - Installing Trailing Arm Mounts
- Slide rear trailing arm mounts back onto bushings (make sure correct side is up and aligns with bolt holes in chassis!).
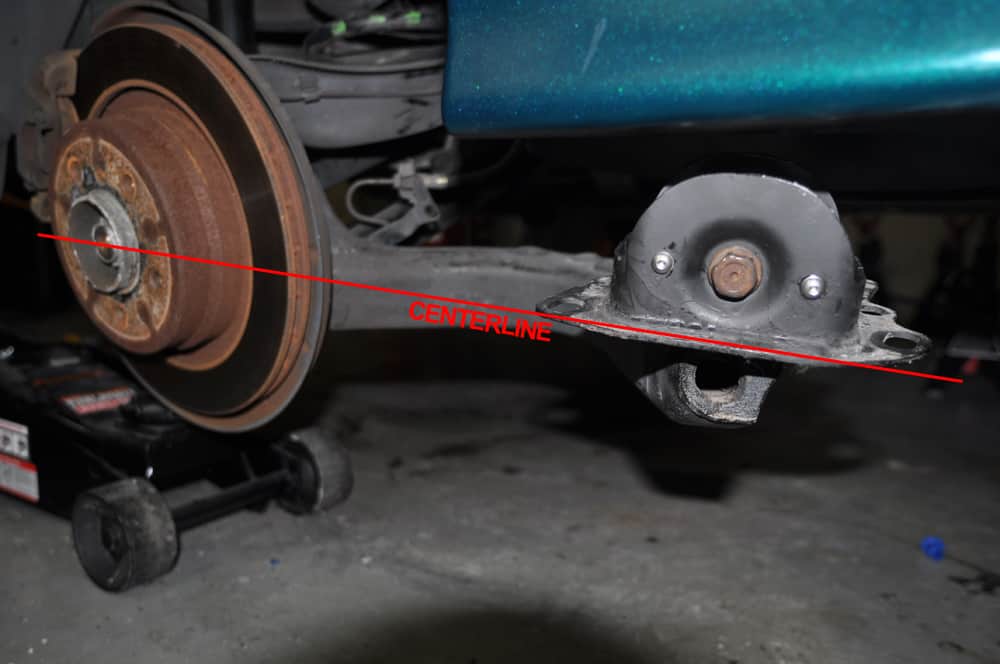
- Using an 18mm socket, tighten trailing arm mount bolt snugly while aligning trailing arm mount. Mount should be aligned so it is parallel to centerline of trailing arm.
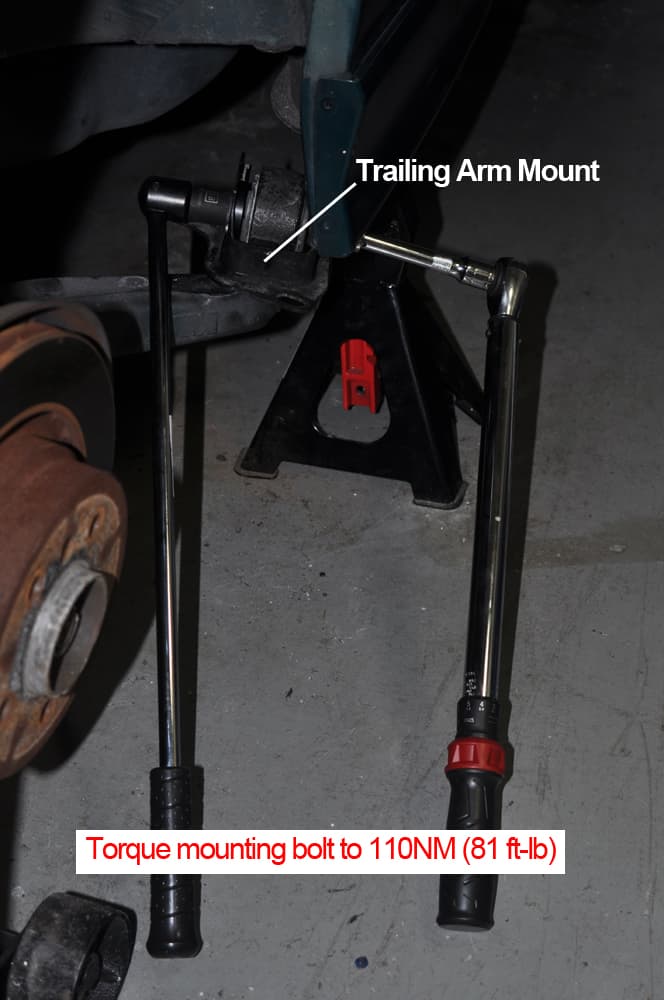
- Finish tightening bolt and torque to (110 Nm or 81 ft-lb) using a torque wrench and breaker bar if needed.
- Raise control arm using jack until trailing arm mount bolt holes are approximately ½” from the chassis. Make sure while raising control arm that spring is properly seated and trailing arm mount does not get hung up on body of car.
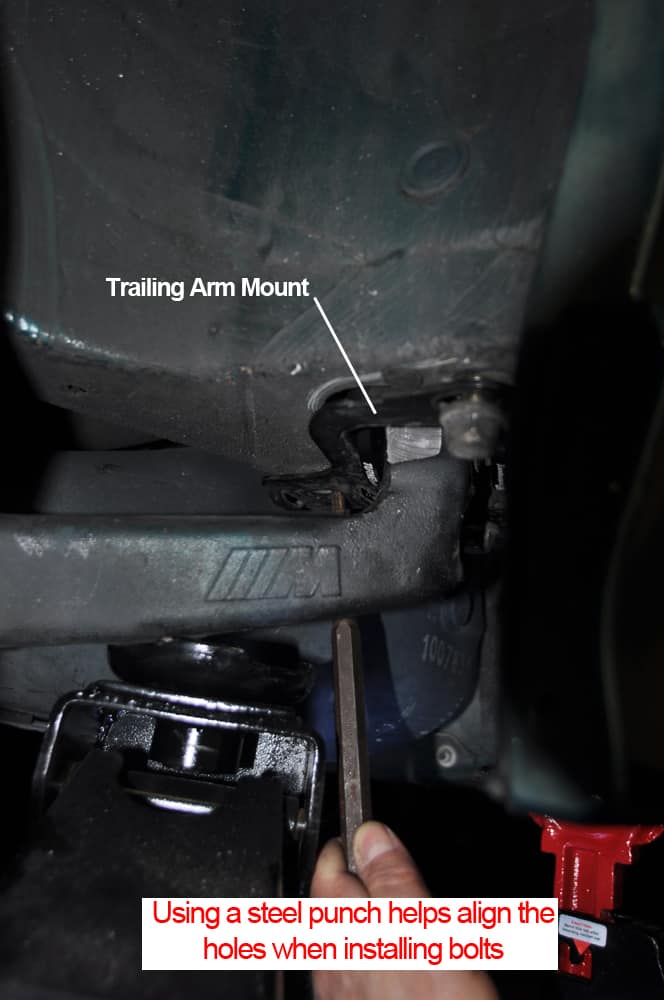
- The trailing arm mount will most likely need to be coerced into position so the bolts can be installed. We have found the best way to do this is to get one of the bolts threaded into a hole and tighten until it touches the mount. Using a steel punch, align the mount so the second and third bolts can be installed (see photo below). DO NOT CROSS THREAD BOLTS. Patience is needed on this step! It is often necessary to lower and raise the control arm several times until you can get the first bolt in.
- Tighten all 3 bolts using an 18mm socket until the mount almost touches the chassis. Do not completely tighten bolts until after step 7.
- Push or pull on trailing arm so mount lines up exactly with the scribe and bolt head marks made on the chassis in Section 1-Step 3.
- When trailing arm mount is correctly lined up with marks, tighten bolts to their final torque specification (77 nm or 57 ft-lb).
- Finish repair by reinstalling brake line and wheel.
***It is highly recommended that you have your car's wheels professionally aligned after completing this repair.
BMW E36 RTAB Replacement Finished
If you have any questions or comments, please feel free to contact us. And congratulations for Doing It Yourself!