
Affiliate link disclosure – The BMW Repair Guide uses affiliate links in their site. For more information on affiliate links, please click here.
Repair Summary
The following article gives detailed instructions on replacing the mechatronics (valve body) sealing sleeves and valve body adapter in a ZF 6HP-19X six speed automatic transmission. Even though we have used a 2006 BMW 530xi to perform this repair, this article can be applied to any vehicle with the ZF 6HP six speed automatic transmission engine with minor modifications.
See all vehicles this article applies to
E60 5 Series M5
E60 5 Series 523Li
E60 5 Series 550i
E60 5 Series 545i
E60 5 Series 540i
E60 5 Series 535d
E60 5 Series 530xi
E60 5 Series 530xd
E60 5 Series 530Li
E60 5 Series 530i
E60 5 Series 530d
E60 5 Series 525i
E60 5 Series 525xi
E60 5 Series 525Li
E60 5 Series 525d
E60 5 Series 523i
E60 5 Series 520i
E60 5 Series 520d
E60N 5 Series 550i
E60N 5 Series 525xi
E60N 5 Series 540i
E60N 5 Series 535xi
E60N 5 Series 535i
E60N 5 Series 535d
E60N 5 Series 530xi
E60N 5 Series 530xd
E60N 5 Series 530Li
E60N 5 Series 530i
E60N 5 Series 528xi
E60N 5 Series 530d
E60N 5 Series 528i
E60N 5 Series 525Li
E60N 5 Series 525xd
E60N 5 Series 525i
E60N 5 Series 525d
E60N 5 Series 523Li
E60N 5 Series 523i
E60N 5 Series 520Li
E60N 5 Series 520d
E60N 5 Series 520i
E61 5 Series 550i
E61 5 Series 530d
E61 5 Series 545i
E61 5 Series 535d
E61 5 Series 530xi
E61 5 Series 530xd
E61 5 Series 525i
E61 5 Series 530i
E61 5 Series 525xi
E61 5 Series 525d
E61 5 Series 523i
E61 5 Series 520d
A BMW mechatronics sealing sleeve and adapter replacement can help cure erratic shifting, drive-train fault codes and the transmission from entering "limp mode".
The ZF 6HP six-speed transmission was one of the most popular gearboxes ever produced for passenger cars. It was manufactured from 2000-to 2014 and was used by many popular U.S. and European automobile brands such as GM, Ford, Audi, Mercedes, and Jaguar...just to name a few. The ZF 6HP is also a BMW workhorse and can be found in most of the models produced throughout the mid to late 2000s including the E60 5 series, E63 6 series, E9x 3 series as well as the X3 and Z4. It is an extremely popular transmission with millions of them still on the road.
As is with most mechanical components on our BMWs, age is starting to take its toll on these iconic transmissions. Internal parts are beginning to wear out causing shifting issues and those infamous warning messages on the iDrive display. It has been well documented that two of the most popular causes of shifting irregularities in the ZF 6HP transmission are the result of leaking sealing sleeves and valve body adapters in the mechatronics unit (also known as the valve body).
In simple terms, the transmission's valve body is its shifting control center. Transmission fluid is channeled through a network of passageways and valves which in turn trigger clutch packages and change gears. The mechatronics four sealing sleeves and sealing adapter are actually gaskets between the transmission and the valve body. They allow transmission fluid to enter the valve body while maintaining a tight seal. Without this tight seal, transmission fluid can leak out causing a drop in hydraulic pressure. This drop-in hydraulic pressure can cause issues ranging from irregular shifting, gear slippage (often at higher RPMs), and the transmission being forced into "limp mode".
A BMW mechatronics sealing sleeve and adapter replacement requires removing the transmission oil pan so the valve body can be accessed. There are no special tools necessary to do this repair...it just requires a lot of time under the vehicle, so make sure you are comfortable with that before starting.
If you are experiencing irregular shifting or gear slippage, the BMW Repair Guide strongly recommends replacing your valve body solenoids while replacing the sealing sleeves and adapter. Please see our article BMW Transmission Solenoid Replacement before starting this repair for more information.


View the detailed parts diagram for this repair.
Includes detailed part diagrams, part numbers and links to purchase all of the required components needed to complete this repair.

Before starting this repair, you must have the following required parts.
All BMW vehicles with the ZF GA6HP19Z transmission
Two of these 20mm valve body sealing sleeves are needed when replacing them in a ZF GA6HP19Z six speed transmission.
All BMW vehicles with the ZF GA6HP19Z transmission
One of these 50mm valve body sealing sleeves is needed when replacing them in a ZF GA6HP19Z six speed transmission.
All BMW vehicles with the ZF GA6HP19Z transmission
One of these 90mm valve body sealing sleeves is needed when replacing them in a ZF GA6HP19Z six speed transmission.
All BMW vehicles with the ZF GA6HP19Z transmission
The transmission valve body adapter helps seal the mechatronics unit to the bottom of the transmission, preventing internal fluid leaks and a drop in hydraulic pressure that can create erratic shifting and gear slippage.
All BMW vehicles with the ZF GA6HP19Z transmission
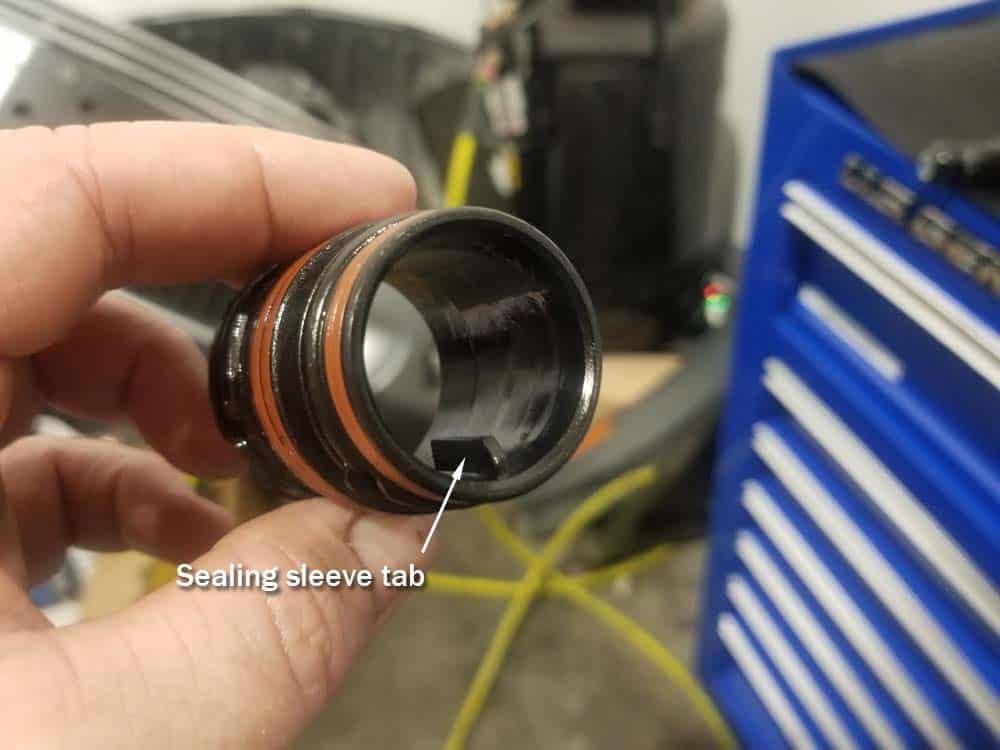
The electrical connection sealing sleeve prevents transmission fluid from leaking out of the rear of the gear box where the electrical plug attaches to the valve body. Heat and age can cause the sleeve to warp, allowing gearbox oil to seep by its o-rings.
All BMW vehicles with the ZF GA6HP19Z transmission
It is good practice to always replace your transmission oil pan gasket when the pan is removed for repairs or service work. A new oil pan gasket is cheap insurance against those annoying transmission leaks that puddle on your garage floor.
For use in all BMW 5 and 6 speed transmissions
Red Line has a reputation with racers and enthusiasts alike for creating products that perform and protect better than any on the market. Redline D4 is a fully synthetic oil that ensures proper shifting while providing ultimate wear protection. For use in all 5 and 6 speed ZF and GM transmissions, meets Shell M1375.4 specifications.
Section 1 - Removing the Transmission Oil Pan
As mentioned above, the vehicle’s transmission oil pan must be removed to perform a BMW mechatronics sealing sleeve replacement. There is a slight variation in the instructions when draining the transmission in an xDrive BMW versus a rear-wheel-drive model. The difference is in accessing the transmission fluid fill plug. Unfortunately in xDrive model vehicles, the front driveshaft blocks access to the fill plug, requiring the shaft to be unbolted from the transfer case and swiveled out of the way (see images below). Since there is no front driveshaft in rear-wheel-drive models, there is clear access to the fill plug and no extra steps are needed. We give instructions below on how to remove the fill plug in both models.- Jack and support your car at all four wheels using wheel ramps or stands. The BMW Repair Guide does not recommend using jack stands to support your vehicle unless the wheels need to be removed for the repair. For more information on jacking and supporting your vehicle, please see our article BMW Jacking and Supporting for Repairs and Maintenance.
- Remove the engine (front) belly pan. This step differs among BMW models, but usually requires removing phillips heads screws like shown on the E61 touring wagon.
- Remove the underfloor (rear) belly pan from the bottom of the car.
- Locate the transmission oil pan cover, approximately in the middle of the vehicle.
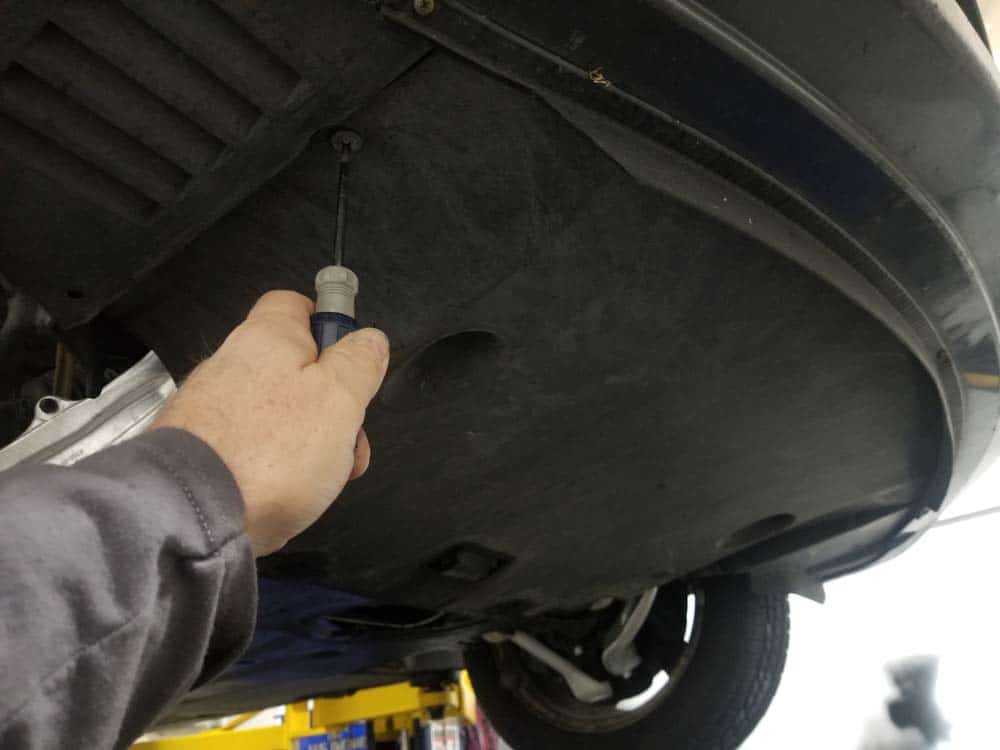
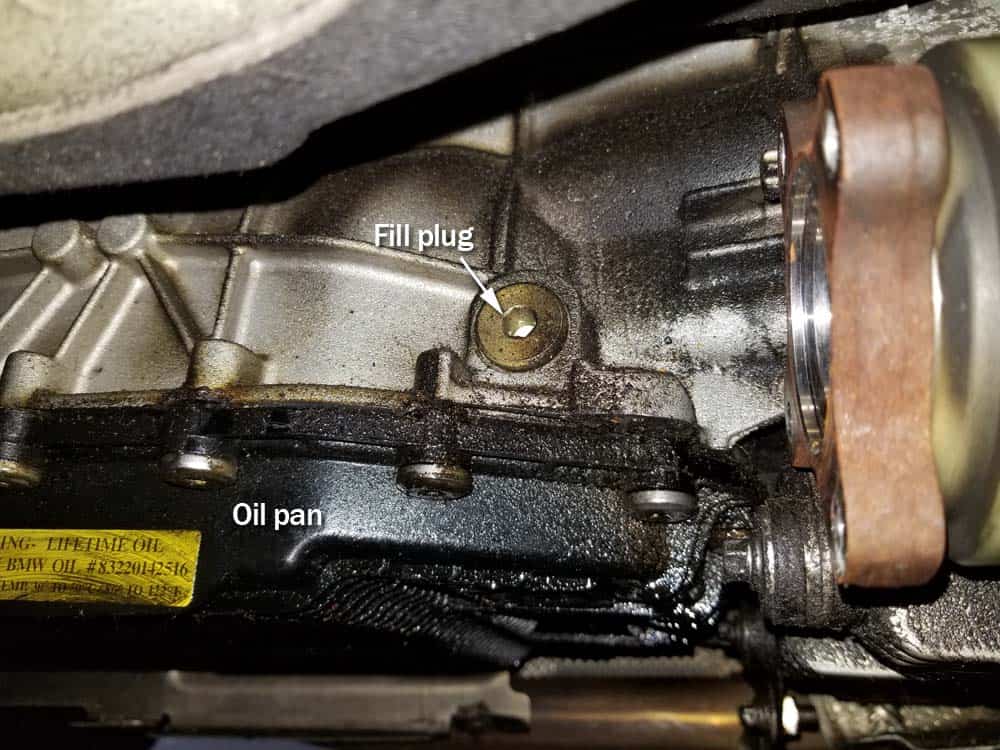
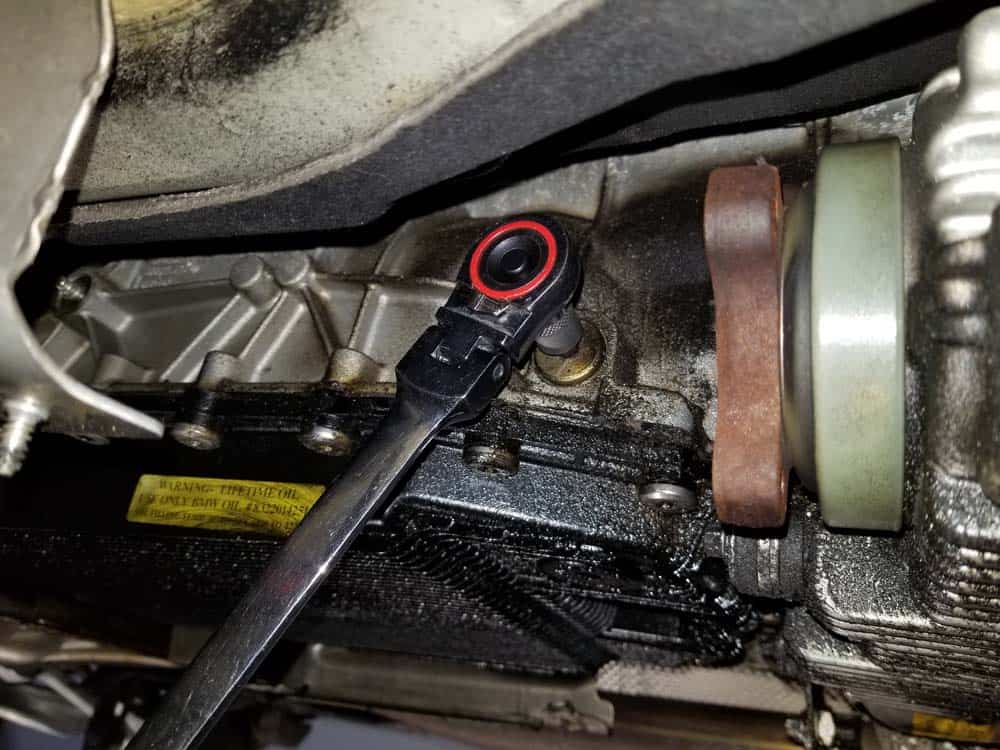
- Before draining the transmission, always loosen the fill plug first. Never attempt to drain the transmission until you have successfully loosened the fill plug. You do not want to find out after you drained the transmission that the fill plug is stuck and you cannot refill the pan.
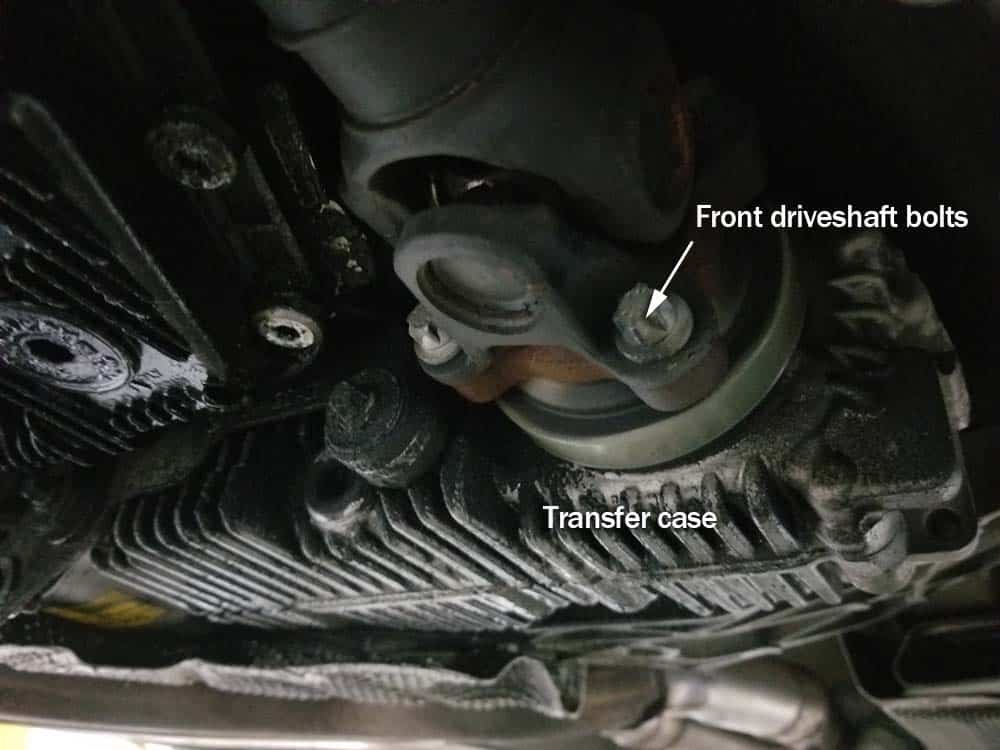
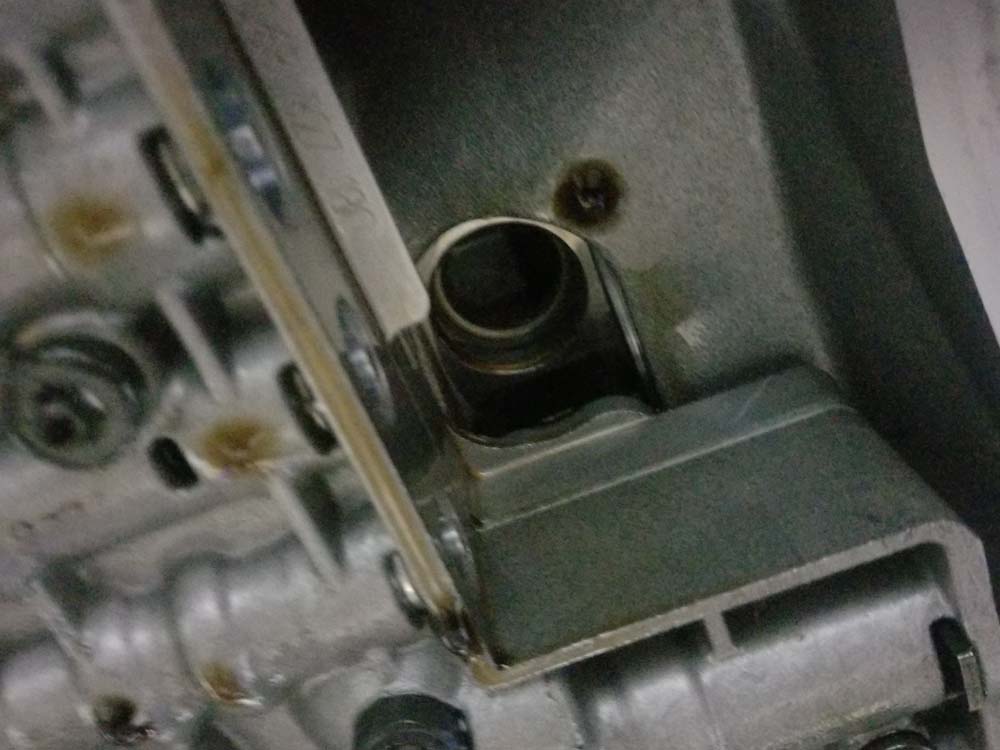
- The fill plug on BMW six speed transmissions is located on the left upper rear of the gear box...above the oil pan. As discussed at the beginning of this section, xDrive cars require the removal of the front drive shaft to access the plug.
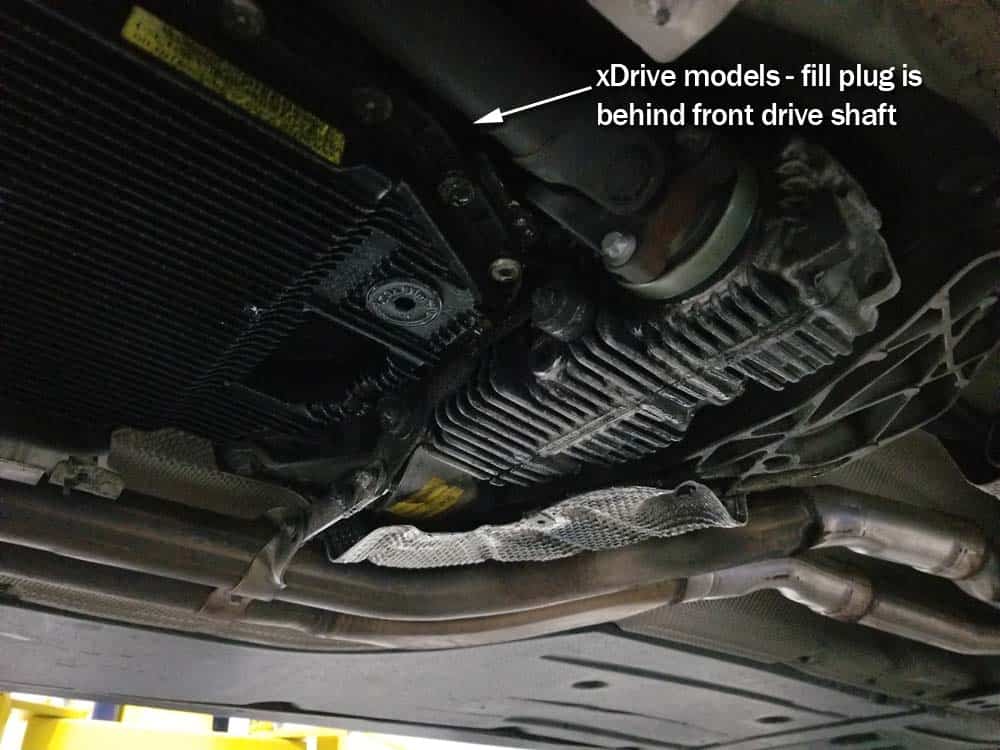
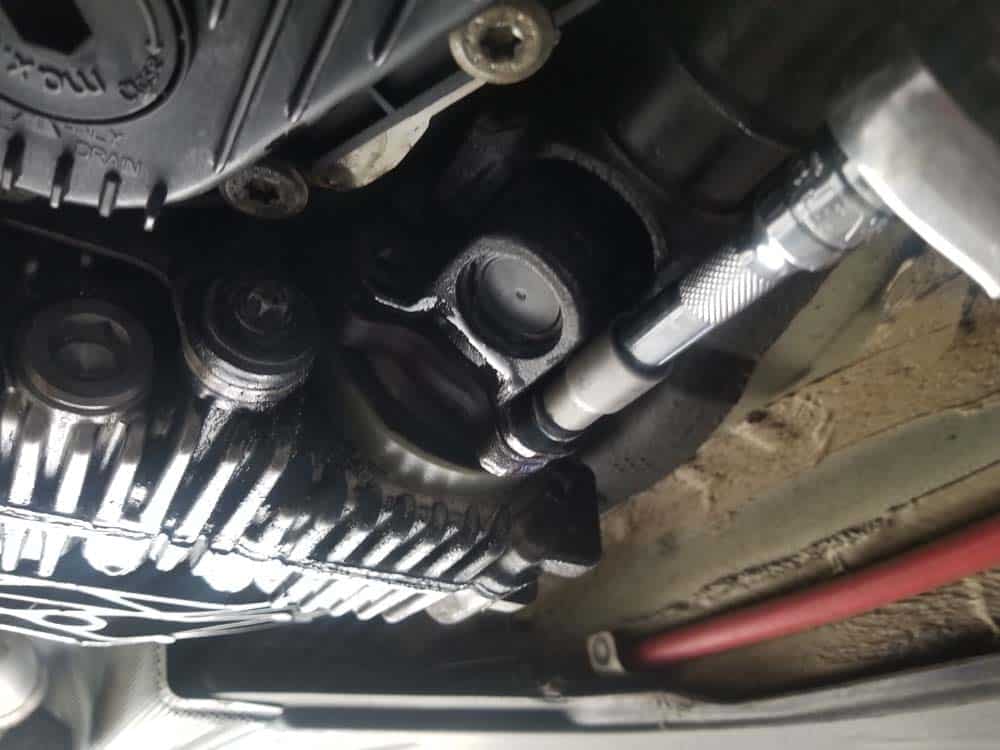
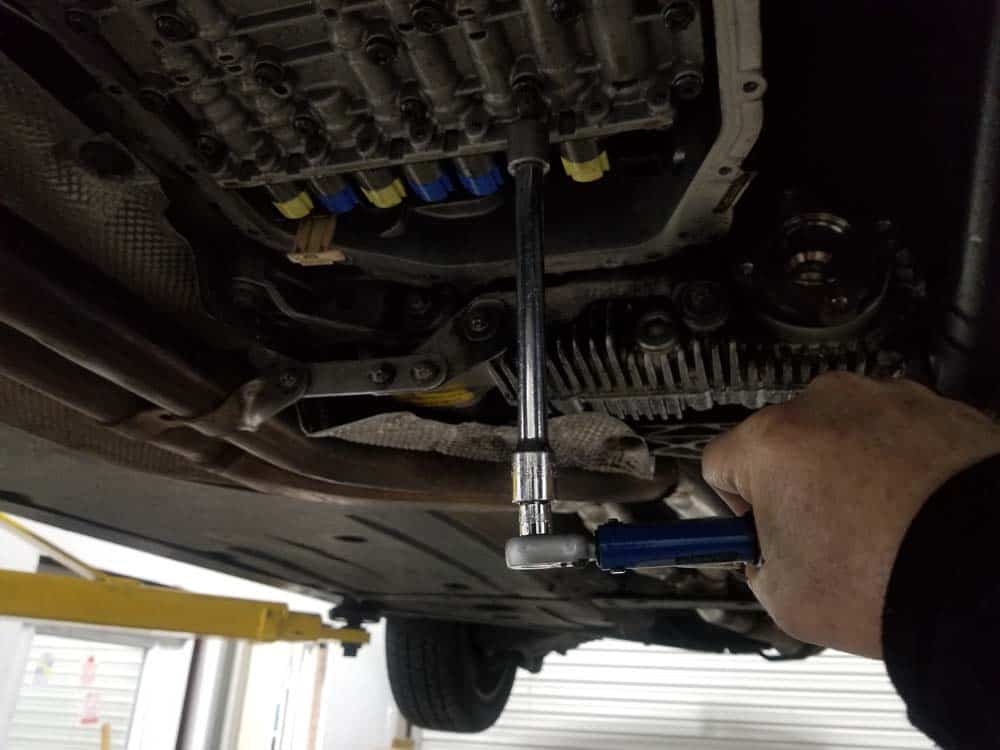
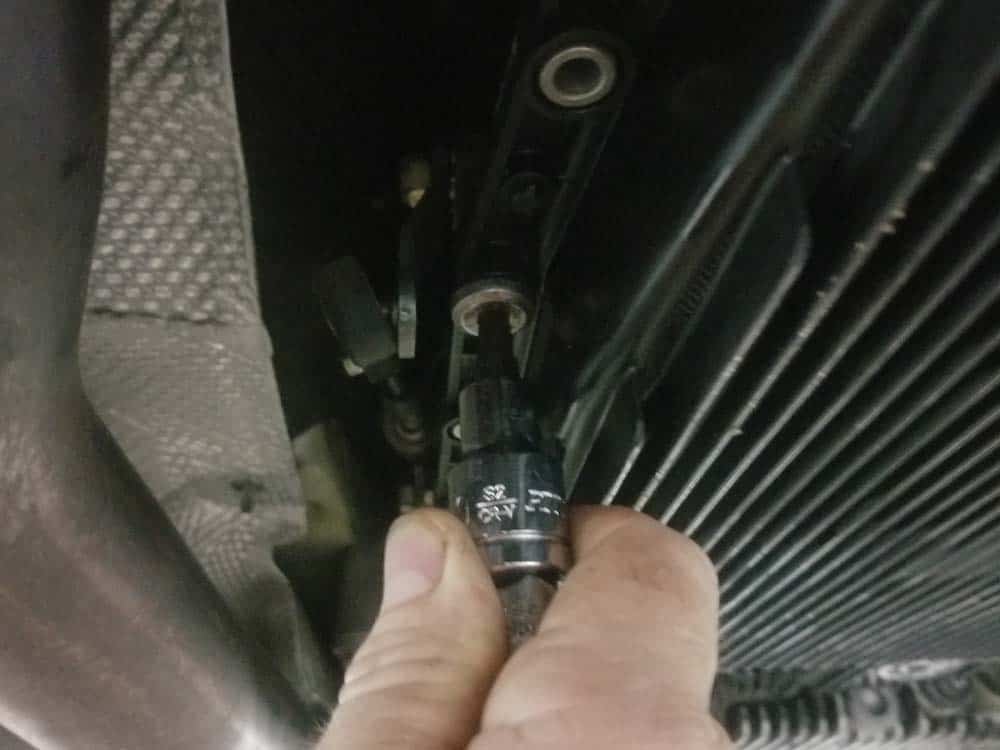
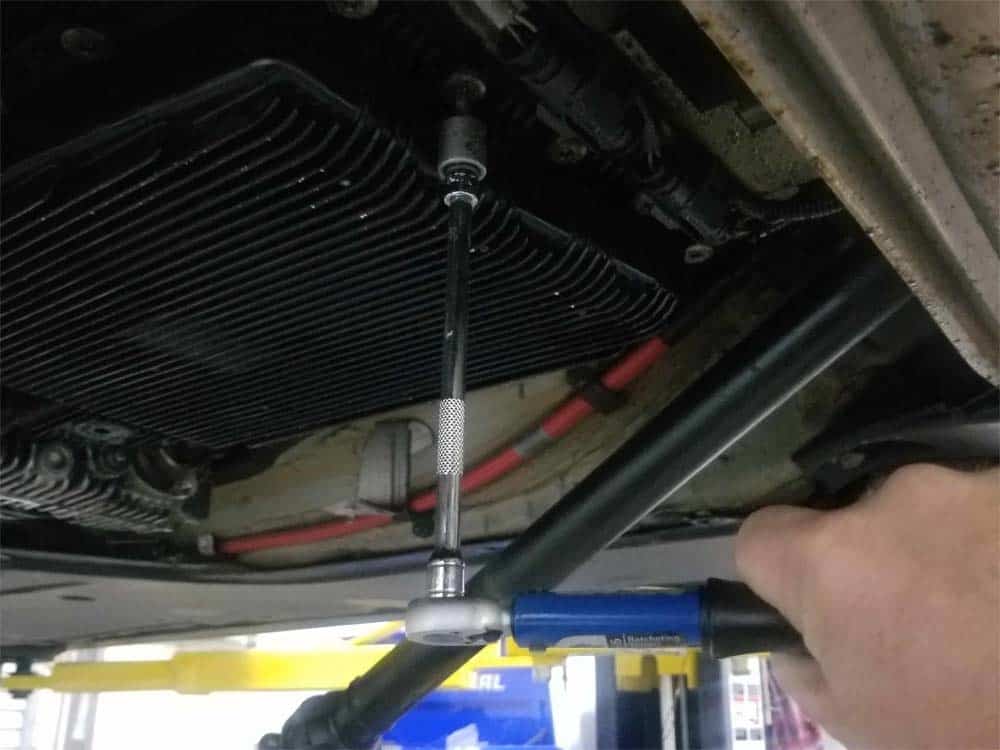
- XDrive "all wheel drive" models - Locate the front drive shaft where it is mounted to the transfer case. Using an E12 external torx socket, remove the four bolts anchoring the front drive shaft to the transfer case. If the wheels of the vehicle are off of the ground (and you are not using an impact wrench), you will need to find a helper to depress the brake pedal while you remove the bolts - otherwise the shaft will just spin freely. Grasp the drive shaft and gently lower it from the transfer case. You can now easily access the fill plug at the rear of the transmission.
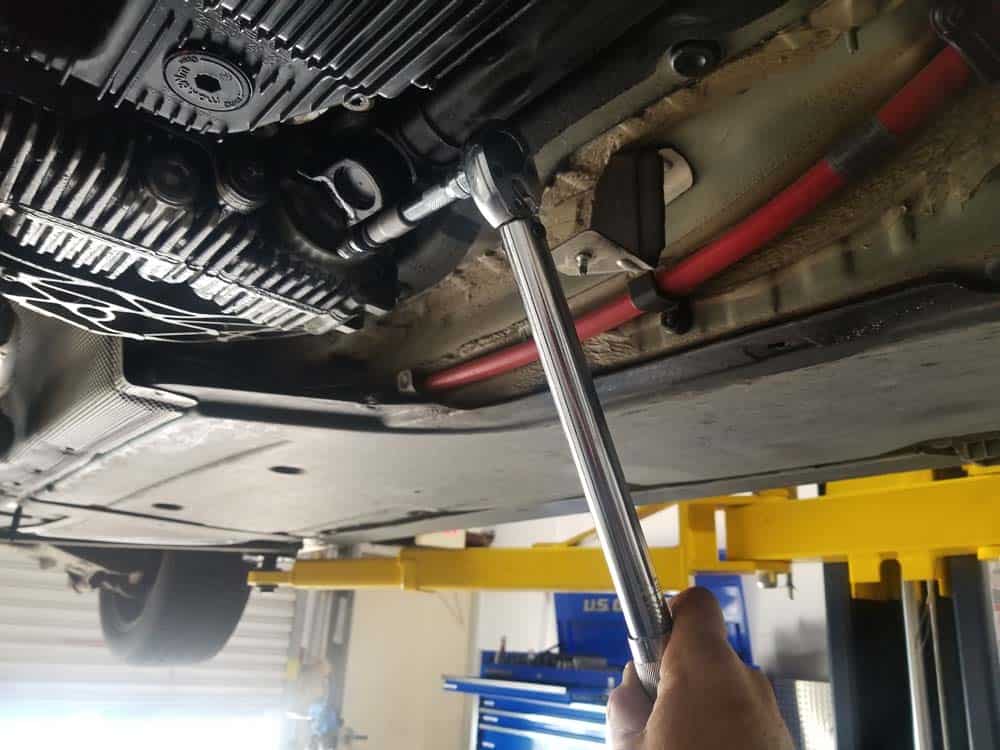
- Rear wheel drive models - Locate the fill plug at the left upper rear of the transmission as shown in the step 6 image above.
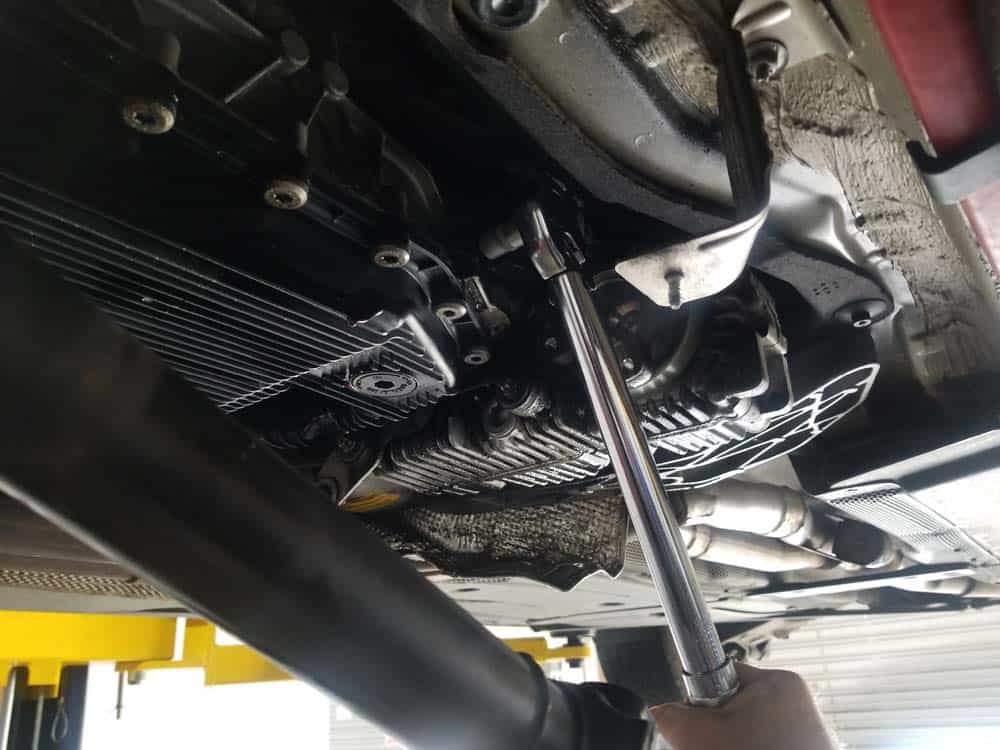
- Using a T50 torx bit and a breaker bar, loosen the plug but do not remove it. DO NOT REMOVE THE PLUG. Removing the plug will cause fluid to pour out. You simply want to break it free and confirm that it can be removed during the filling process below.
- Position a 5 gallon drain pan under the transmission. Locate the drain plug on the bottom of the oil pan. Using a T50 torx bit, remove the drain plug and allow the pan to thoroughly drain.
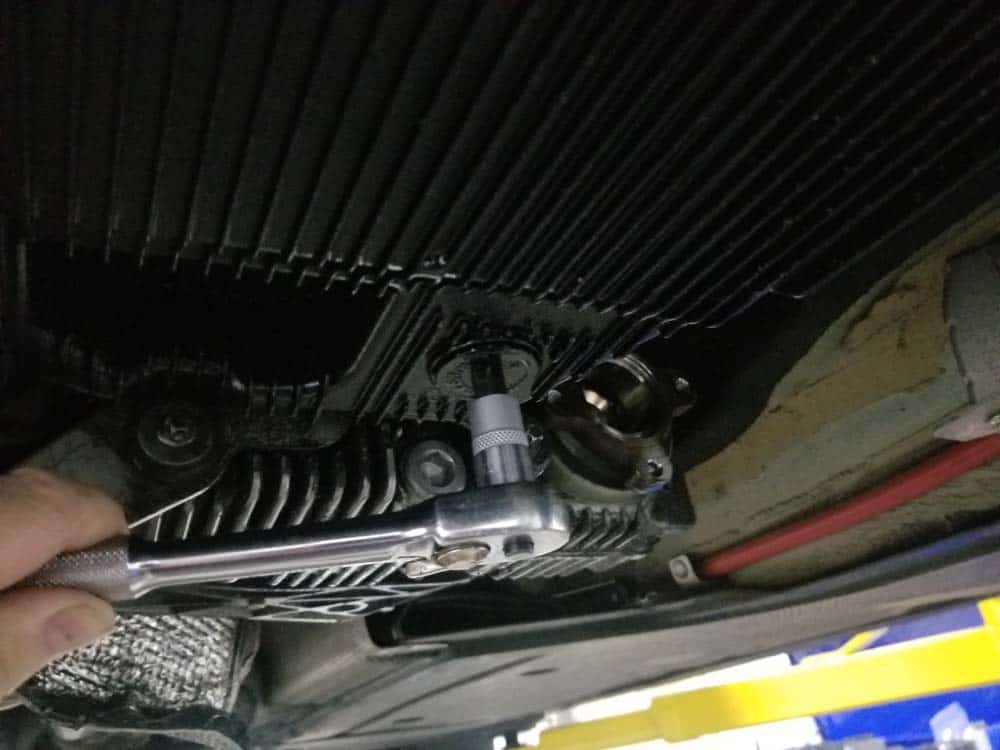

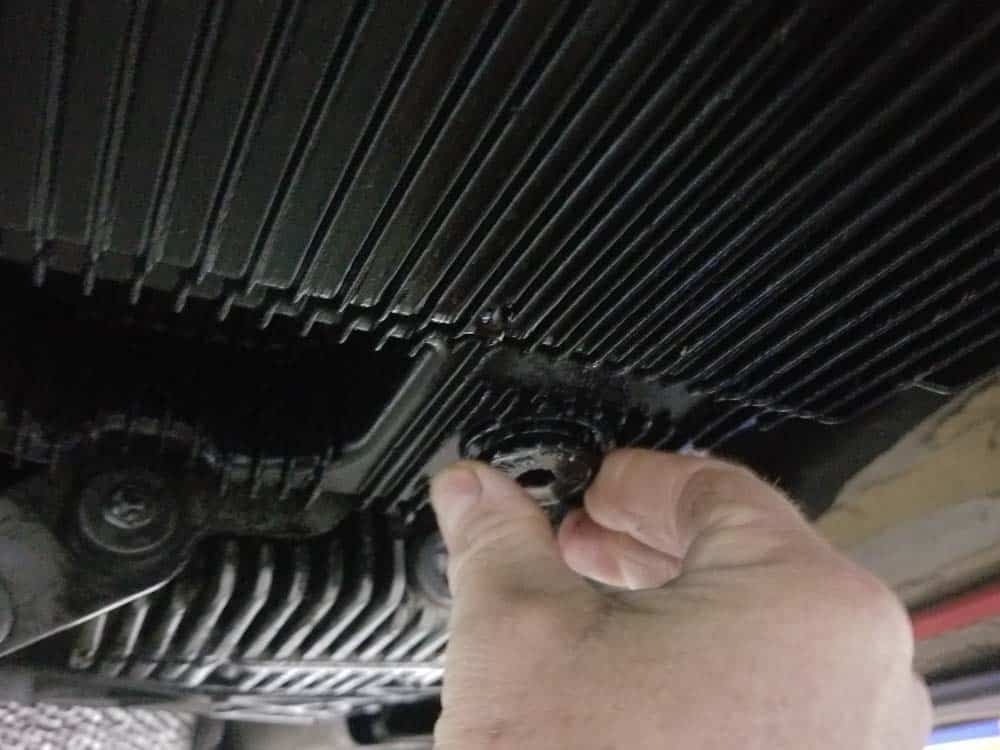
- When the oil pan has completely drained replace the plug. There is still a little bit of oil left in the pan...replacing the plug will keep it from draining on the floor (and on you) when the pan is removed.
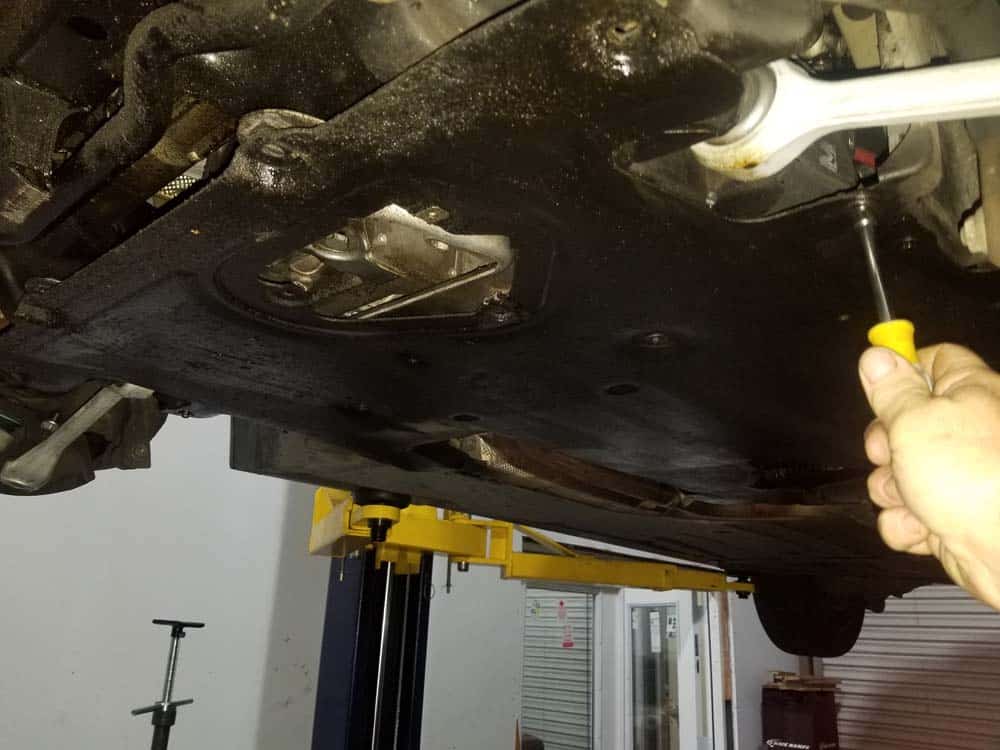
- Using a T40 torx bit, remove the 24 oil pan bolts. The oil pan bolts are at a very low torque, so they should come out easily. It is perfectly acceptable to reuse the oil pan bolts if they are in good condition. If for some reason you have to replace one (which rarely happens), you can reorder replacement bolts by clicking here.
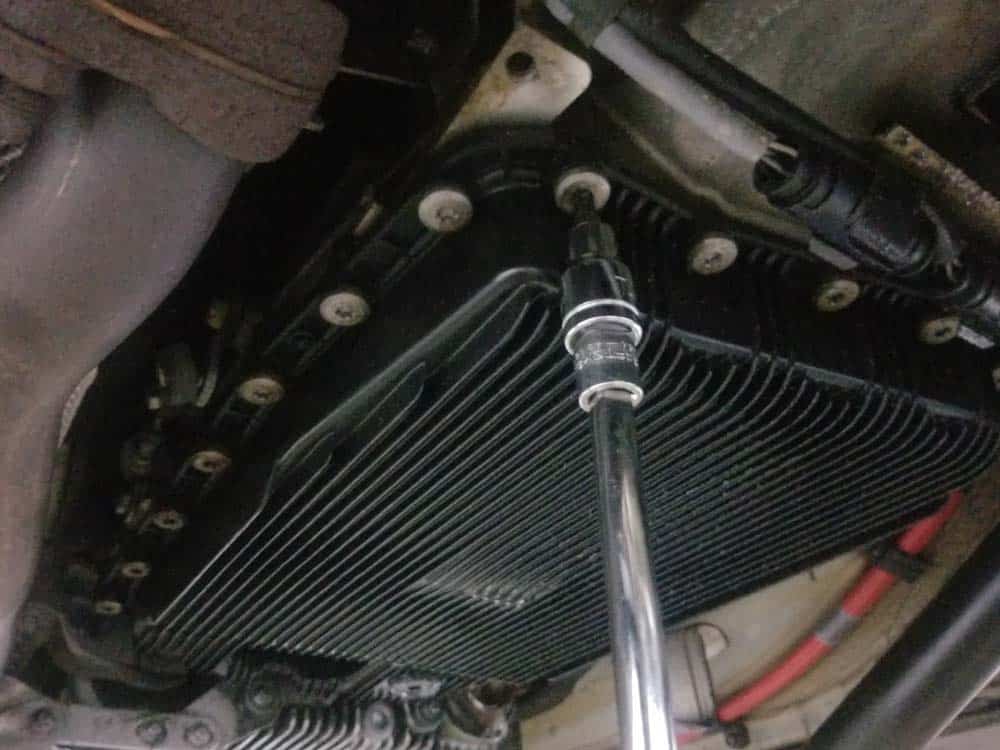
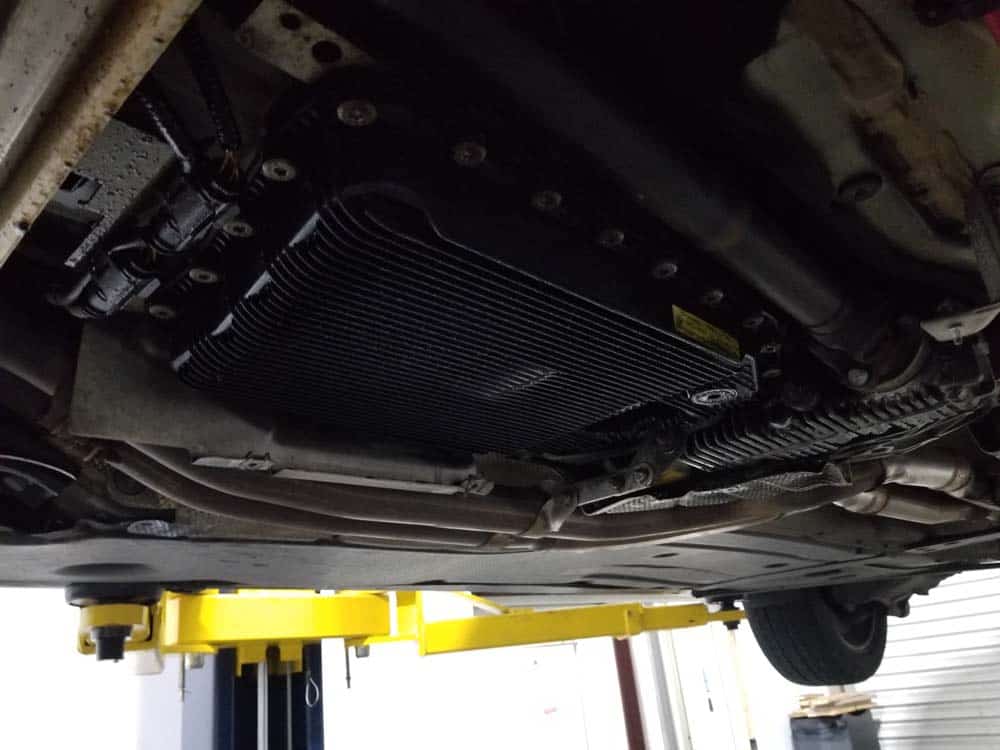
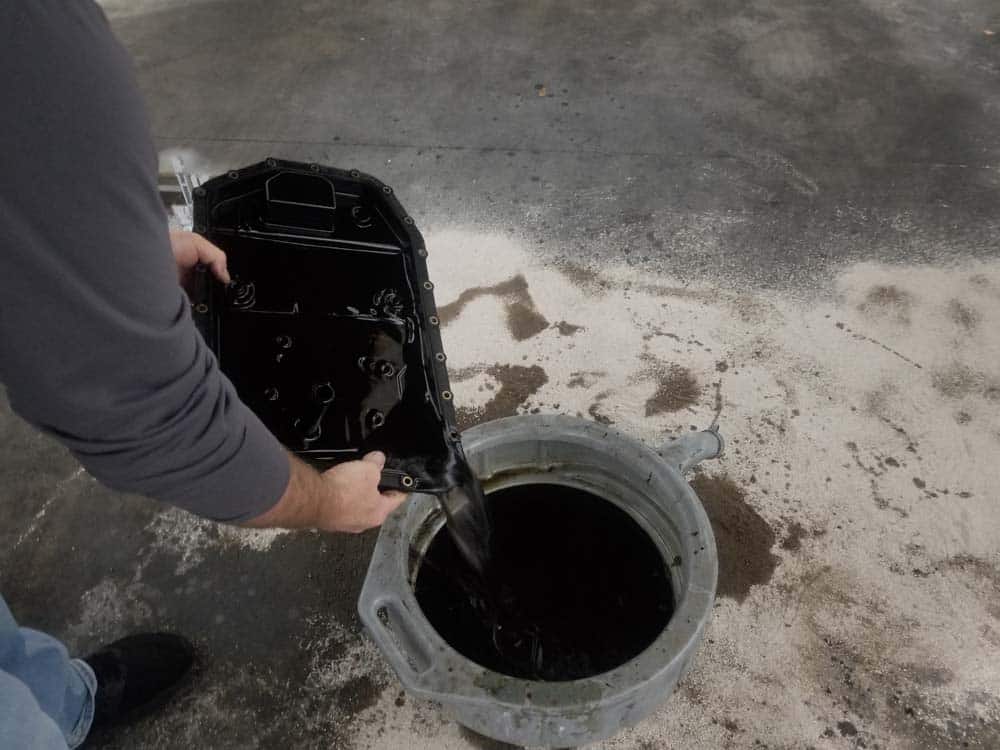
- Grasp the oil pan and carefully remove from the car. Remember the pan still has quite a bit of oil left in it. Dump the remainder of the oil in a drain pan.
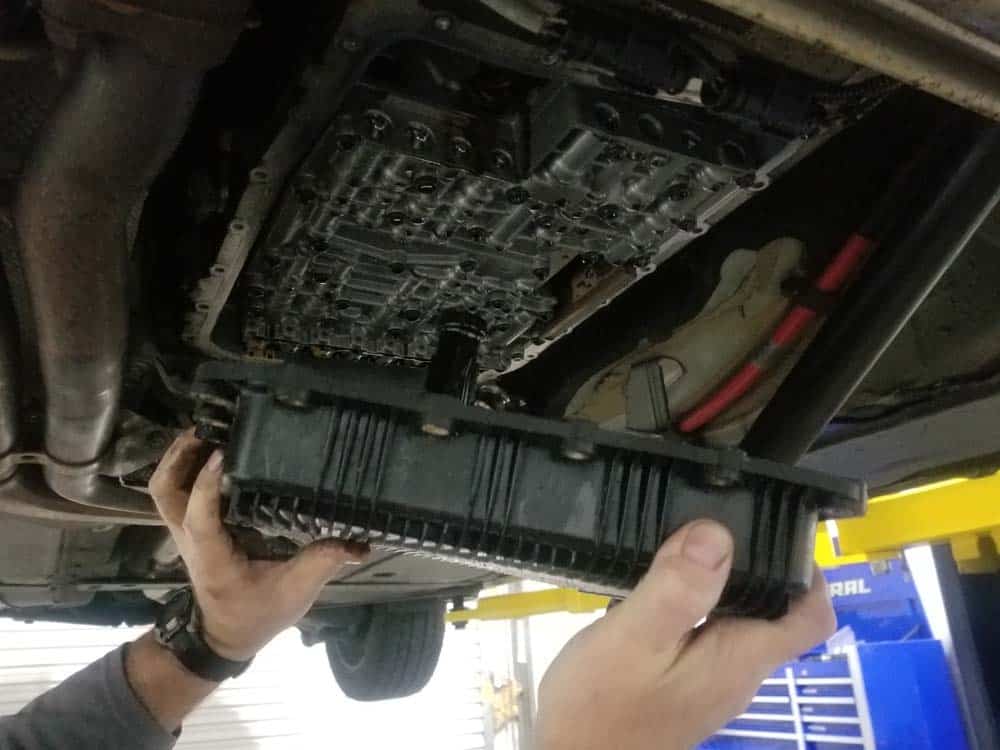
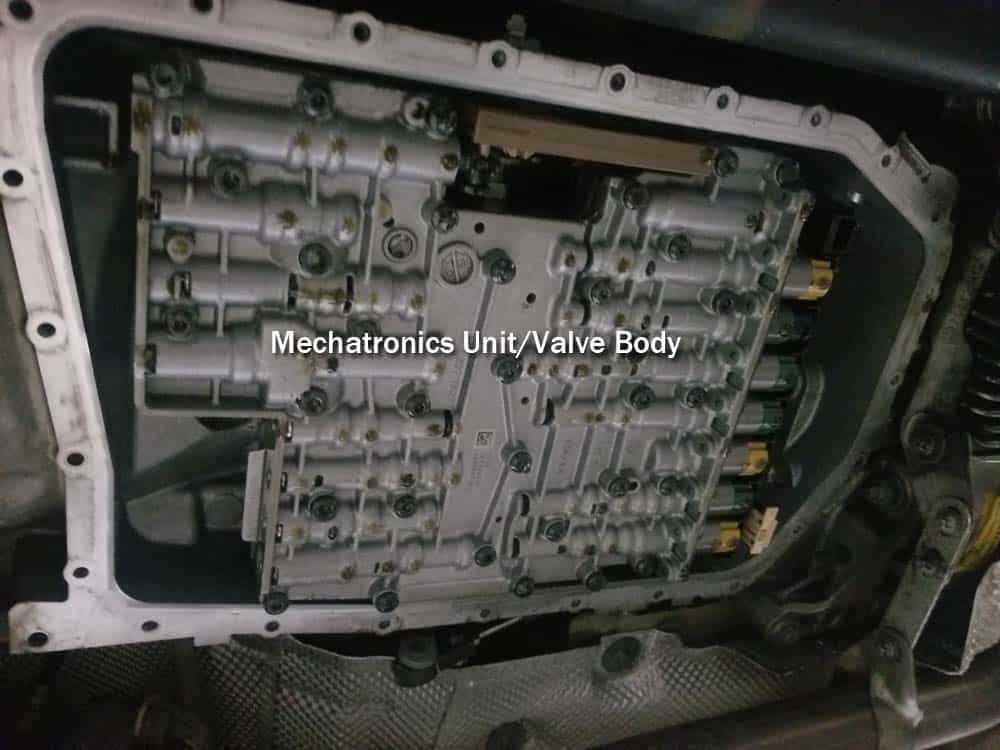
Section 2 - Removing the Valve Body
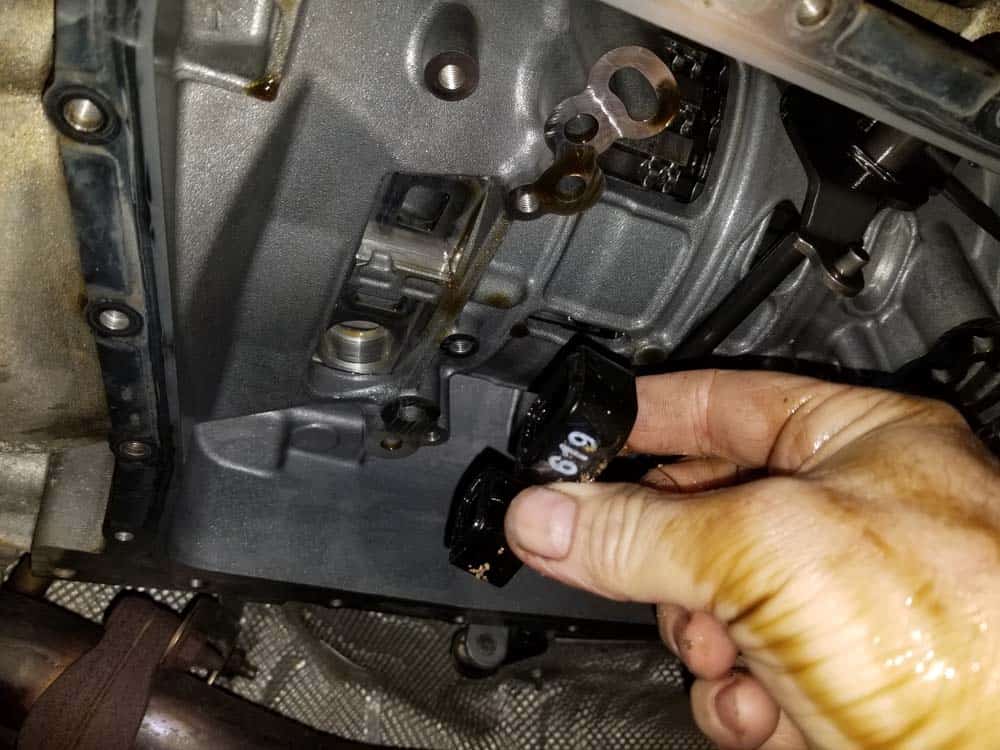
Be very careful when removing the valve body from the vehicle...dropping it can cause severe damage.- Identify the transmission valve body attached to the bottom of the transmission housing.
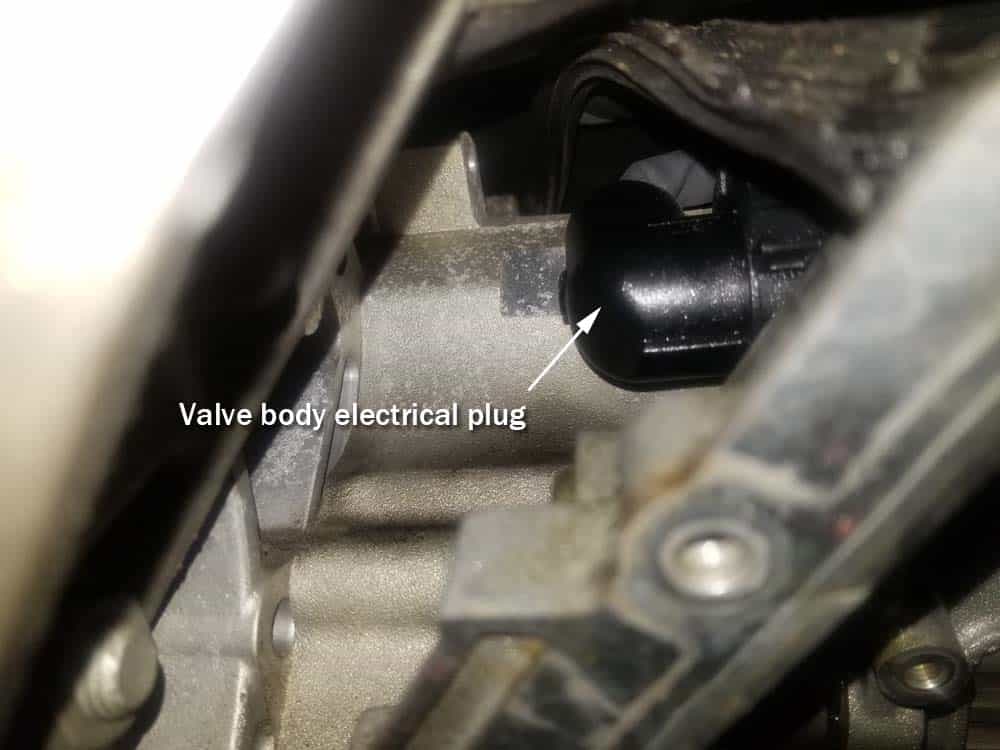
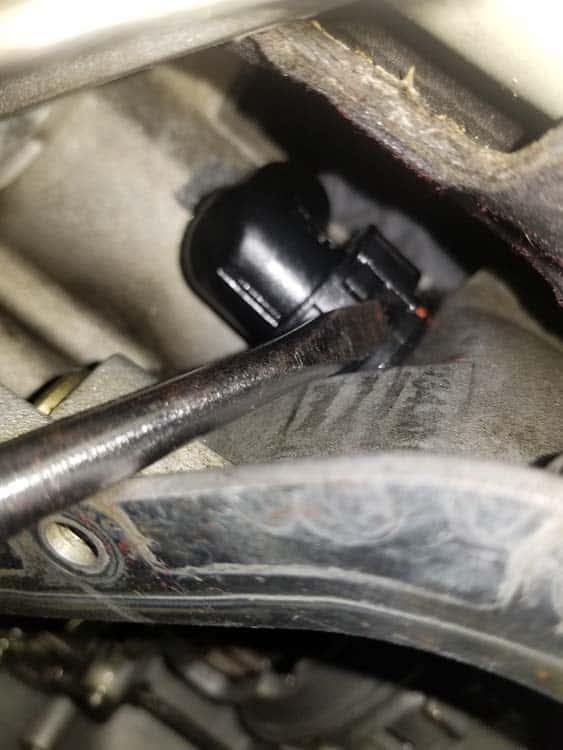
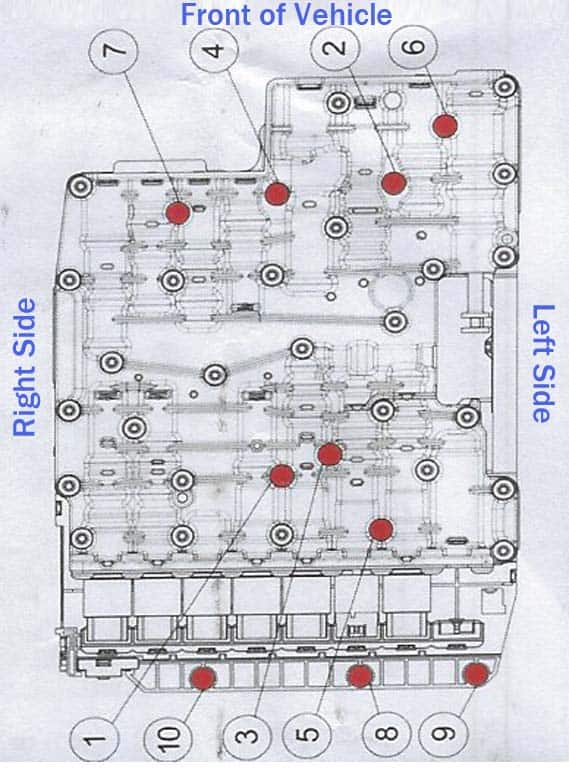
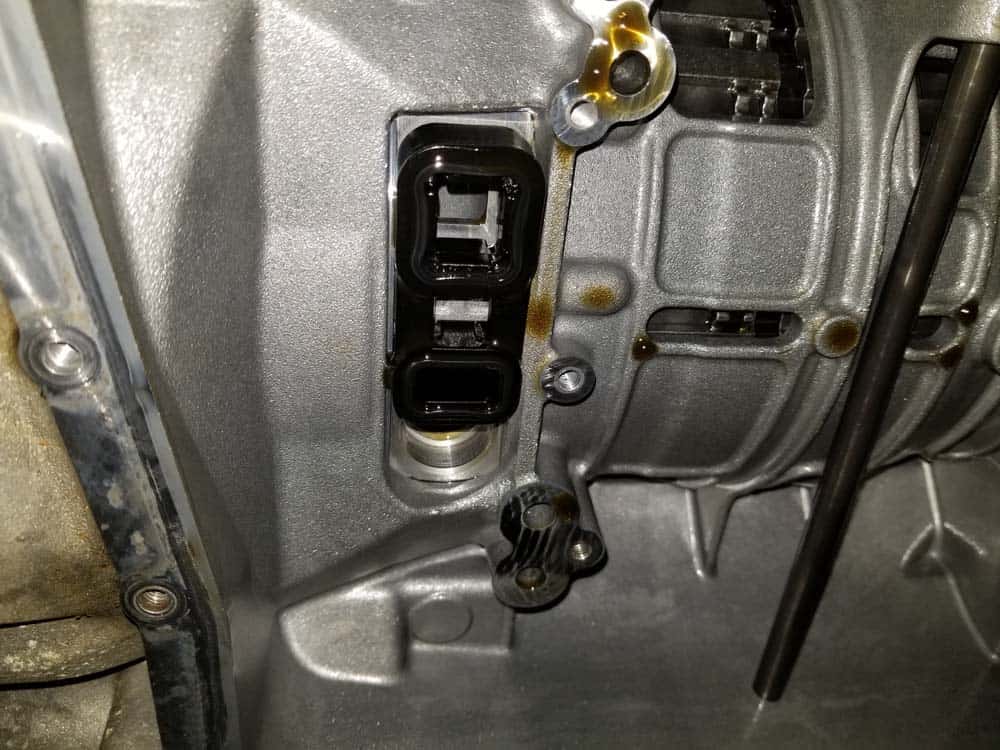
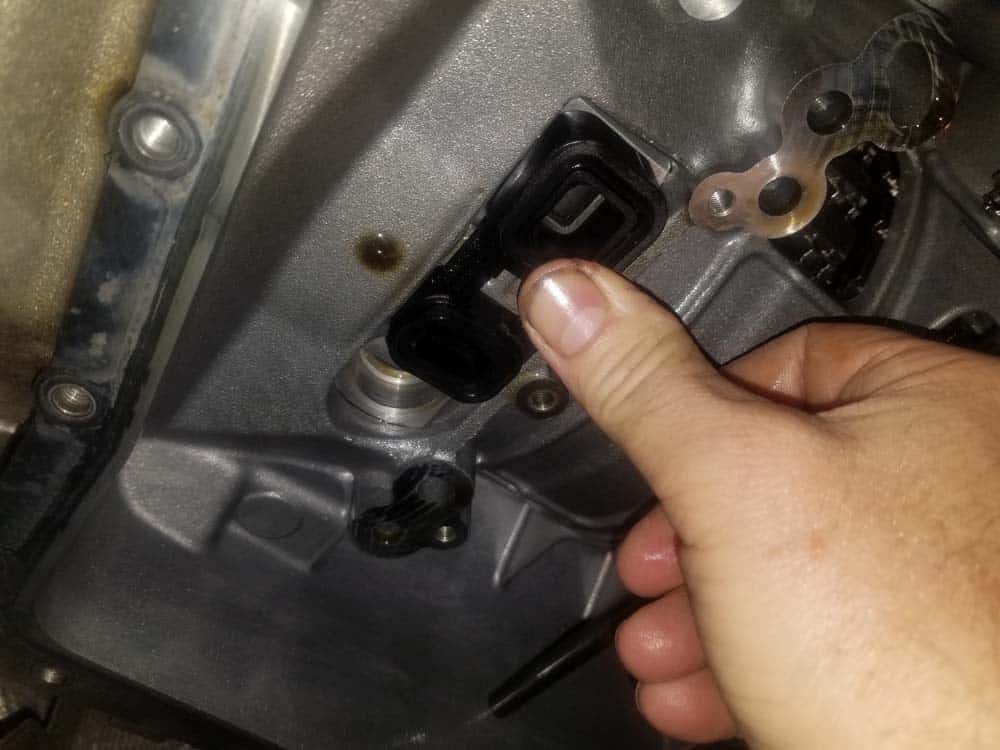
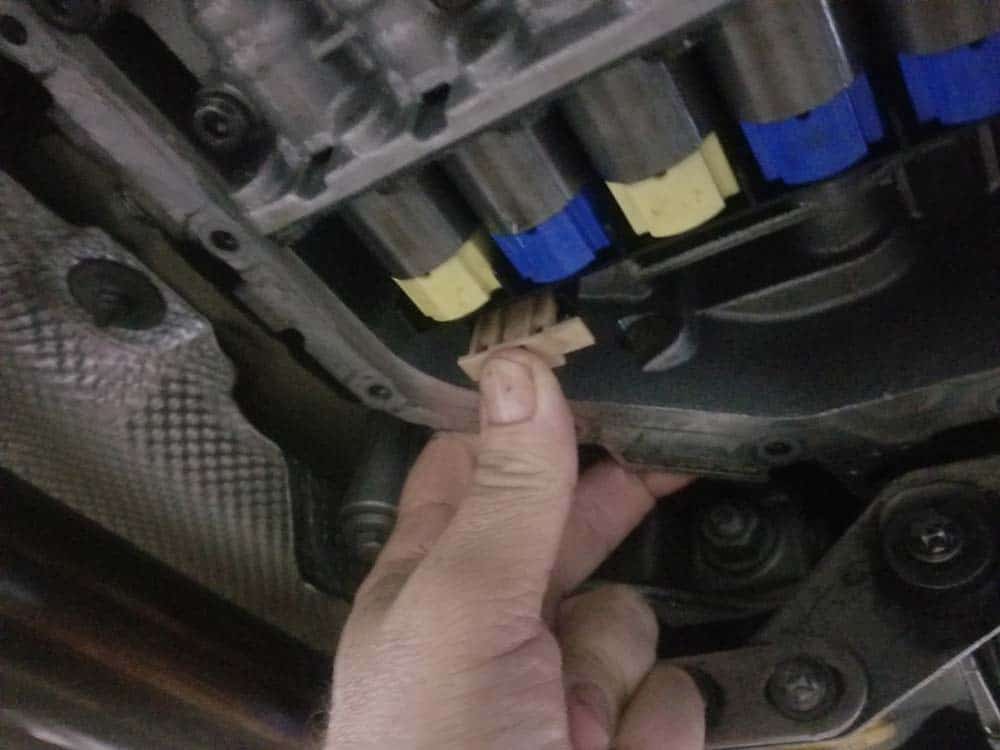
- Reach up behind the right rear of the transmission and release the electrical plug from the valve body by turning its locking ring counterclockwise. Sometimes this ring can get stuck...use a large flat blade screwdriver to turn it if necessary. Pull the plug free from the transmission.
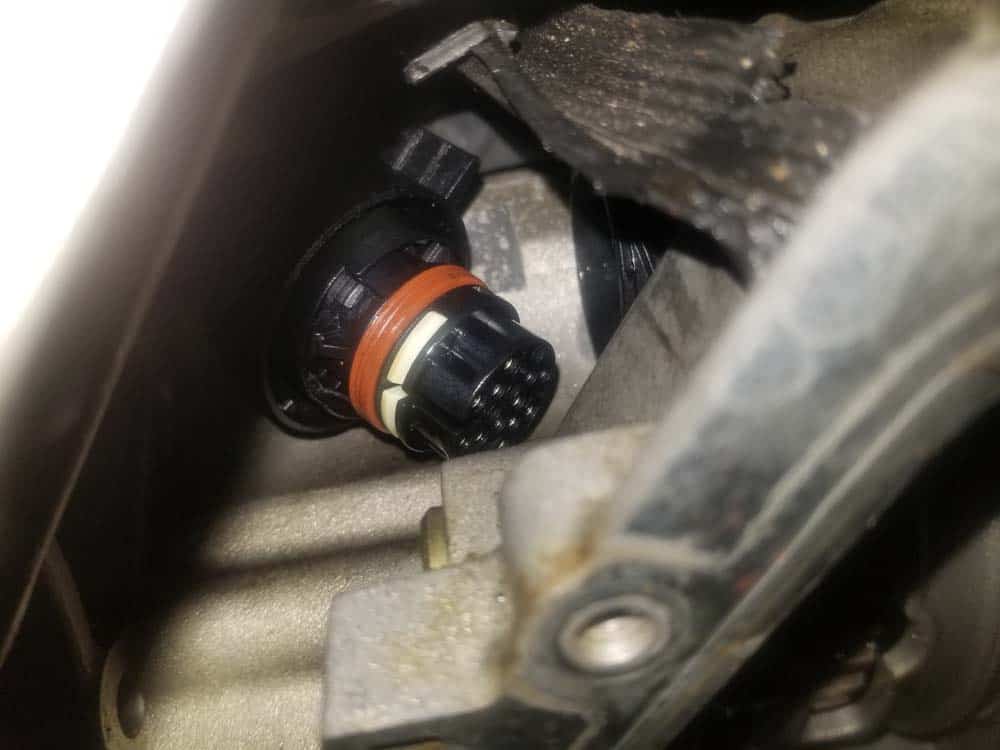
- Release the electrical connector sleeve locking mechanism on the back of the valve body by pulling it down.
- Reach up behind the transmission again and pull the sleeve out of the valve body and remove from the vehicle. Please note that removing the sleeve from the car on xDrive models can be a little tricky because of the transfer case...take your time, it will come out.
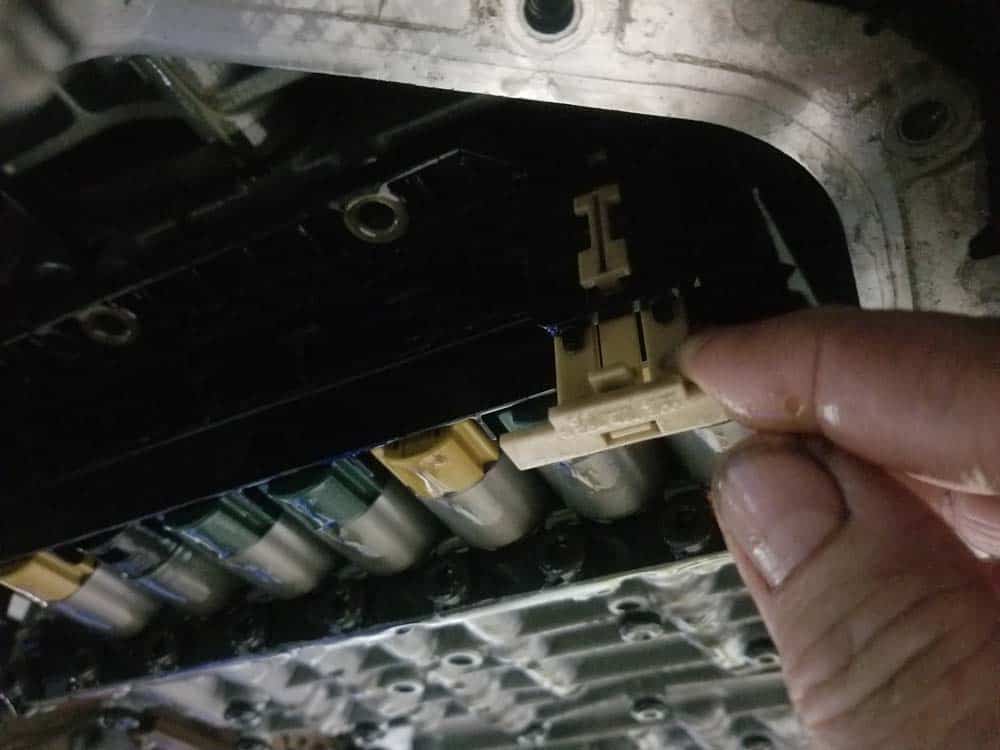
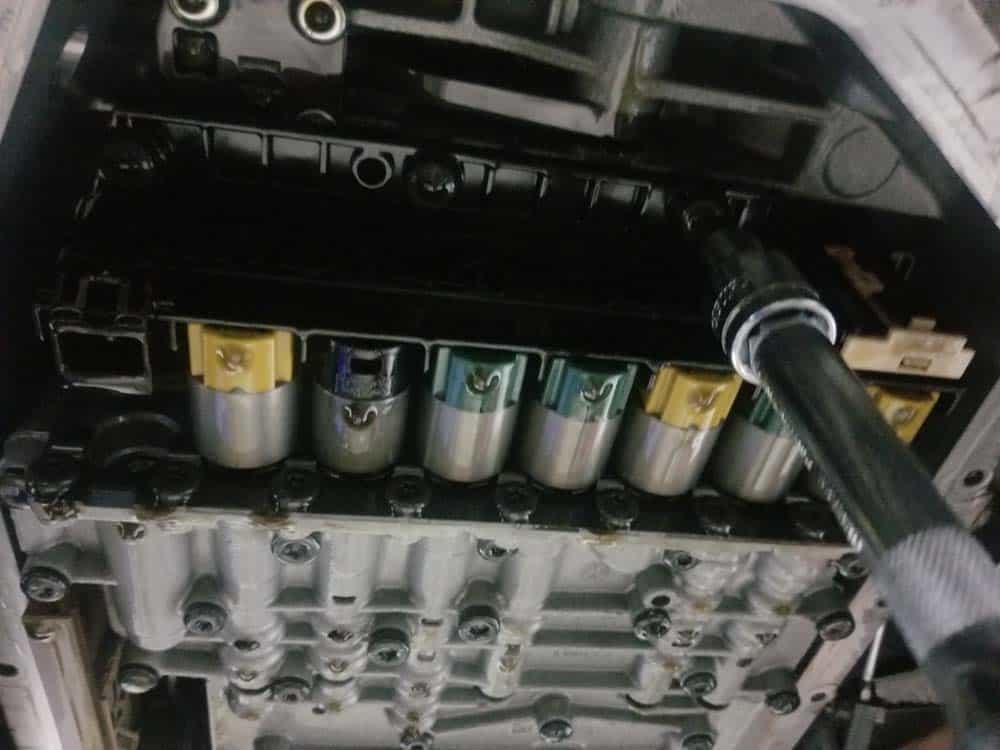
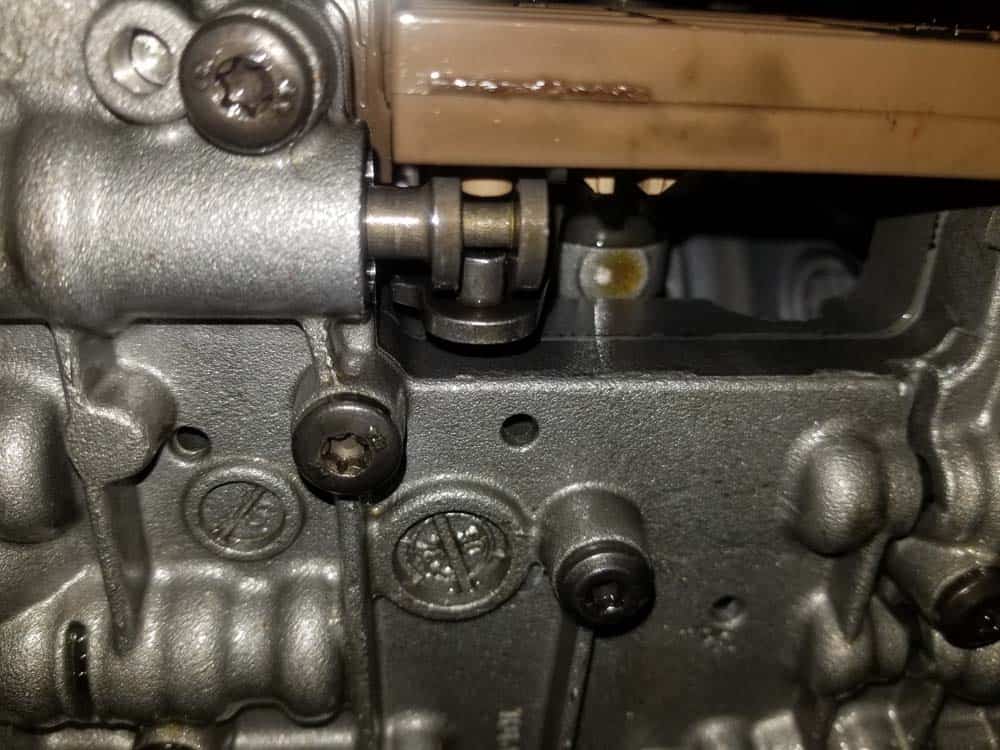
- Remove the ten T40 bolts securing the valve body to the transmission. There are seven in the front and three in the rear as shown in the diagram below. Make sure to hold the valve body as you remove the last bolt. Dropping the valve body can cause severe damage and may require purchasing a new part.
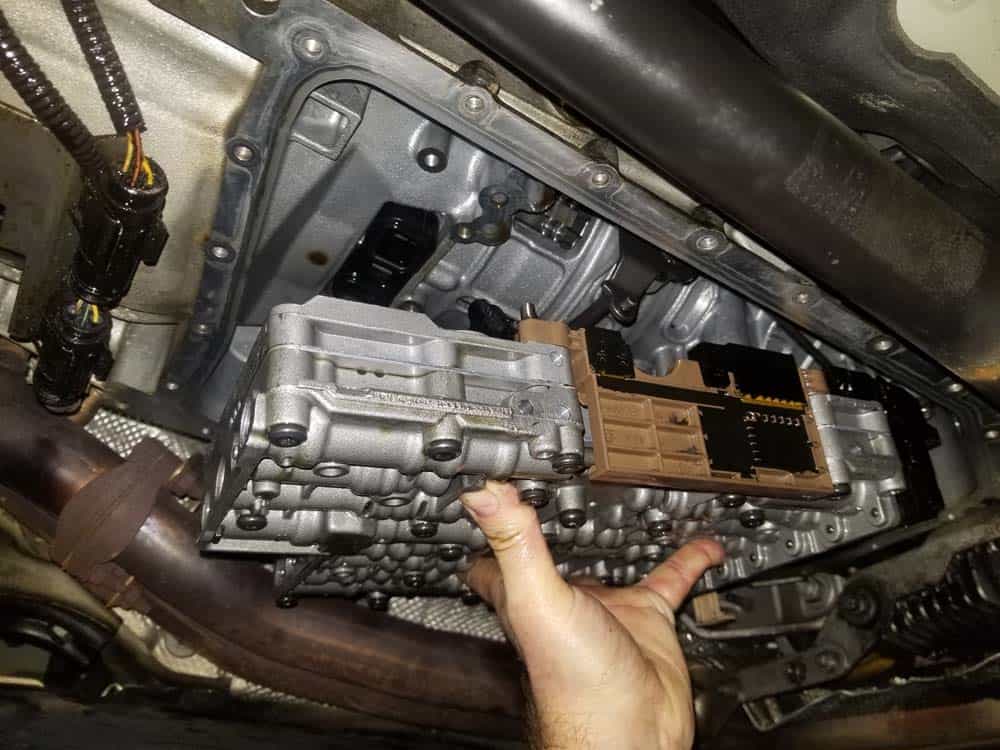
- Place the valve body on a clean bench.
Section 3 - Replacing the Sealing Sleeves and Valve Body Adapter
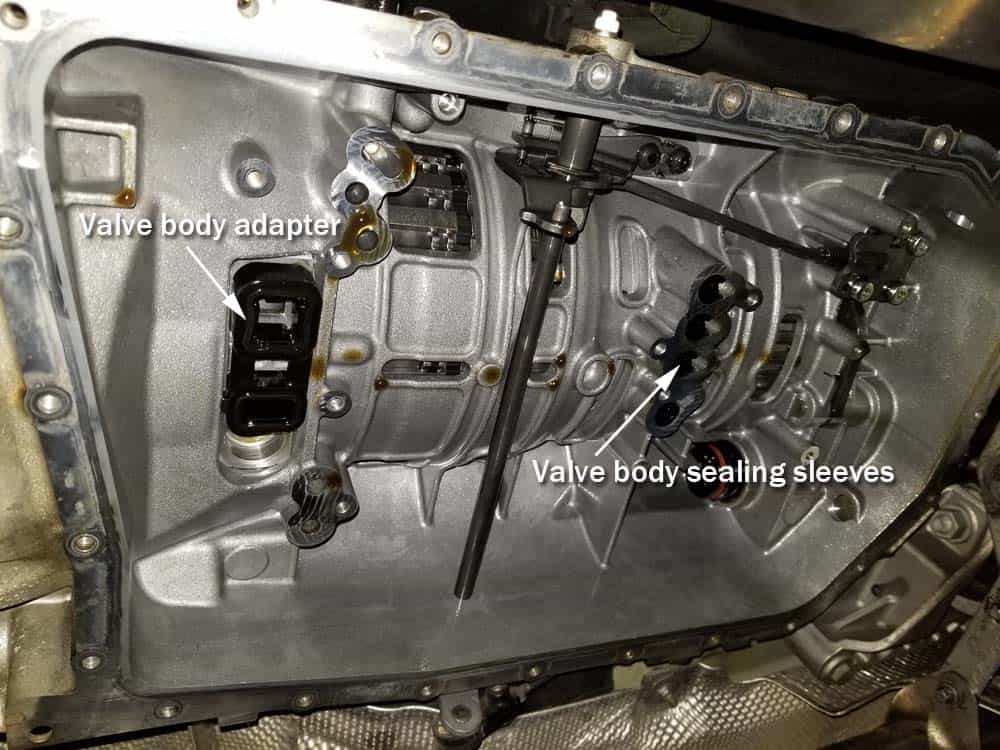
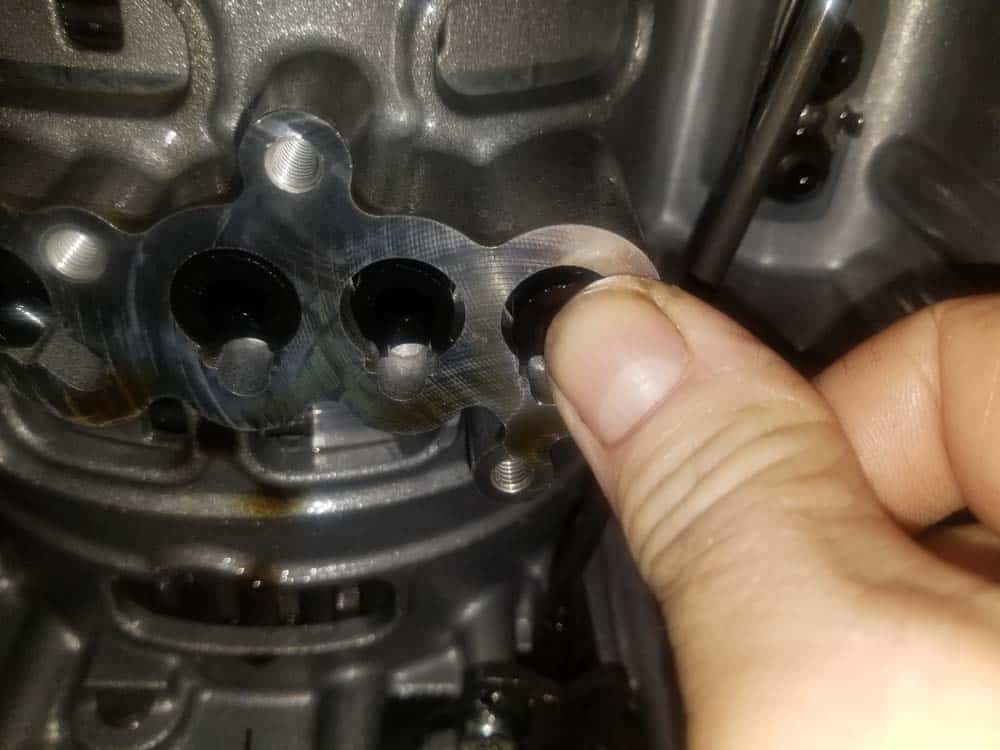
Replacing the BMW valve body sealing sleeves and adapter is very simple...in fact the hardest part of the repair is just gaining access to them. Make sure to thoroughly wipe down all of the surfaces on the valve body and transmission before installing the sleeves and adapter to make sure you get a tight seal.- Identify the valve body sealing sleeves and the valve body adapter installed in the bottom of the transmission.
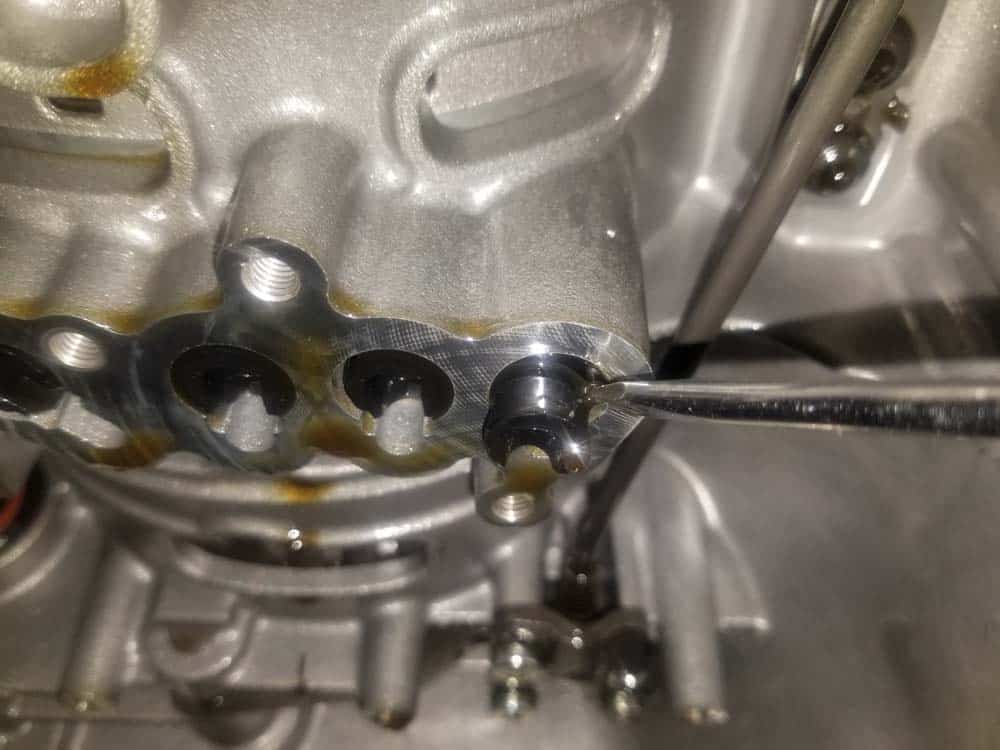
- Starting with the valve body sealing sleeves, use a small flat blade screwdriver to pry the first sleeve out. Note that the sealing sleeves come in different sizes, so make sure to replace them with the correct ones (we suggest replacing the sealing sleeves one at a time to avoid mixing them up).
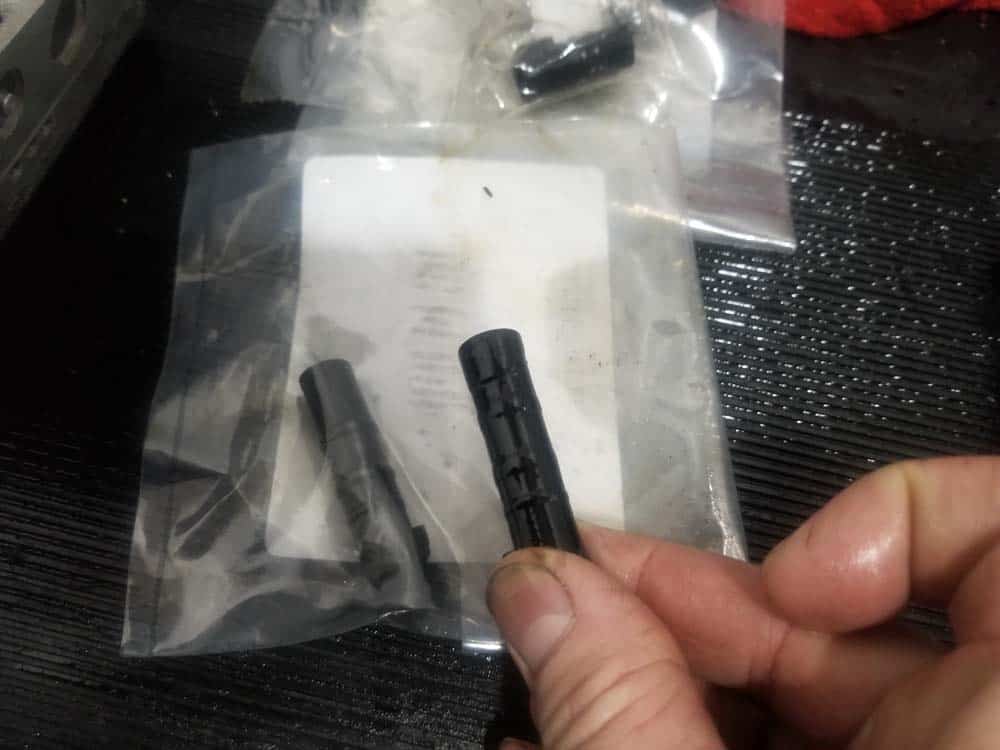
- Use your thumb to press the new valve body sealing sleeve into the transmission. It should be firmly seated with its lip slightly above the surface.
- Repeat the above steps on the other three sealing sleeves.
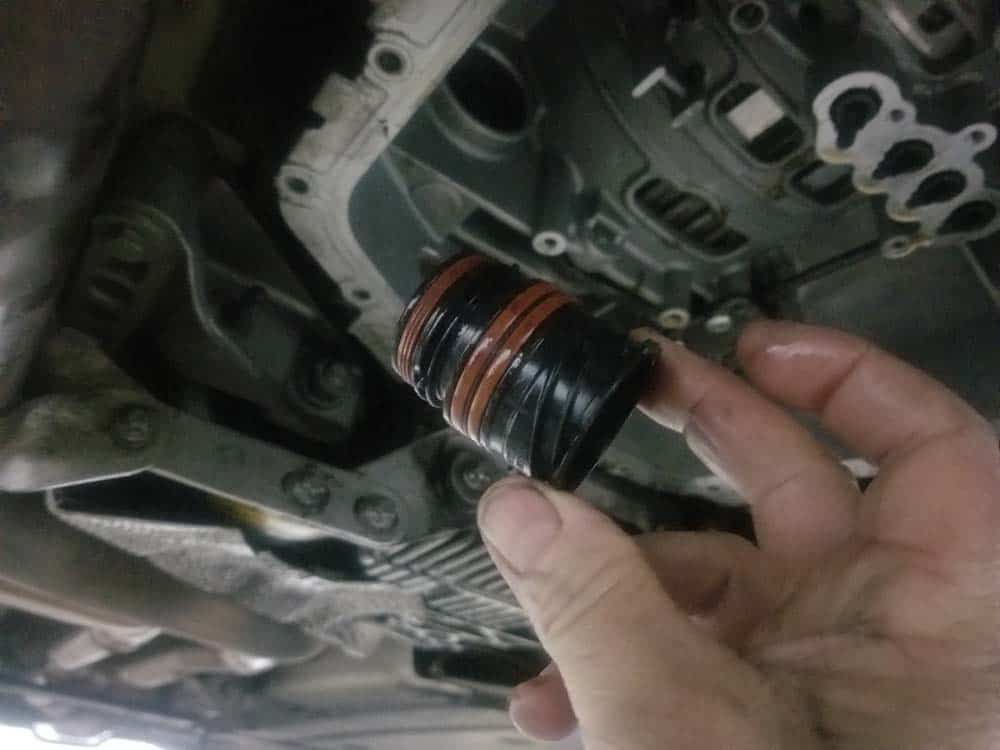
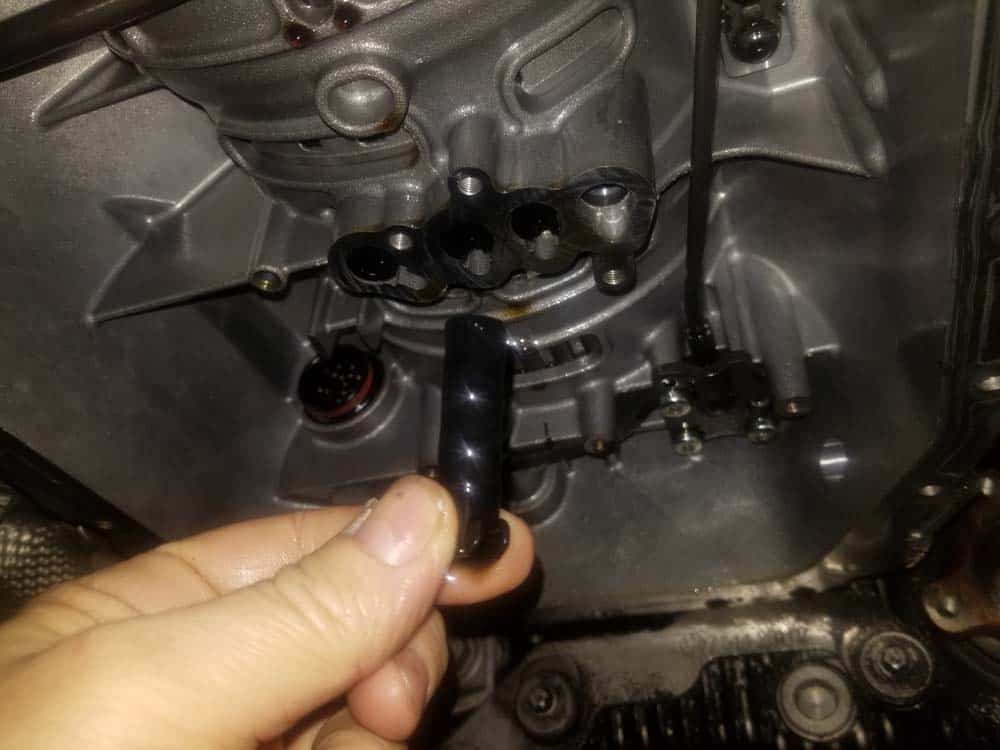
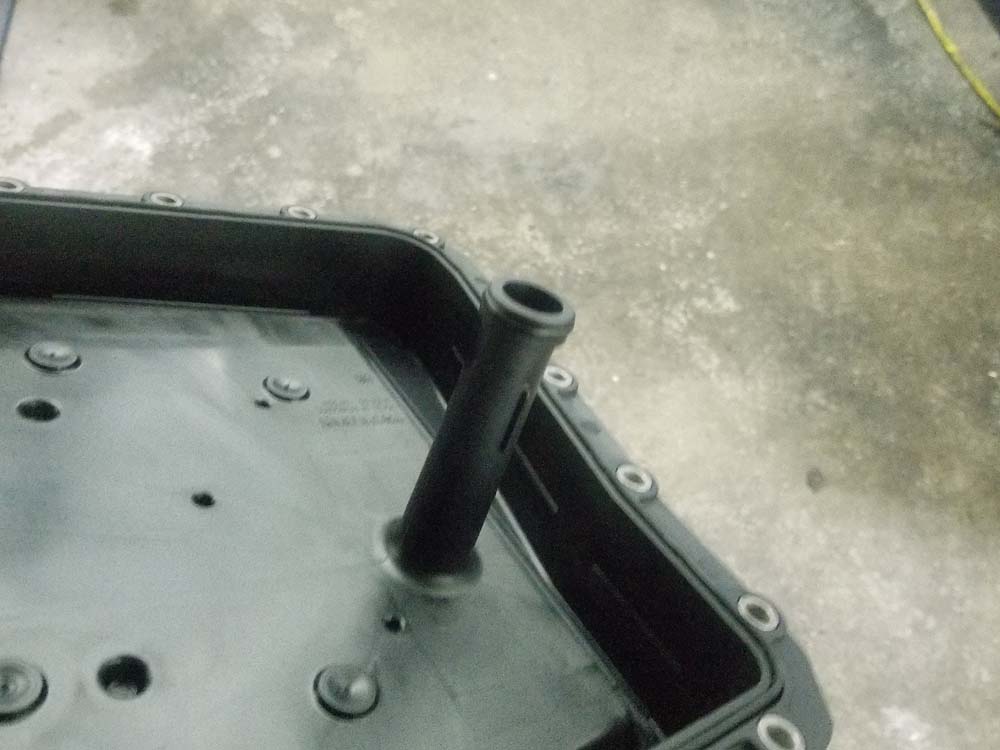
- Locate the valve body rubber adapter located near the front of the transmission.
- Grasp the valve body adapter and remove, noting its mounting orientation.
- Install the new valve body adapter by pressing it in with your thumb. Make sure it is seated correctly in the transmission as shown in the following image.
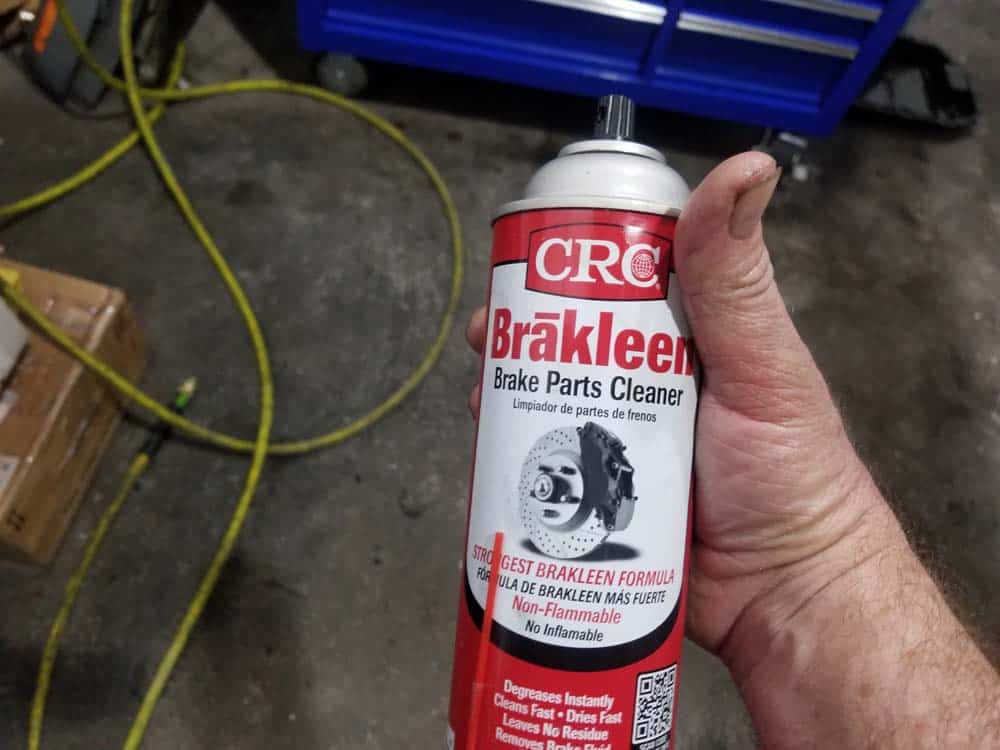
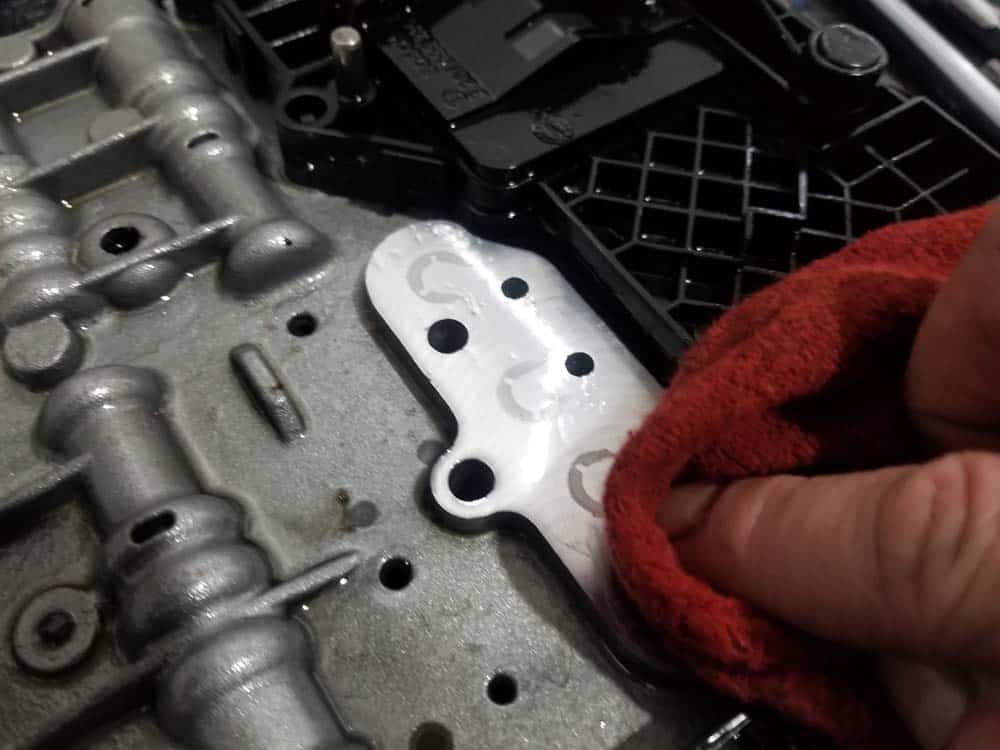
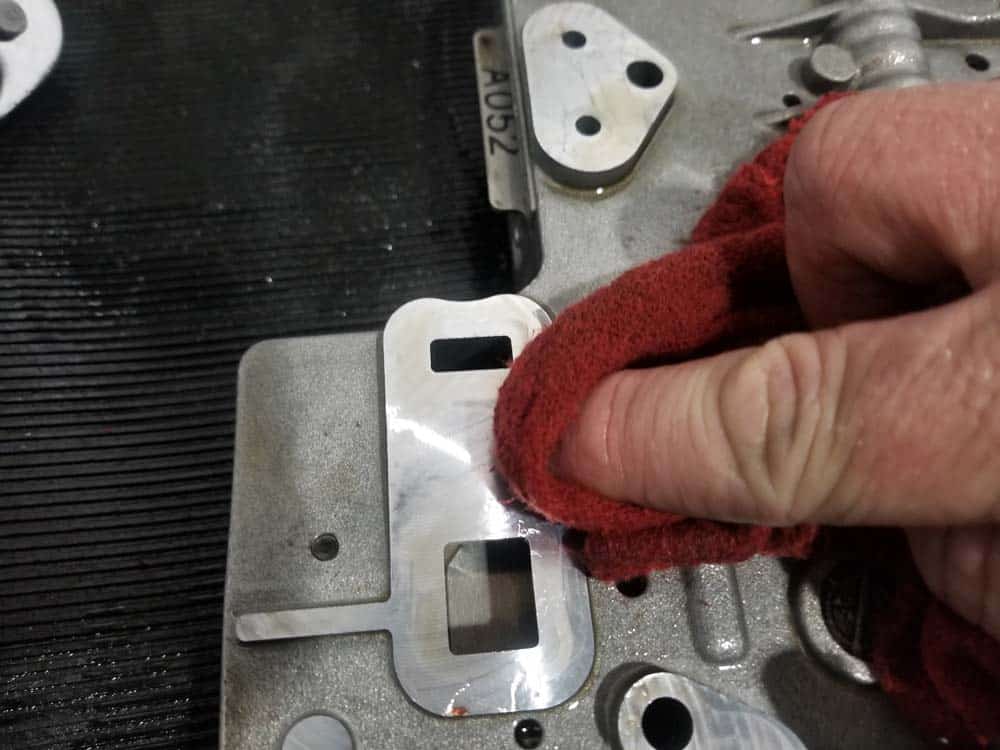
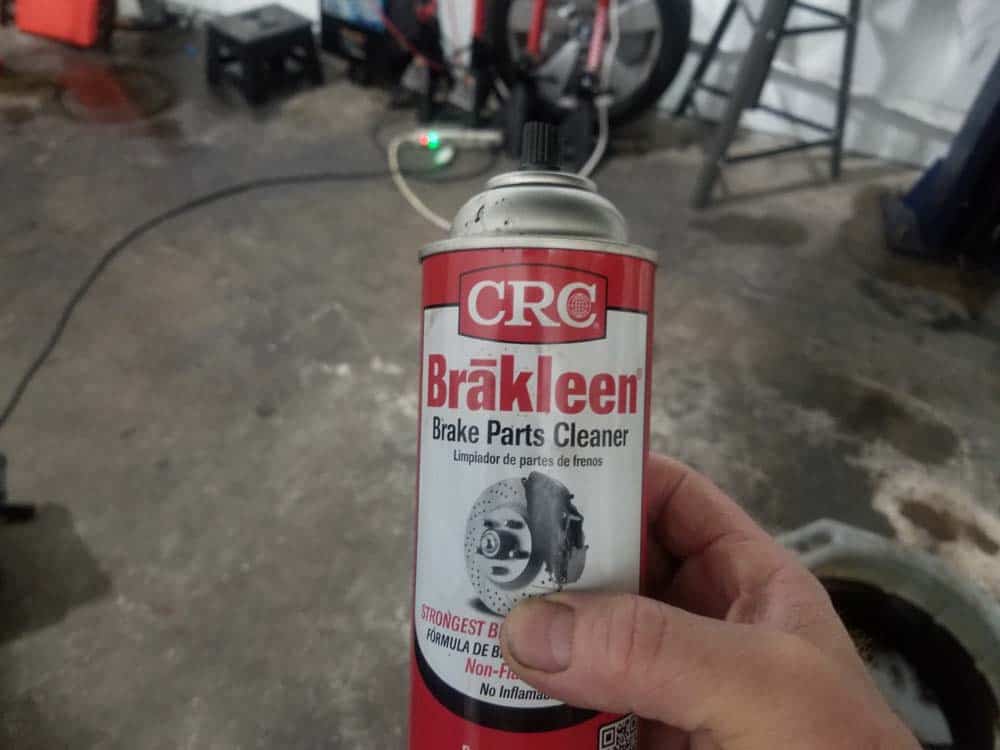
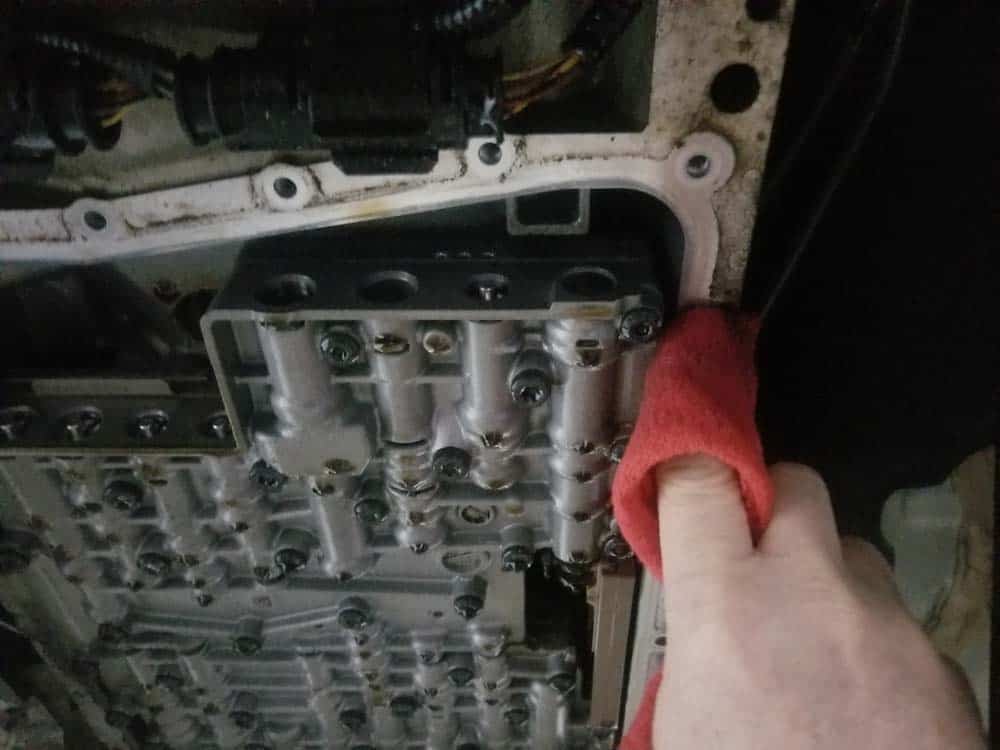
- Use some CRC Brakleen and a clean rag to thoroughly wipe down the valve body where the BMW mechatronics sealing sleeves and adapter attach. Make sure to remove any old residue that may keep them from creating tight seal.
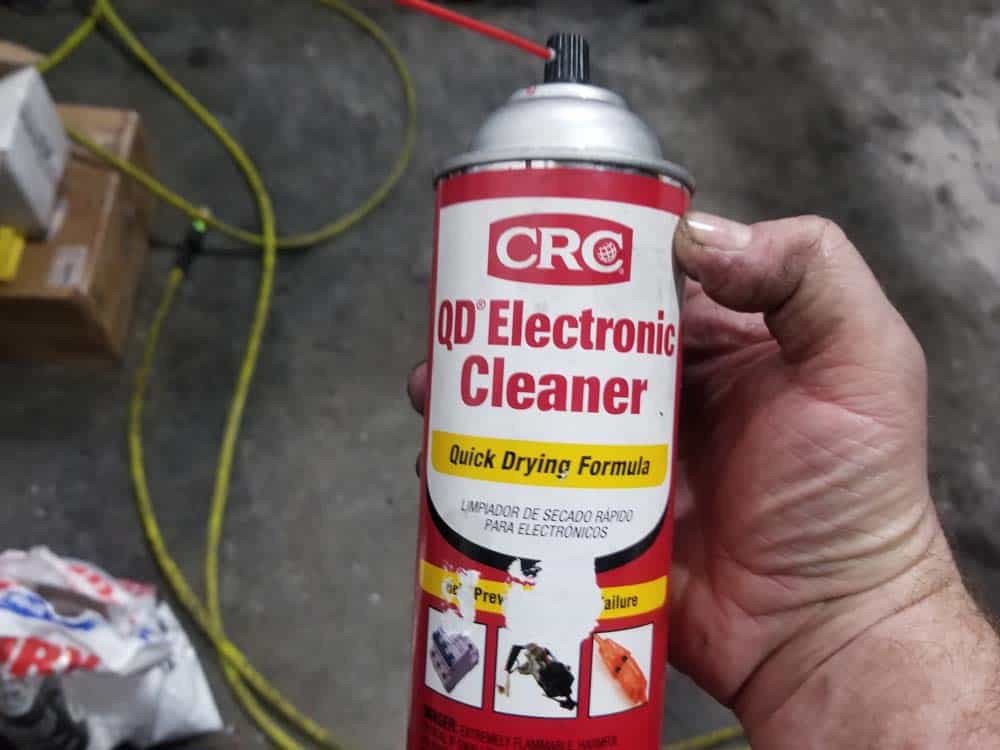
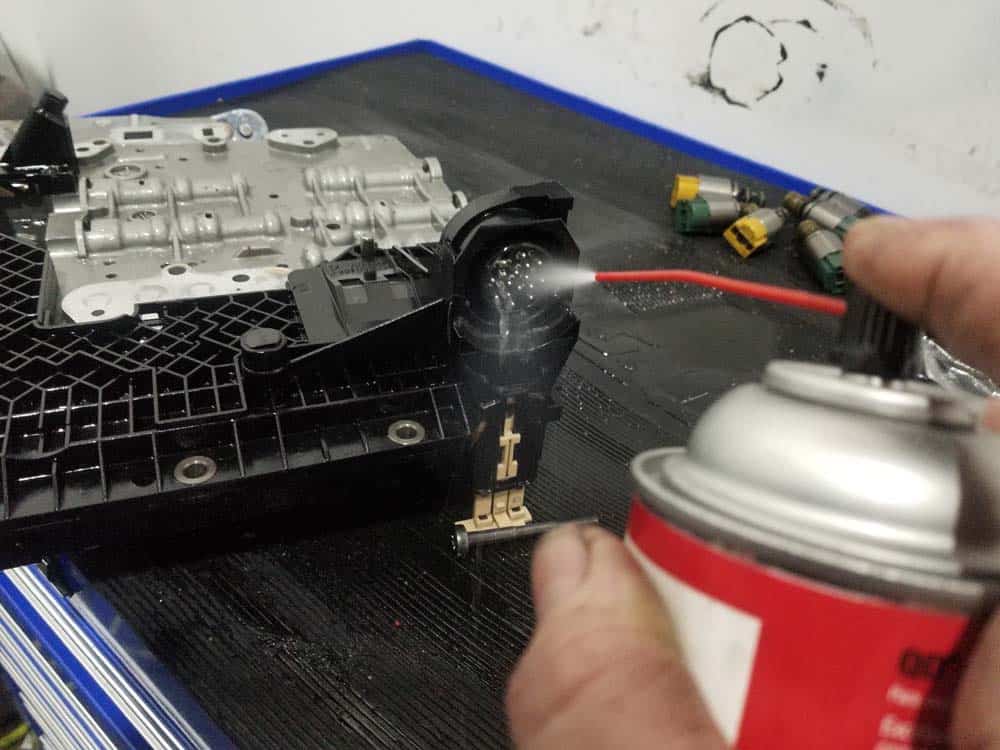
- Spray the valve body’s electrical connector with some CRC electronics cleaner.
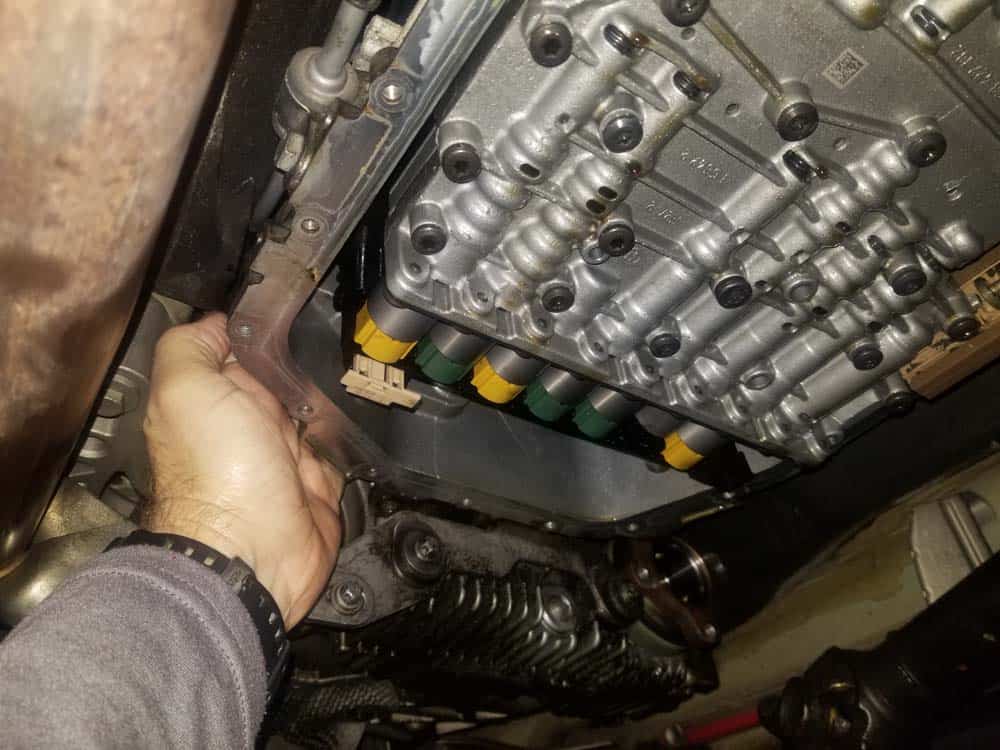
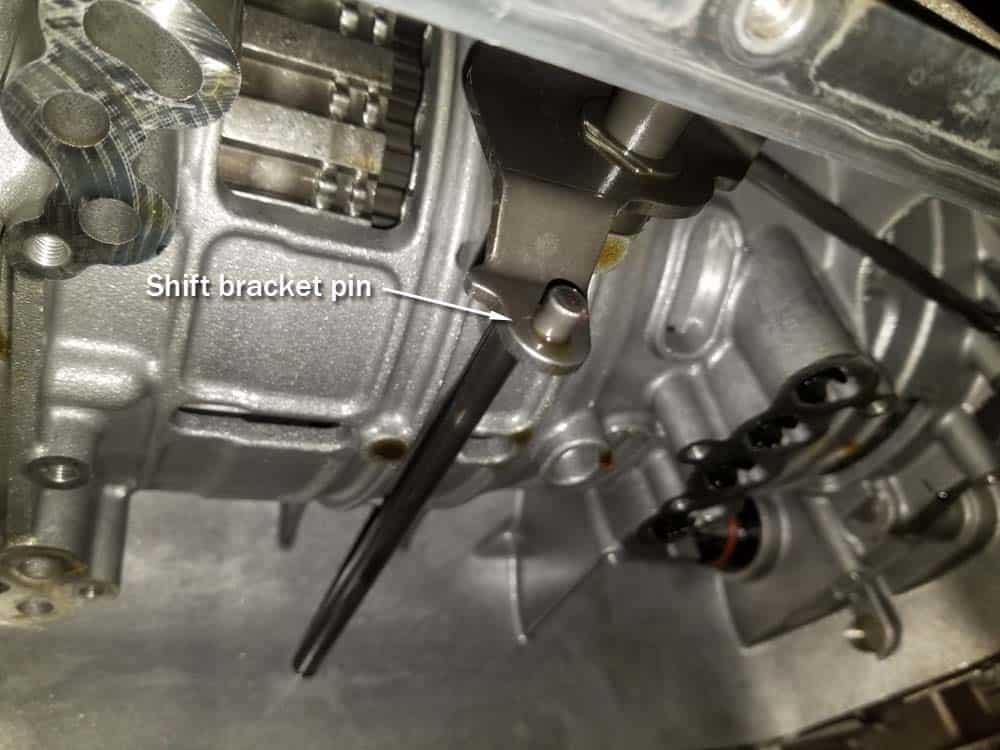
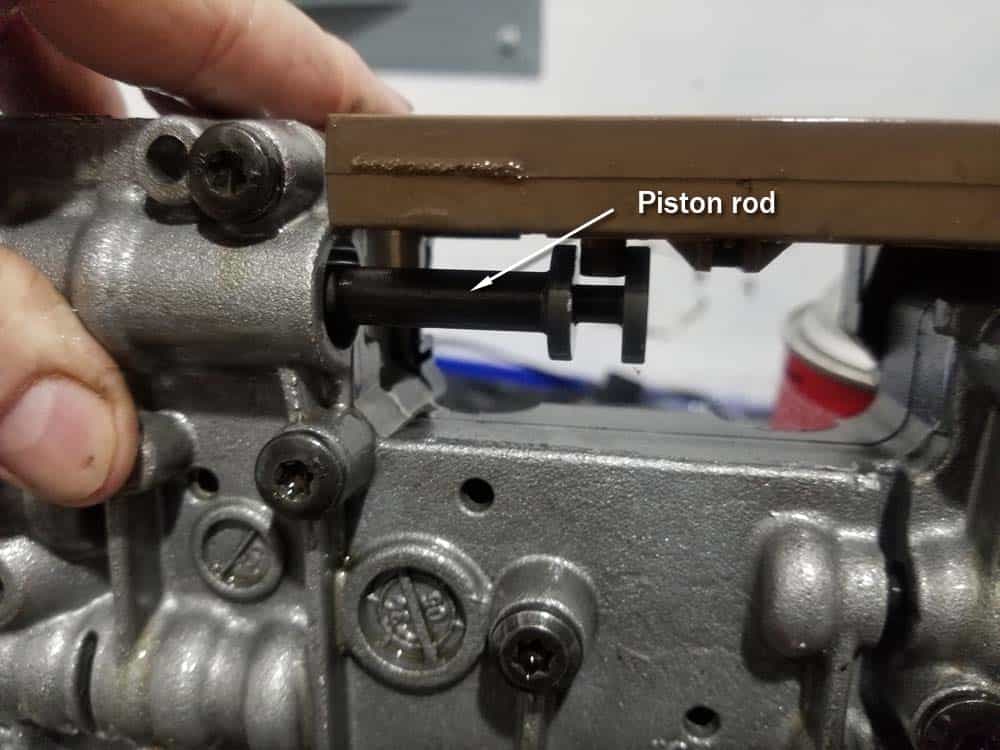
- Lift the valve body up and align it on the transmission. ***VERY IMPORTANT - Make sure the pin on the shift bracket lines up properly with the piston rod in the valve body. It is a very common mistake to put the valve body back on without lining them up. (see image below).
- Install the ten T40 mounting bolts and torque to 8 Nm (6 ft-lb).
- The electrical connection sealing sleeve has a tab in it that must line up with a notch in the electronics module for it to properly install. You will not be able to close the locking mechanism until the sealing sleeve is properly installed into the valve body.
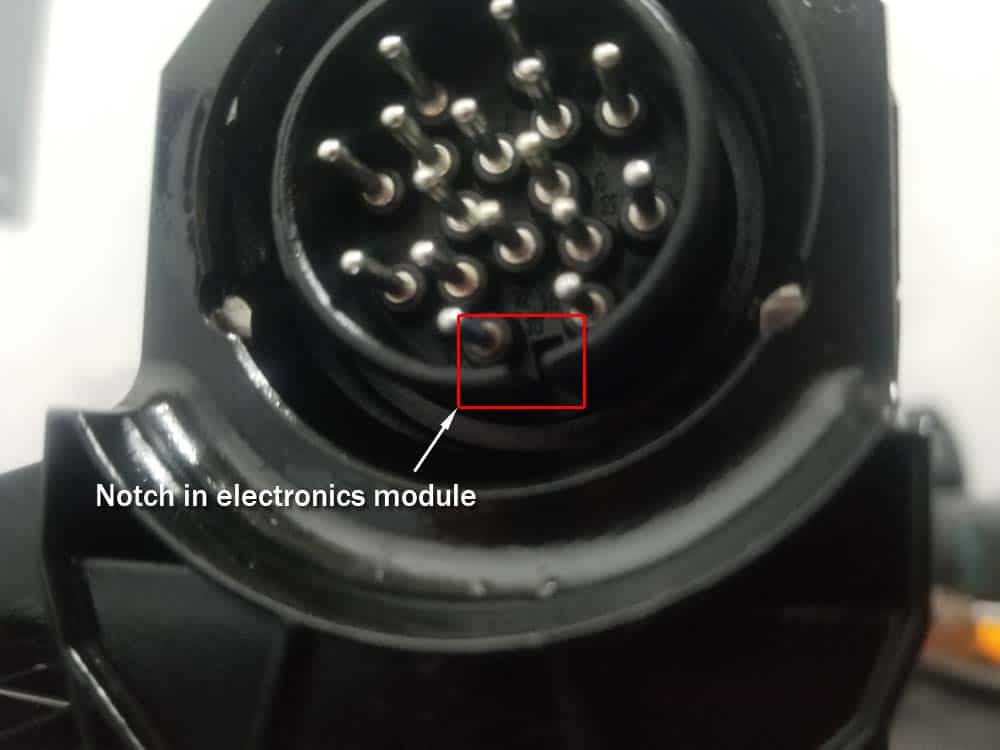
- Reach up and behind the transmission and install the new electrical connection sleeve. Turn it slowly until the tab on the sleeve lines up with the notch in the electronics module. Push the sleeve in as far as it will go and close the locking mechanism. If the locking mechanism will not close, then the sleeve is not seated properly in the valve body. Try reaching up and tilting it up and down until the locking mechanism closes.
- Install the electrical plug back onto the sleeve. Turn the locking ring clockwise until it is snug.
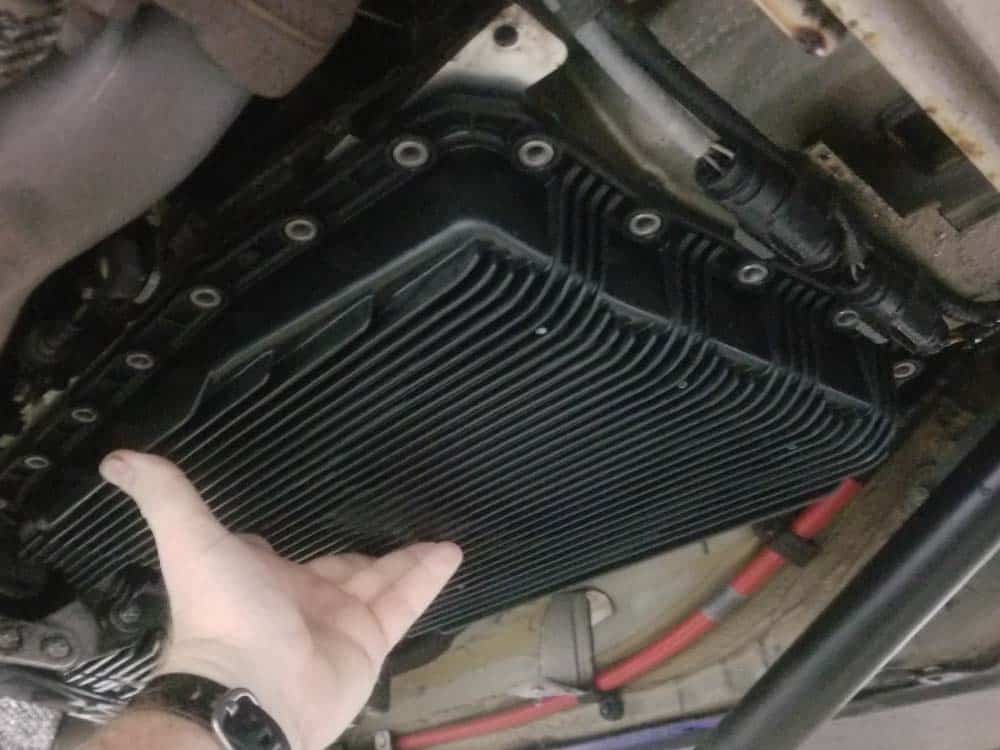
Section 4 - Replacing the Oil Pan
Once you have successfully completed the BMW mechatronics sealing sleeve and adapter replacement, the next step is to replace the oil pan.- Install a new rubber gasket in the transmission oil pan.
- Using a rag and some CRC Brakleen, thoroughly clean the transmission surface that the oil pan attaches to. Make sure to remove any dirt, grime and oil…all of these can affect the gasket’s seal and cause leaks.
- Lift the oil pan back into position. Make sure the oil filter fits snugly into its opening in the bottom of the transmission.
- Using the T40 torx bit, hand tighten the mounting bolts back into the pan.
- Torque the transmission oil pan mounting bolts to 10 Nm (7 ft-lb).
Section 5 - Refilling the 6HP19X Transmission with Fluid
Refilling the BMW 6HP19X six speed transmission is a two step process. First the transmission oil pan must be initially filled. After the initial fill, the transmission must be warmed up to its final fill temperature (100F) before topping off with fluid. Per the manufacturer (ZF) specifications, the vehicle must be running and the transmission in park while topping off the transmission - topping of the transmission with the engine off could cause an under filled transmission. - Remove the transmission fill plug.
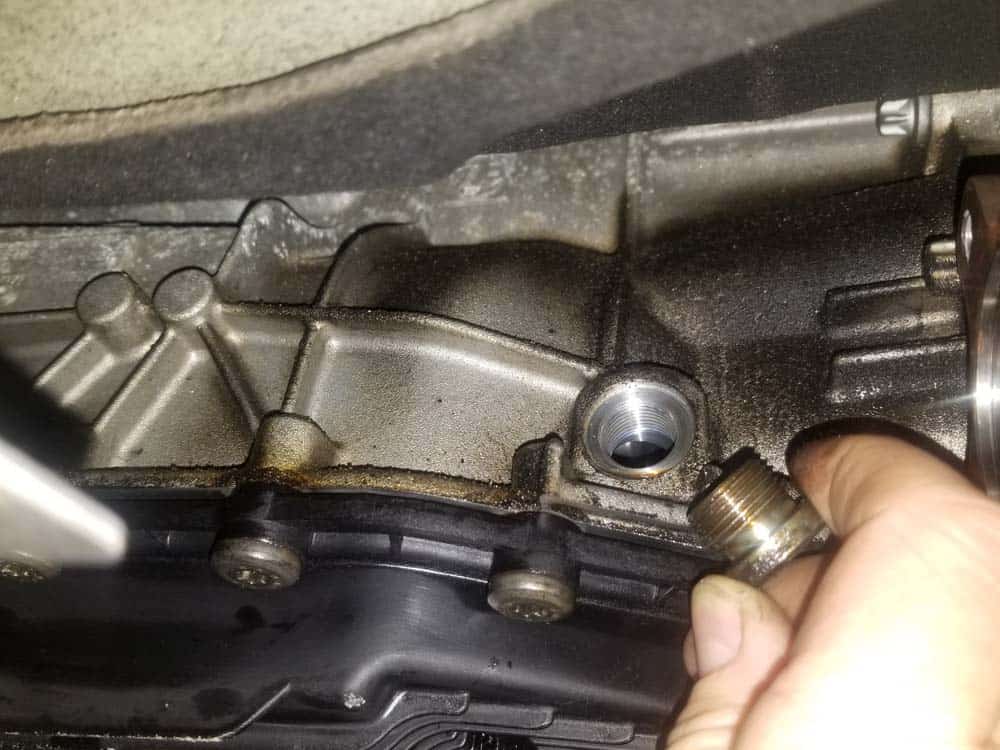
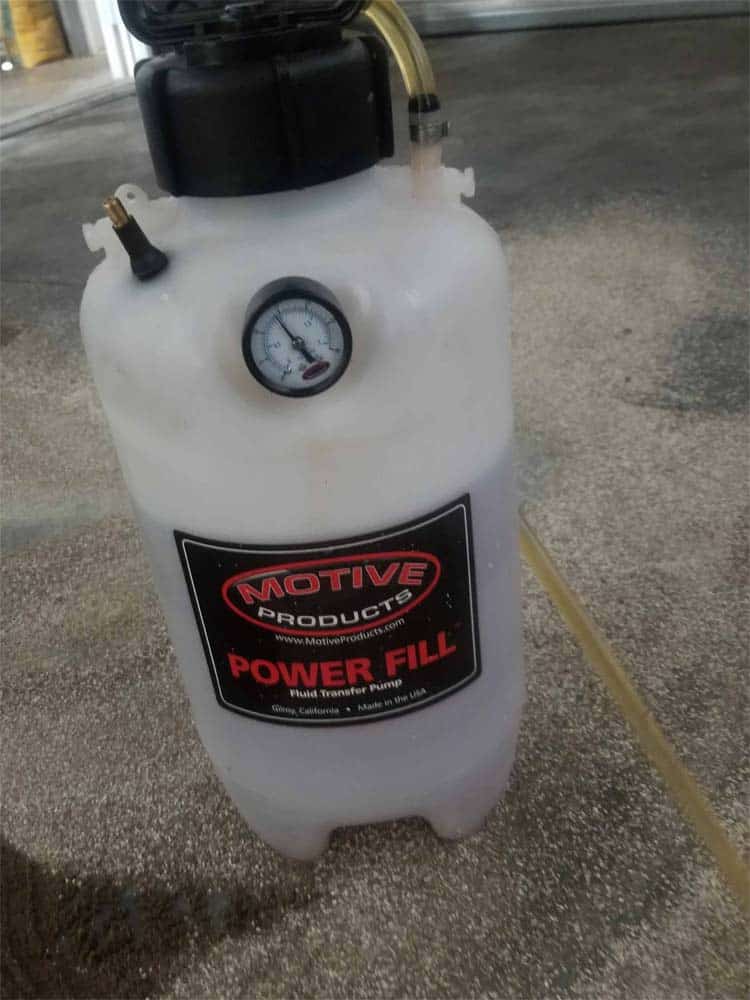
- Using a fluid transfer pump, fill the oil pan with approved fluid until it starts to run out of the fill hole.

- Replace the plug and snug up with a T50 torx socket. DO NOT torque the plug yet...it will be removed again to check the final level of the transmission fluid.
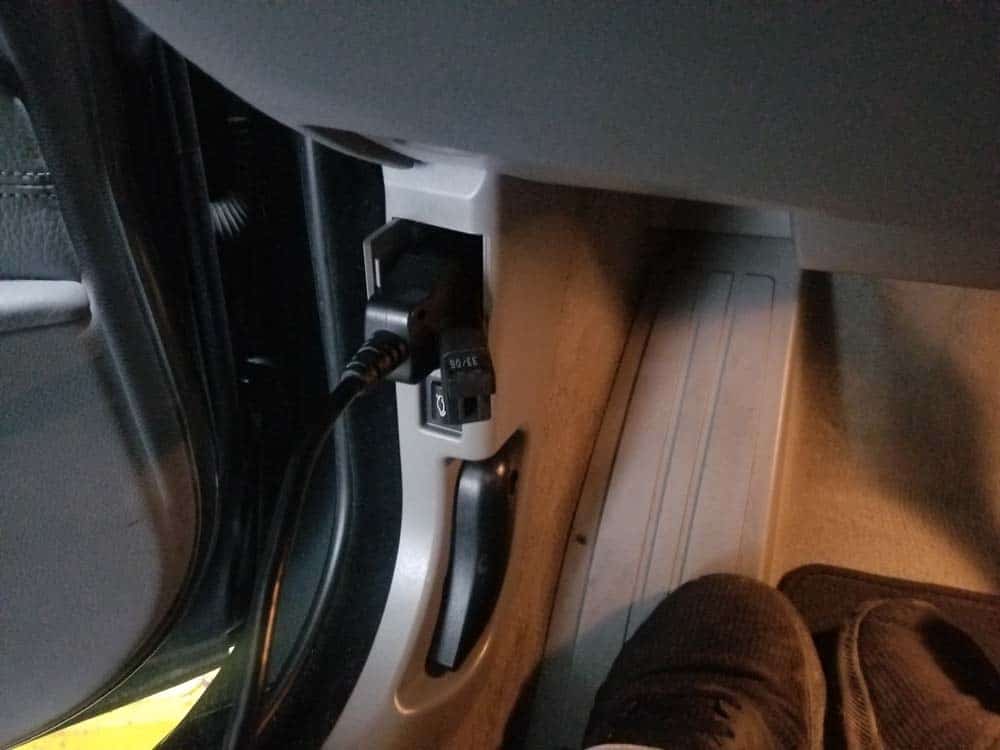
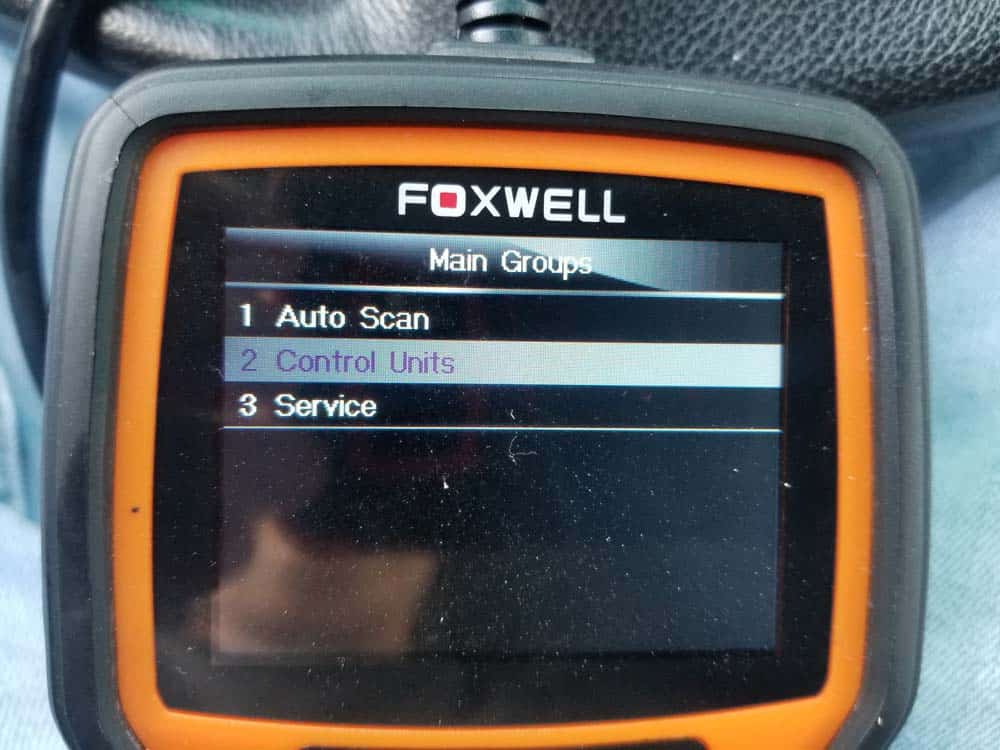
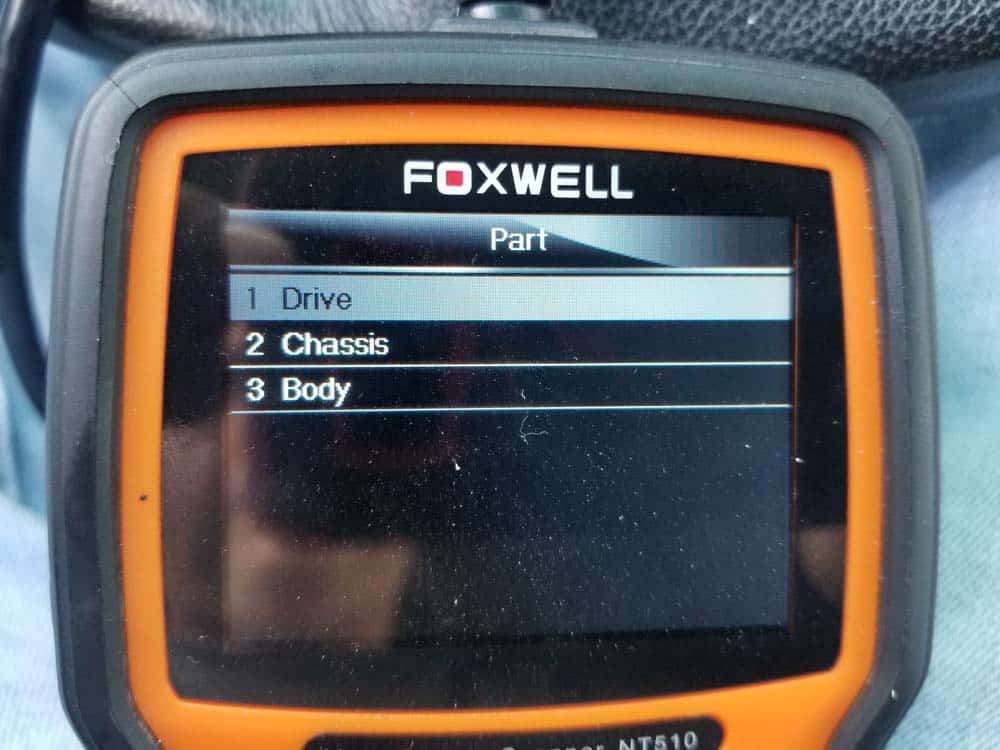
- Next, the automatic transmission fluid (ATF) level needs to be checked. In order to get a correct ATF level reading, the fluid must be at a temperature between 86-122 degrees Farenheit (we recommend 100F). The correct way to determine the temperature of the ATF is to use a diagnostic scanner. If you are a home mechanic and do not currently own a diagnostic scanner for your BMW, we encourage you to purchase one as soon as possible. A diagnostic scanner is as important to your tool chest as a set of socket wrenches. You can purchase a very affordable BMW diagnostic scanner by clicking here.
- First, connect your diagnostic scanner to the OBD-II port located in the driver's side footwell. Do not start the vehicle yet.
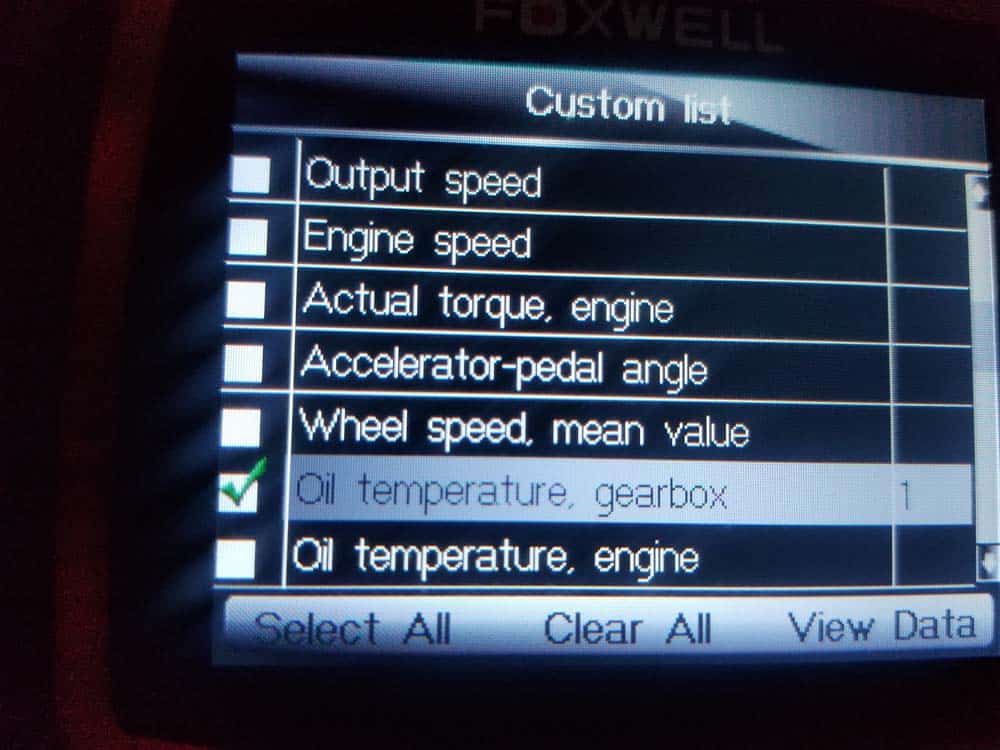
- With the vehicle off, scroll through the diagnostic scanner menu until you find the screen that monitors the transmission fluid temperature in live data. You want to keep the vehicle off because it may take you some time to find the correct screen. You don't want to start warming up the fluid until you are all ready to go. The following image shows the correct screen on the Schwaben (Foxwell) diagnostic scanner. This screen will differ among scanner manufacturers.
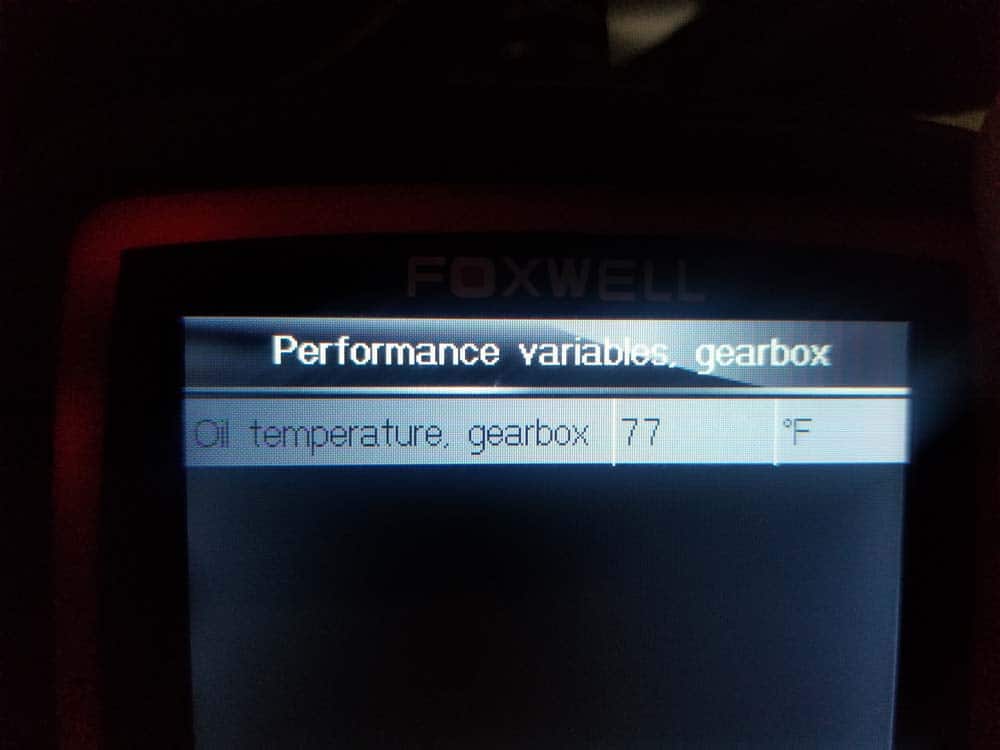
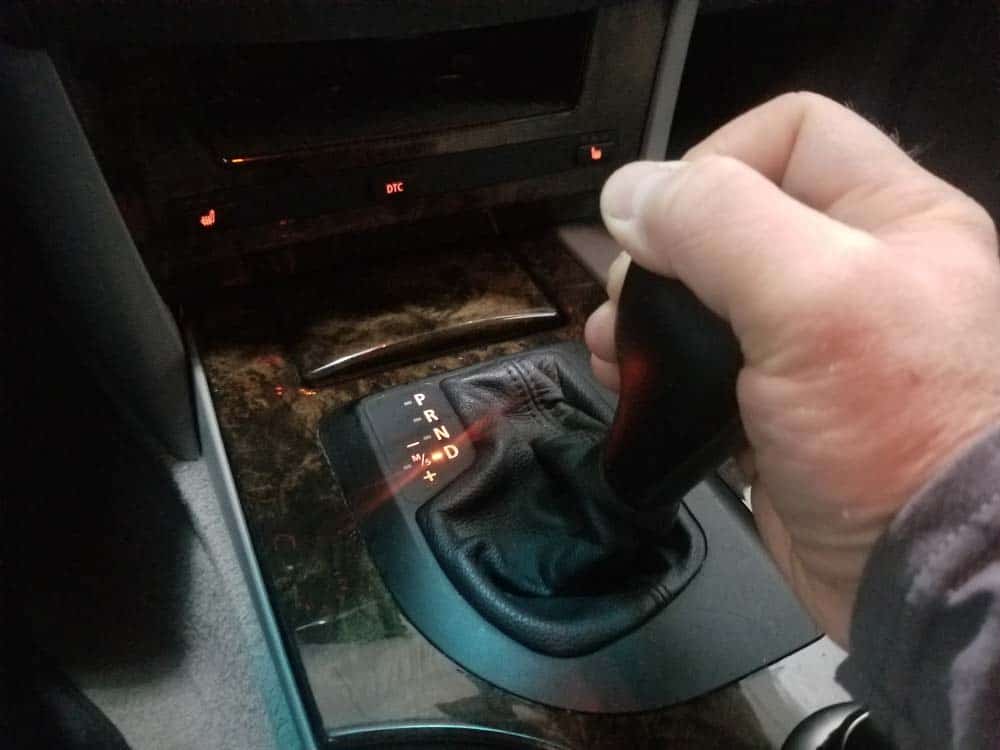
- Start the vehicle. Depress the brake pedal and hold. With the brakes applied, SLOWLY shift the transmission into reverse, then neutral, and then into drive. Pause in each gear about three seconds. Repeat this process six times, then put the vehicle back into park. This will circulate the fluid through the transmission. Closely monitor the diagnostic scanner.
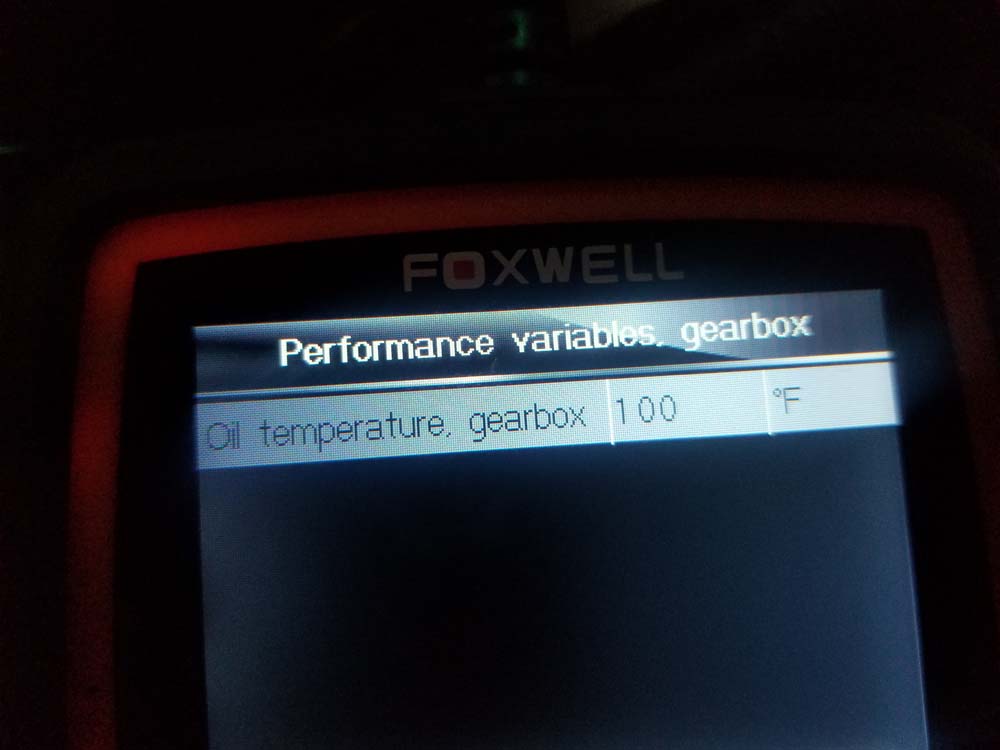
- When the diagnostic scanner shows the transmission fluid at 100 degrees Fahrenheit leave the engine running with the transmission in park and proceed to the transmission for the final fill.
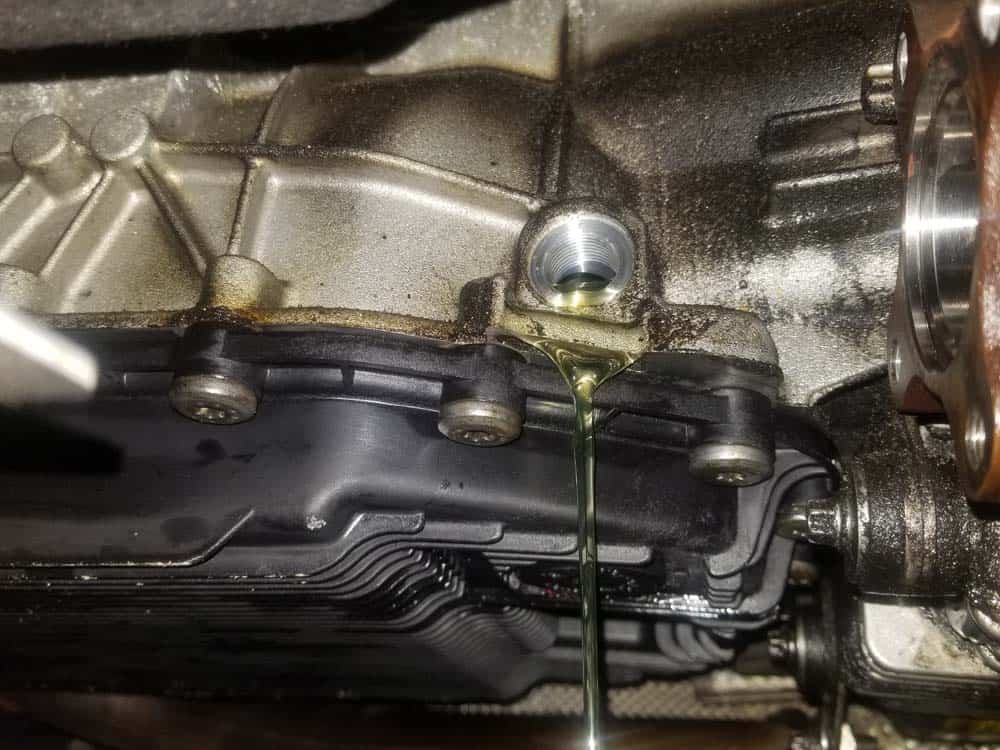
- Remove the fill plug on the transmission. Add transmission fluid until it flows out of the drain hole. Once again, the engine must be running and the vehicle in park while performing the final fill.
- Replace the fill plug and torque to 32 Nm (24 ft-lb).
- With the vehicle still running, check for any leaks in the oil pan gasket. If you see any visible leaks, use you T40 torx socket to snug up the mounting bolts (no more than 1/8 of a turn).
- xDrive models - Turn the engine off. Reinstall the front driveshaft to the transfer case. Torque the mounting bolts to 20 Nm (15 ft-lb).
- Replace the front and rear belly pans and lower the vehicle.
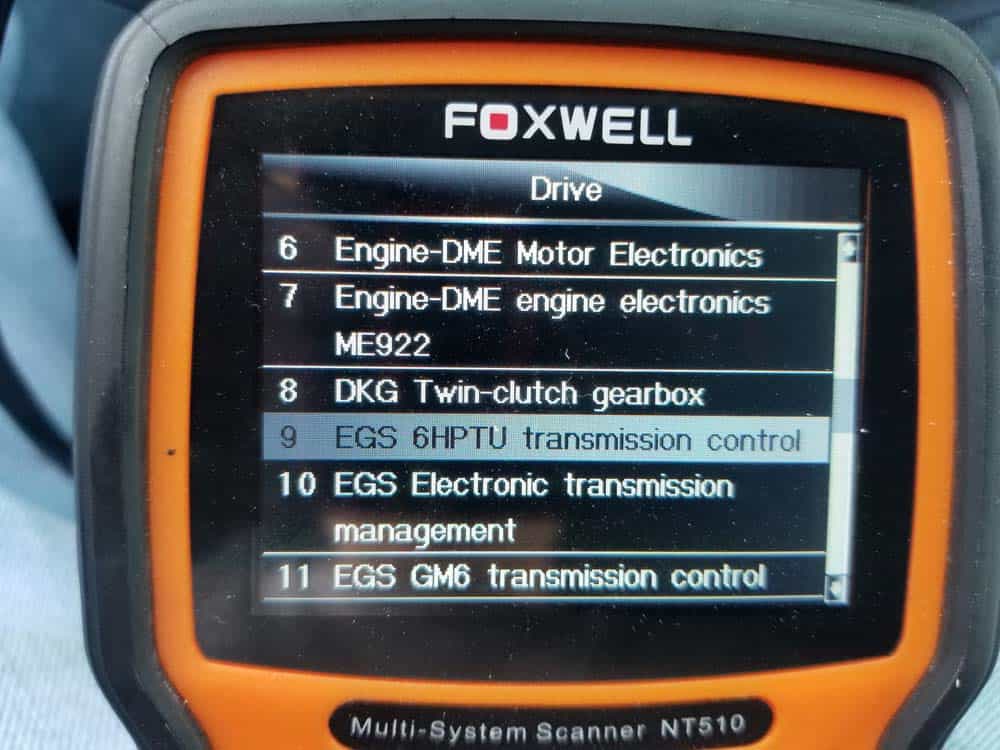
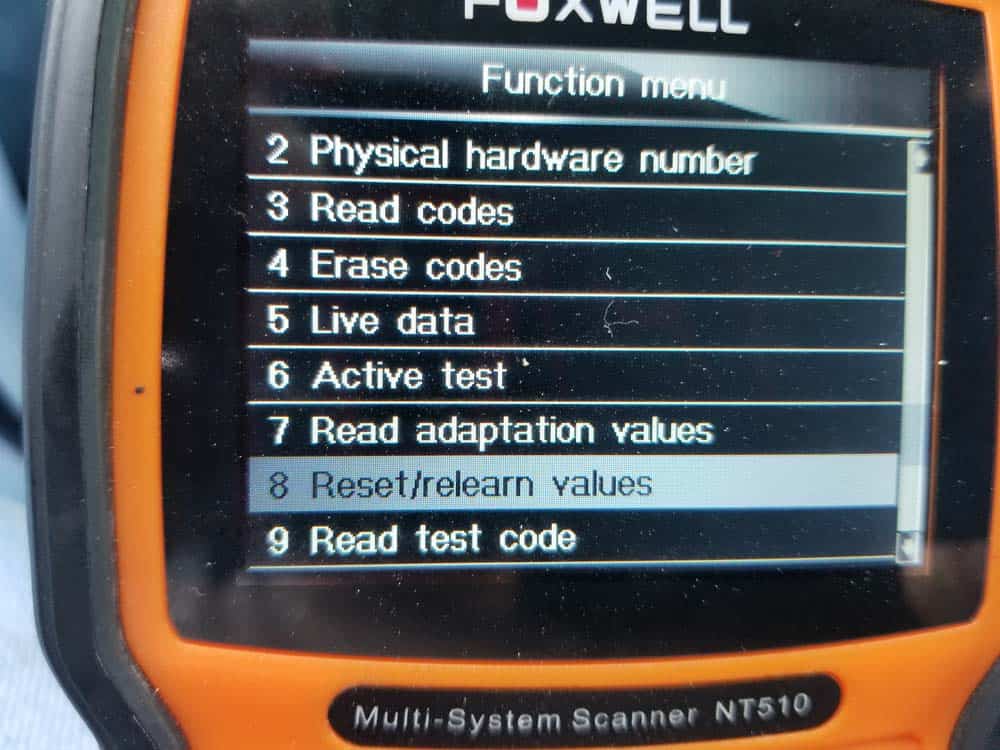
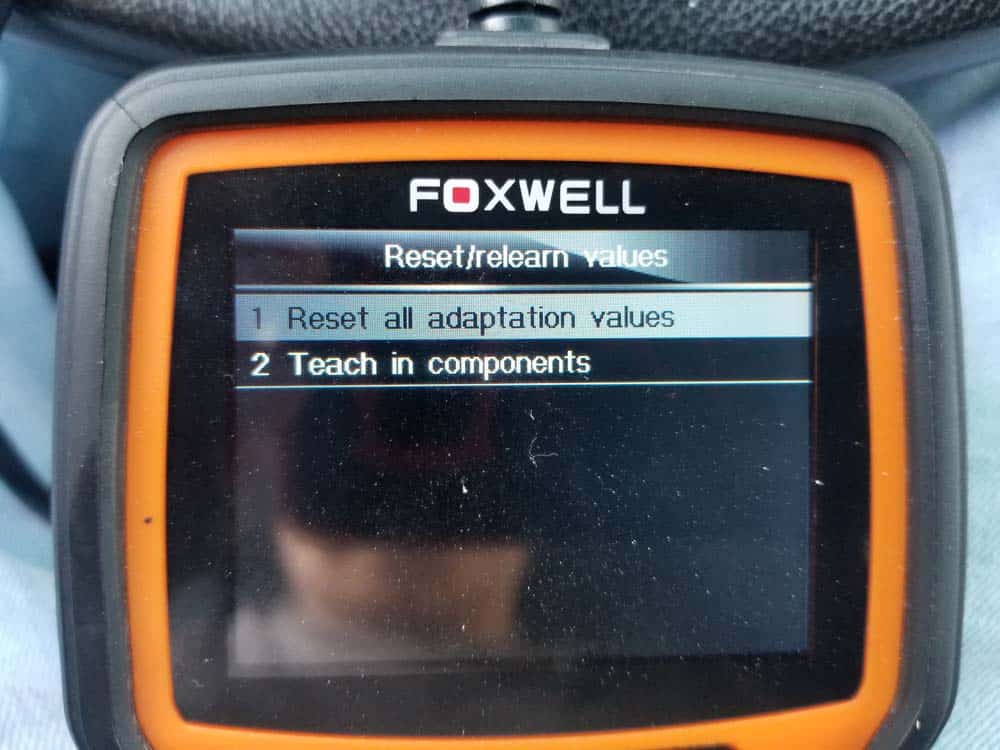
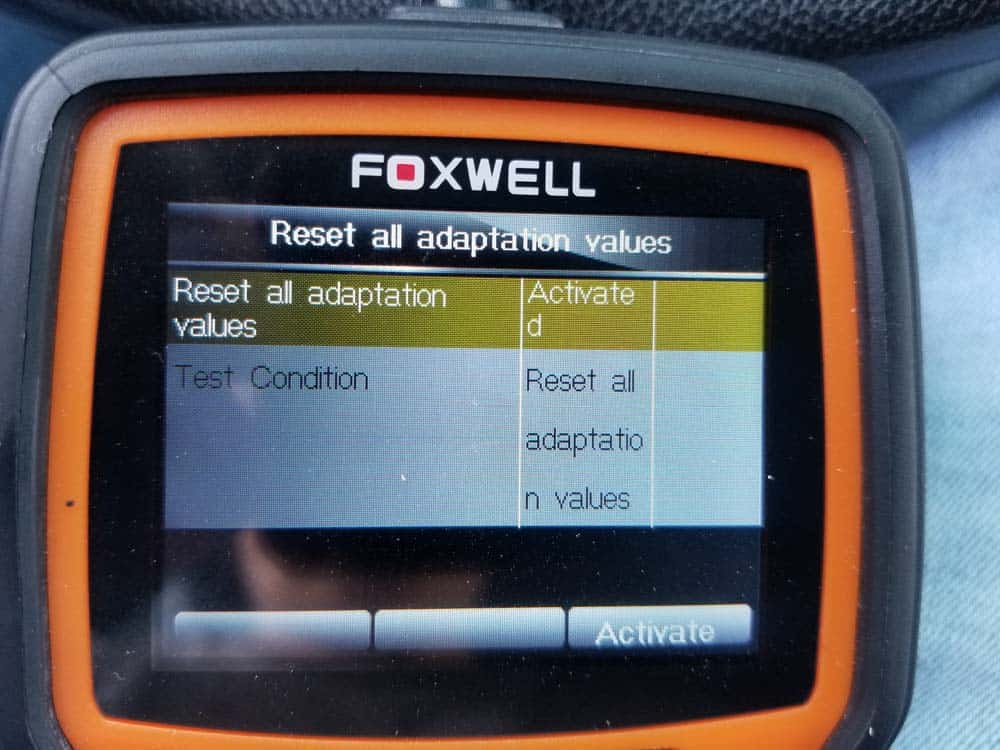
Section 6 - Resetting the Transmission's Adaptation Values
It is very important that at the end of any service work or repair to the ZF six speed transmission, the gearbox's adaptations are reset. The adaptations are a "learned" code stored in your transmission's computer module that changes the performance of your transmission based on past driving habits and driving conditions. They also make changes based on the wear and tear of internal parts. Not resetting the adaptations after this repair may cause reduced performance in your transmission and potential long term damage to its internal components. Resetting the adaptations is extremely easy and only takes a couple minutes. You must have a BMW diagnostic scanner to reset them. Don't have a BMW scanner? You can purchase the same inexpensive scanner we use by clicking here.- Plug your BMW diagnostic scanner into the OBD-II port and start the vehicle.
- Depending on which scanner you have, you will need to get to the screen that allows you to reset the transmission's adaptations. Every scanner is different...the following images show how to do it on the Schwaben/Foxwell scanner.
- After the adaptations are reset, turn off the car and remove the key. You are now finished and can drive the vehicle.
BMW Mechatronics Sealing Sleeve and Adapter Repair Finished