
Affiliate link disclosure – The BMW Repair Guide uses affiliate links in their site. For more information on affiliate links, please click here.
Repair Summary
This article gives detailed instructions on an E60 Valve Cover Gasket Replacement in a BMW 5 series vehicle with the N52 engine. Even though we used a 2006 530xi touring wagon to perform this repair, this article can be applied to any BMW vehicle with the N52 6 cylinder engine with minor modifications to the repair steps.
See all vehicles this article applies to
E90 3 Series 323i
E90N 3 Series 325i
E90N 3 Series 325xi
E90N 3 Series 323i
E91 3 Series 325i
E91 3 Series 323i
E91N 3 Series 325xi
E91N 3 Series 325i
E91N 3 Series 323i
E92 3 Series 325xi
E92 3 Series 325i
E92 3 Series 323i
E92N 3 Series 323i
E92N 3 Series 325xi
E92N 3 Series 325i
E93 3 Series 325i
E93 3 Series 323i
E93N 3 Series 323i
E93N 3 Series 325i
E60 5 Series 523i
E60N 5 Series 525Li
E60N 5 Series 525i
E60N 5 Series 523Li
E60N 5 Series 523i
E61 5 Series 525i
E61 5 Series 525xi
E61 5 Series 523i
E61N 5 Series 523i
E61N 5 Series 525i
F10 5 Series 523i
F11 5 Series 523i
E83N X3 Series X3 2.5si
E85 Z4 Series Z4 2.5si
E89 Z4 Series Z4 23i
F18 5 Series 523Li
F18 5 Series 520Li
E60 5 Series 523Li
E60 5 Series 525Li
E81 1 Series 130i
E87 1 Series 130i
E88 1 Series 128i
E88 1 Series 125i
E82 1 Series 128i
E82 1 Series 125i
E87N 1 Series 130i
E90 3 Series 330xi
E90 3 Series 330i
E90 3 Series 328i
E90 3 Series 328xi
E90 3 Series 325xi
E90 3 Series 325i
E90N 3 Series 330i
E90N 3 Series 328xi
E90N 3 Series 328i
E91 3 Series 330xi
E91 3 Series 330i
E91 3 Series 328xi
E91 3 Series 328i
E91 3 Series 325xi
E91N 3 Series 330i
E91N 3 Series 328xi
E91N 3 Series 328i
E92 3 Series 330xi
E92 3 Series 330i
E92 3 Series 328xi
E92 3 Series 328i
E92N 3 Series 330i
E92N 3 Series 328xi
E92N 3 Series 328i
E93 3 Series 330i
E93 3 Series 328i
E93N 3 Series 330i
E93N 3 Series 328i
E60 5 Series 530xi
E60 5 Series 530i
E60 5 Series 525i
E60 5 Series 525xi
E60N 5 Series 530xi
E60N 5 Series 530Li
E60N 5 Series 530i
E60N 5 Series 528xi
E60N 5 Series 528i
E61 5 Series 530xi
E61 5 Series 530i
E61N 5 Series 530xi
E61N 5 Series 530i
F10 5 Series 530i
F10 5 Series 528i
F11 5 Series 530i
E63 6 Series 630i
E63N 6 Series 630i
E64 6 Series 630i
E64N 6 Series 630i
E65 7 Series 730i
E66 7 Series 730Li
F01 7 Series 730i
F01N 7 Series 730i
F02N 7 Series 730Li
E84 X1 Series X1 25iX
E83N X3 Series X3 3.0i
E83N X3 Series X3 3.0si
F25 X3 Series X3 28iX
E85 Z4 Series Z4 3.0si
E85 Z4 Series Z4 3.0i
E86 Z4 Series Z4 3.0si
E89 Z4 Series Z4 30i
F18 5 Series 530Li
F18 5 Series 528Li
F18N 5 Series 530Li
F02 7 Series 730Li
E70 X5 Series X5 3.0si
E60 5 Series 530Li
A BMW E60 valve cover gasket replacement may be needed if you are experiencing oil leaks in your engine compartment or cylinder misfires.
In 2004 BMW introduced one of the most popular engines ever produced by the company...the N52 naturally aspirated six-cylinder engine. It was to take the place of the aging M54 six-cylinder engine, the reliable workhorse that had powered a huge range of vehicles through the early part of the 2000s. The N52 was designed to be technologically more advanced than it's predecessor, sporting a new magnesium alloy/aluminum engine block, lightweight camshafts, electric water pump, and Valvetronic (variable intake valve lift).
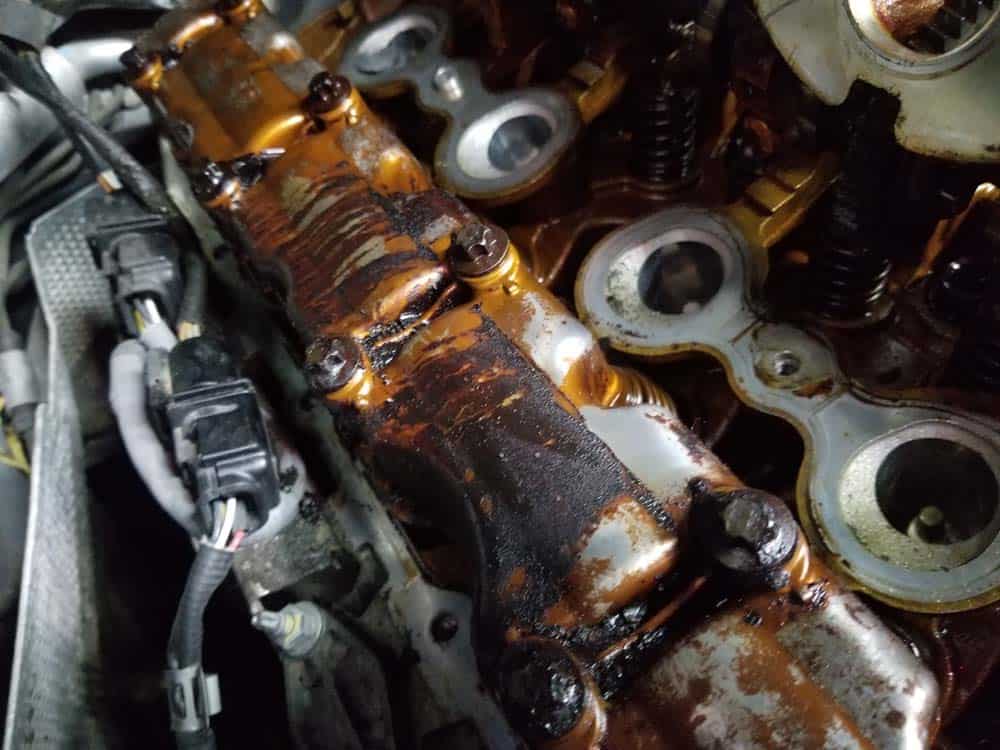
The N52 engine was assembled with two different valve covers, depending on the year and the model of the E60 5 series. As a general rule of thumb, all U.S. delivered 525i and 530i models (which switched to the N52 engine around October of 2004) were delivered with a lightweight magnesium valve cover with single use aluminum bolts anchoring it to the engine head and metal gaskets. The E60 528i was assembled with a plastic valve cover with steel bolts and rubber gaskets. Both valve covers have their unique issues and are prone to premature oil leakage. If you are repairing a non-U.S. E60, please verify which type of valve cover you have prior to ordering below.
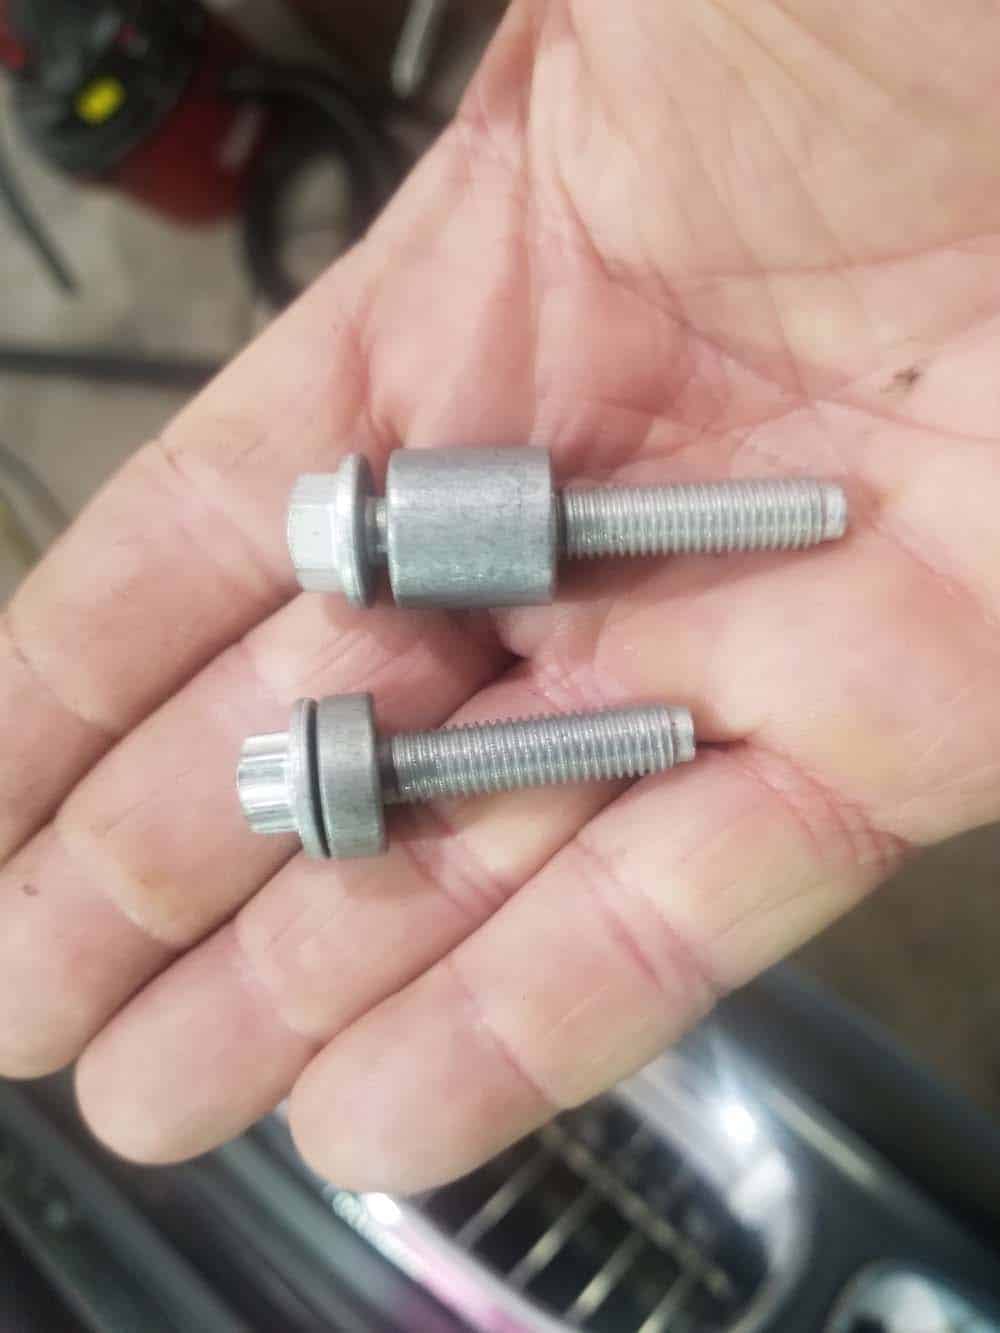
The main cause for magnesium valve cover leaks is due to broken aluminum mounting bolts that allow oil to seep between the metal gasket and onto the engine block. The magnesium covers are also notorious for breaking the three bolts sealing the spark plug tubes allowing hot engine oil to flow into the coils, causing rough idling and cylinder misfires. This is the reason the aluminum mounting bolts must always be replaced when conducting a BMW E60 valve cover DIY replacement.
Plastic valve covers were produced with steel mounting bolts that do not break and can be reused when performing a BMW E60 valve cover DIY replacement. The plastic covers were assembled with rubber gaskets that tend to crack with heat and age, once again allowing engine oil to bleed onto the hot engine surface and into the coils. They can also crack and should be checked thoroughly when replacing the gaskets.
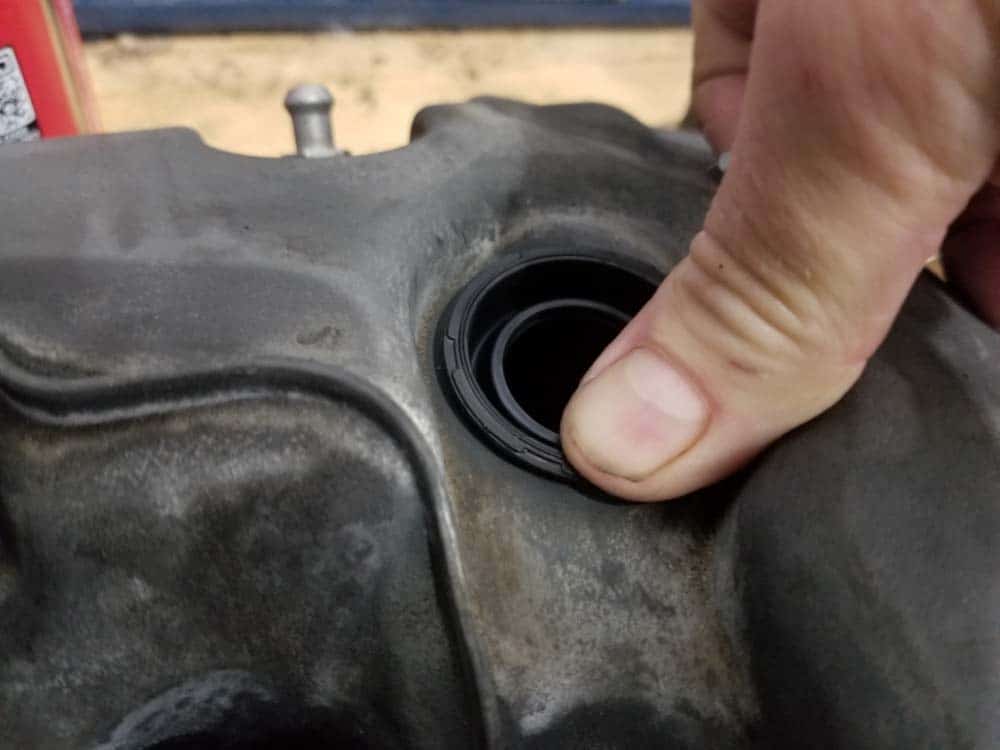
Another source of oil leaks in both magnesium and plastic valve covers is the rubber gasket sealing the eccentric valve sensor. The eccentric valve sensor is located on the front of the cover and is sealed with a small rubber gasket that is prone to becoming brittle and oozing engine oil. Even though this inexpensive gasket can be replaced without doing this repair, it is much easier with the valve cover off of the vehicle.


View the detailed parts diagram for this repair.
Includes detailed part diagrams, part numbers and links to purchase all of the required components needed to complete this repair.

Before starting this repair, you must have the following required parts.
All N52 engines with metal valve cover only
This valve cover gasket set is for those BMWs with the magnesium (metal) valve cover. If your vehicle has a plastic valve cover, you cannot use this gasket set (see part number 11127552281).
N52 6 cylinder engine magnesium valve cover only
If your vehicle has an N52 engine with a metal valve cover, then you must replace these aluminum bolts every time the cover is removed. Do not purchase if your valve cover is plastic.
All N52 engines with plastic valve cover only
This gasket is for plastic valve covers only on the N52 6 cylinder engine. For engines with a magnesium (metal) valve cover, please see part # 11127581215. This is the same factory valve cover gasket that would be installed at the dealership.
BMW N52 magnesium valve cover only
This is the same factory eccentric valve sensor gasket that would be installed at the BMW dealership. N52 magnesium valve covers only.
BMW N52 plastic valve cover only
This is the same factory eccentric valve sensor gasket that would be installed at the BMW dealership. N52 plastic valve covers only.
Section 1 - Preparing Engine for a BMW E60 Valve Cover Gasket Replacement
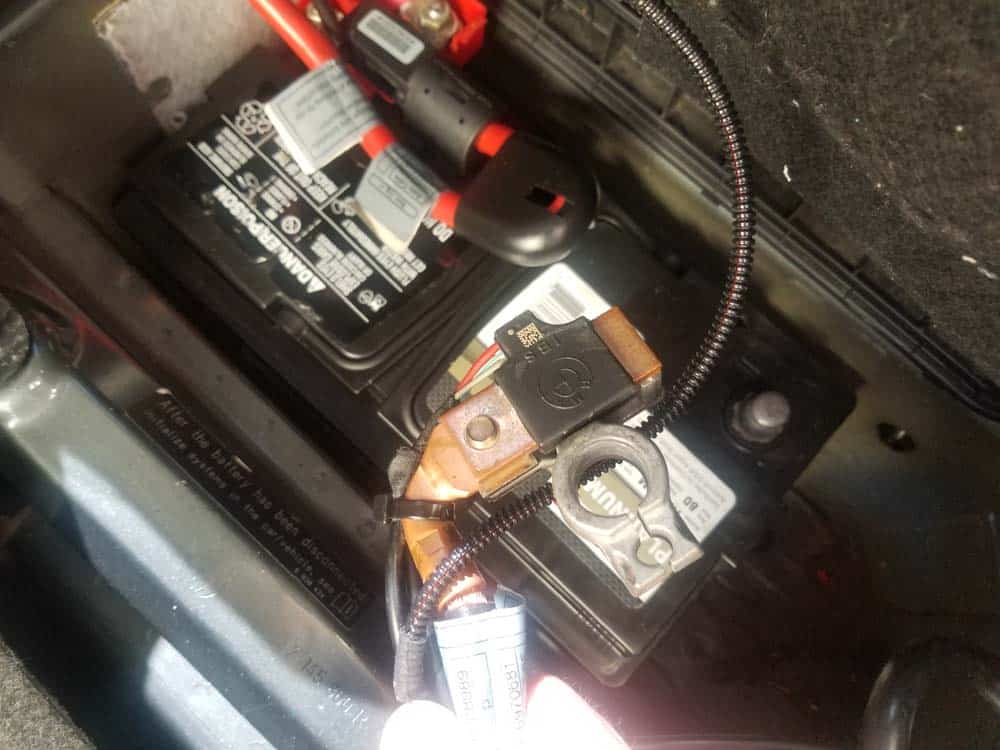
- Before starting a BMW E60 valve cover gasket replacement, remove the negative terminal from the battery. Never attempt any work on your engine that requires disconnecting electrical connections without removing the negative terminal to the battery first...you can cause catastrophic damage to sensitive electronic parts.
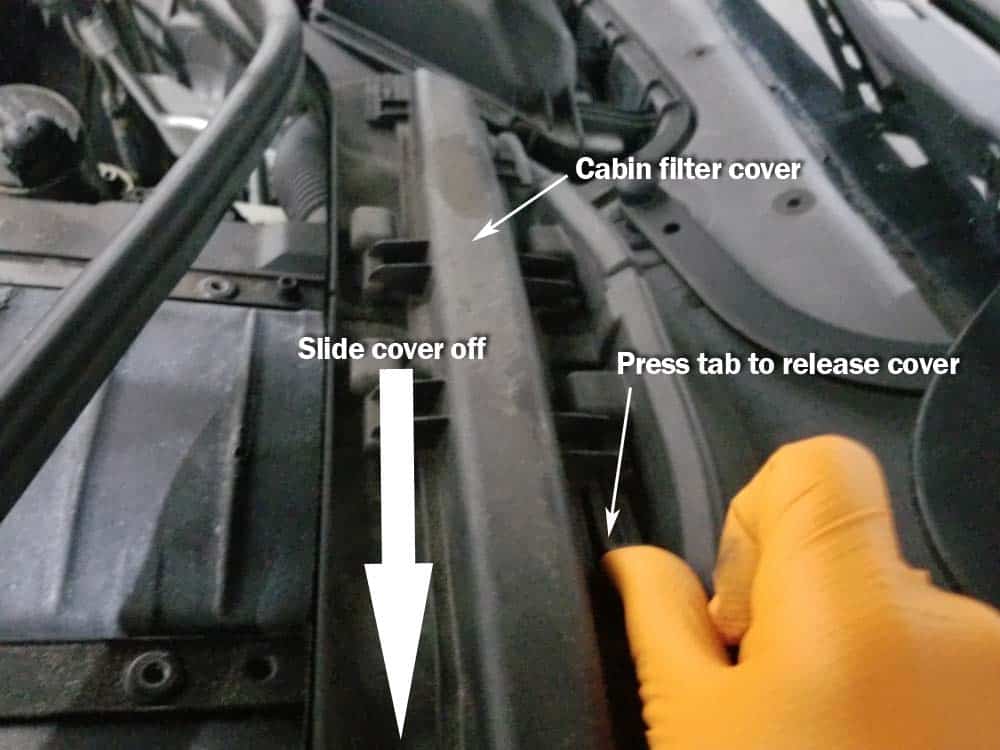
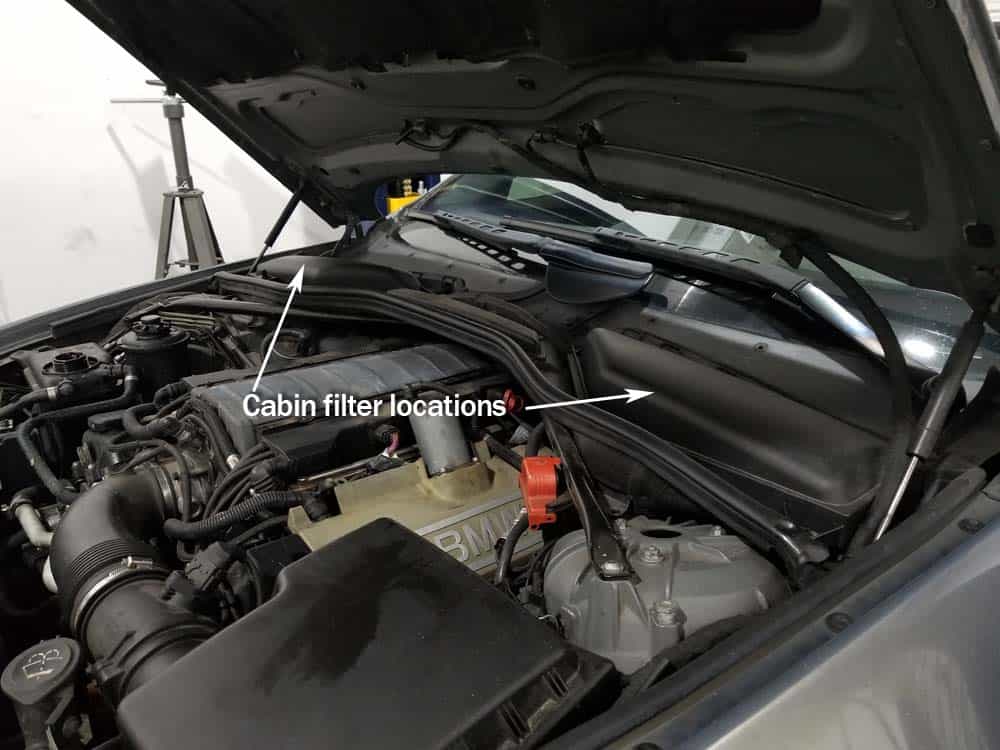
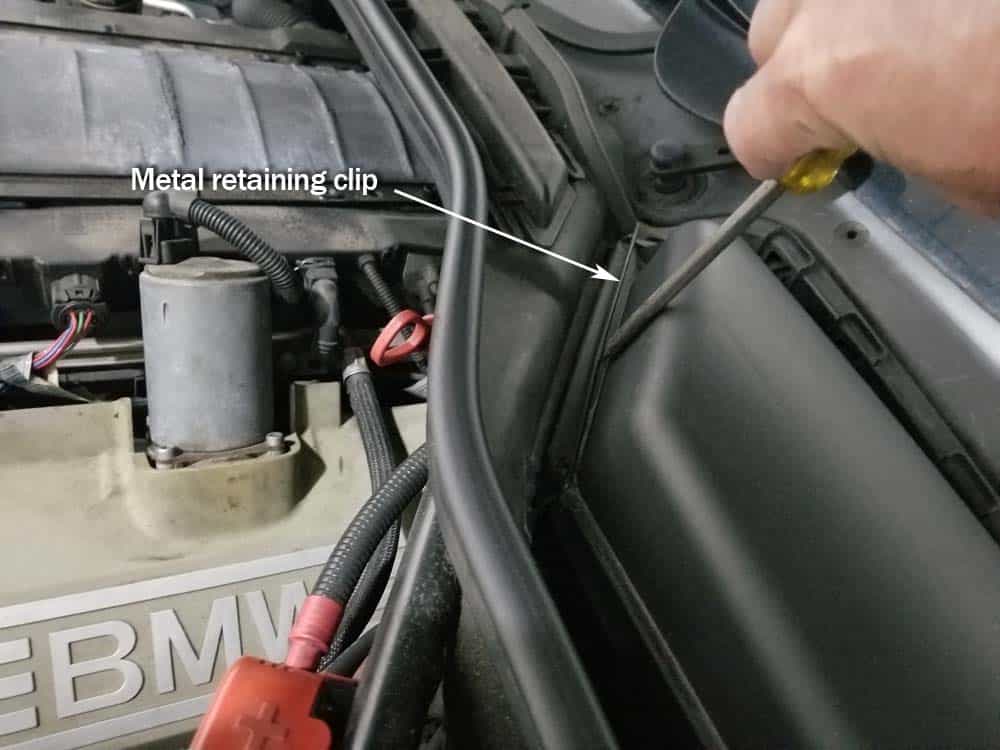
- Start the repair by removing the cabin filter assembly in the back of the engine compartment. Please note the following images are from a repair article on a BMW E64 645ci. It is exactly the same the same procedure on the BMW E60.
- Start by removing the cabin filter cover by pressing the side tab and sliding the cover off.
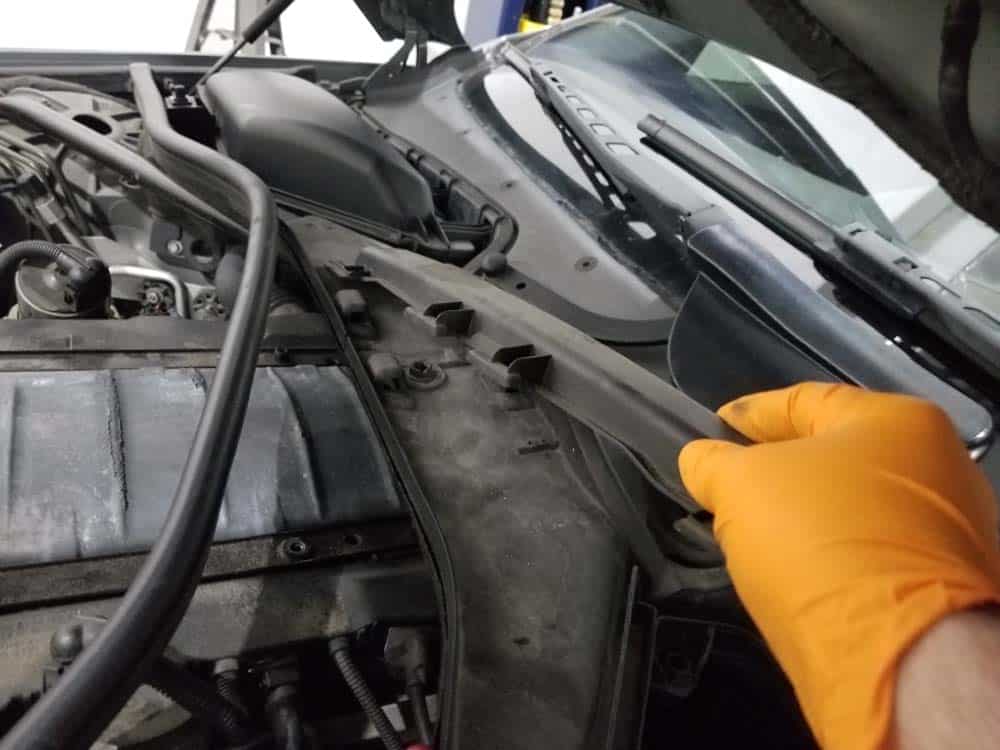
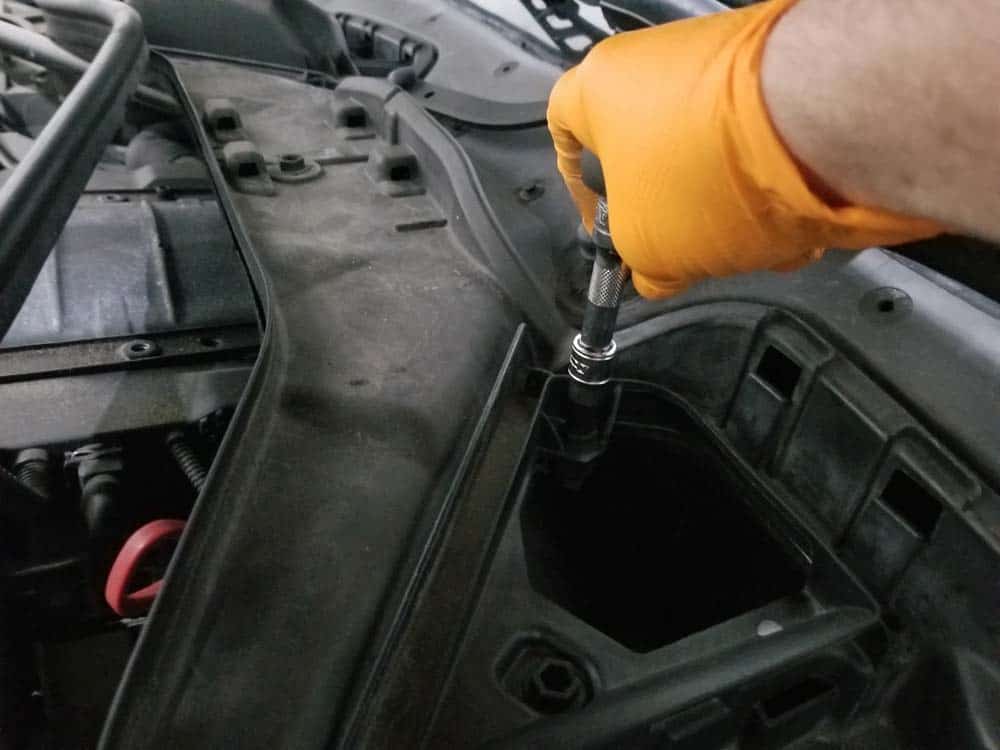
- Use a flat blade screwdriver and an 8mm hex socket to remove the cabin filter containers.
- Next, remove the right air inlet with an 8mm hex socket and a T20 torx bit.
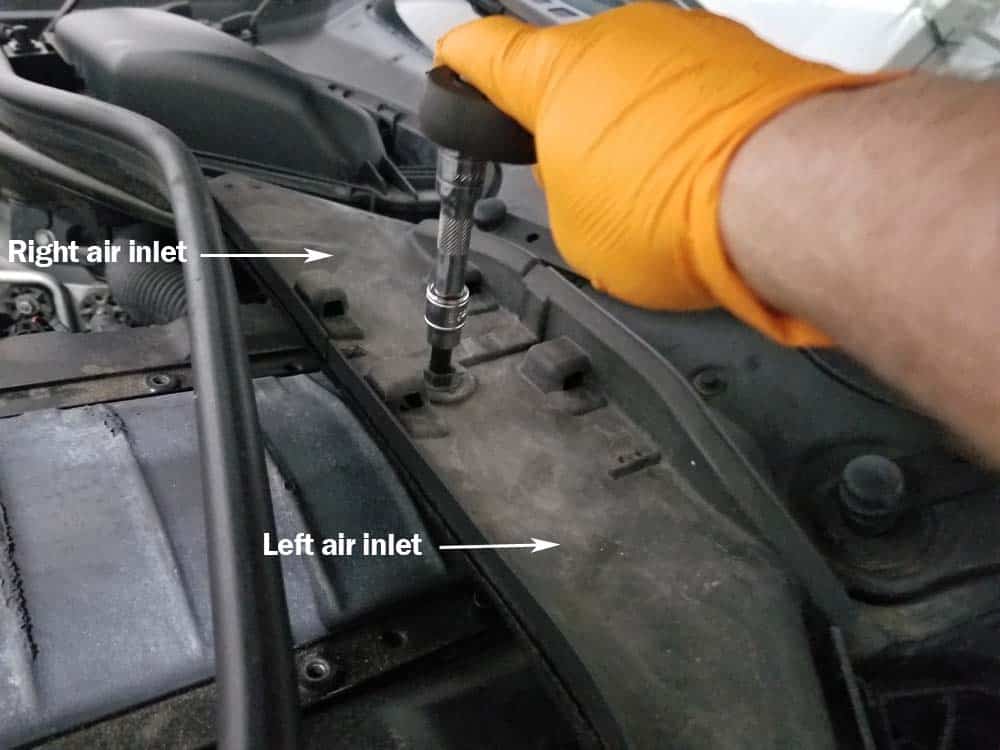
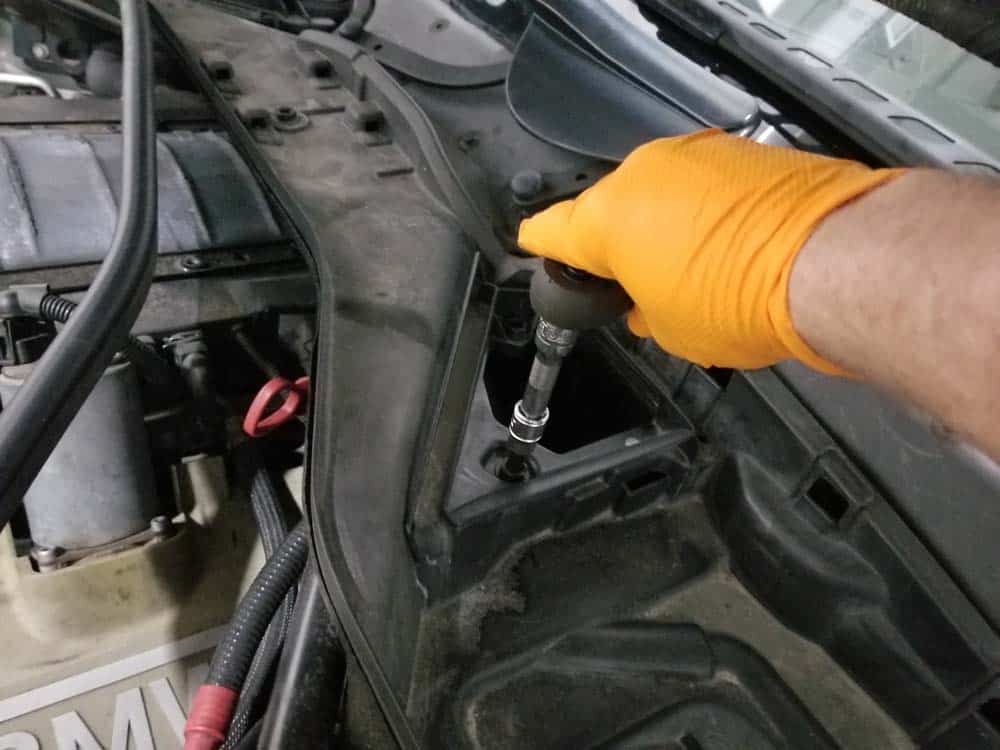

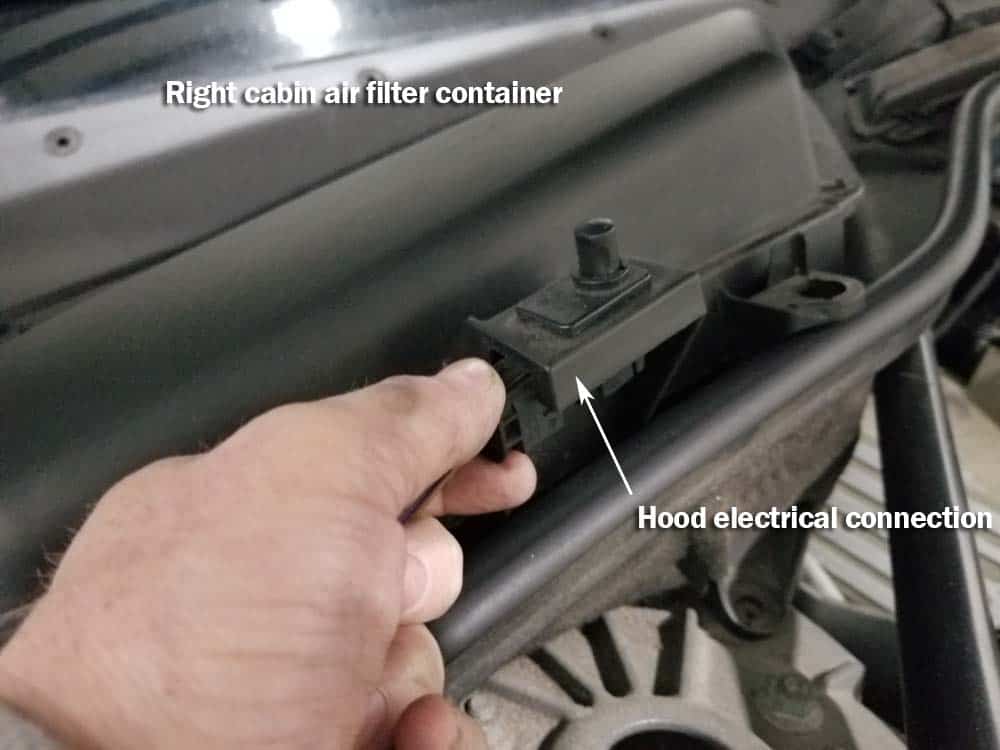
- Repeat above steps with right cabin filter container and air inlet. Note the hood electrical connector and AUC sensor will need to be removed from the right cabin filter container.
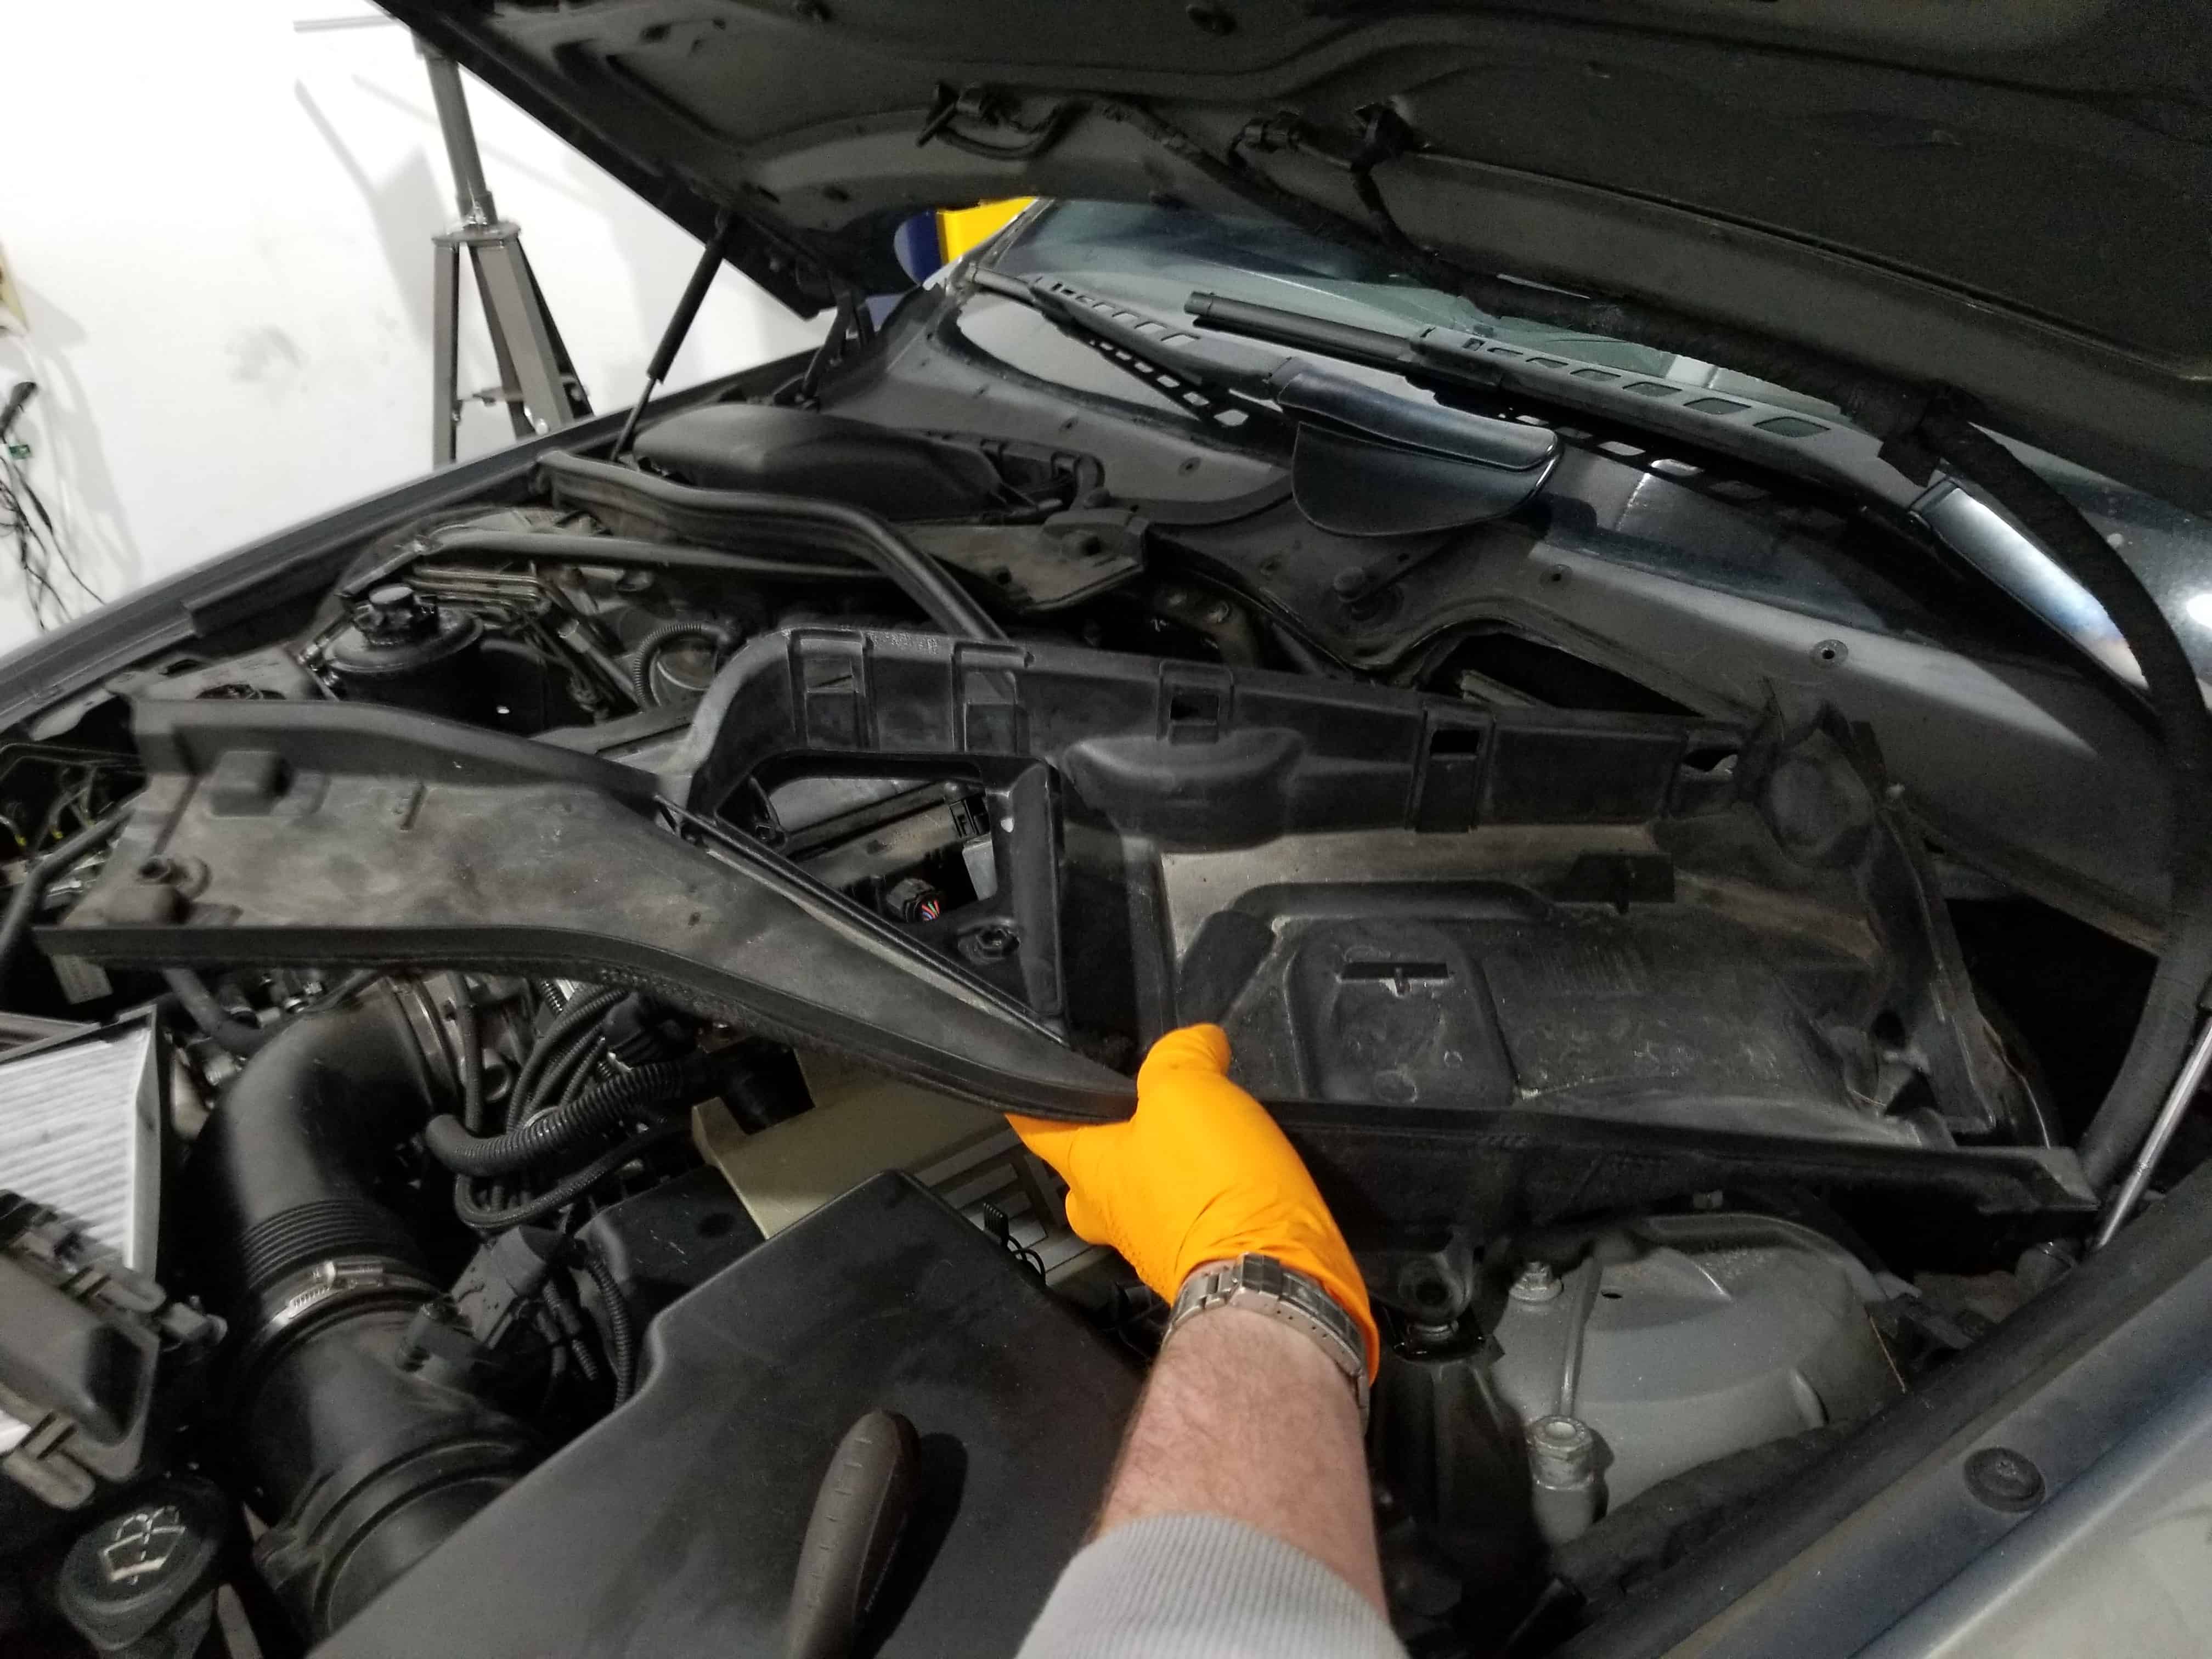
- Use a T45 torx bit (no ratchet is needed) to remove the screws anchoring the engine cover. Remove the engine cover from vehicle.

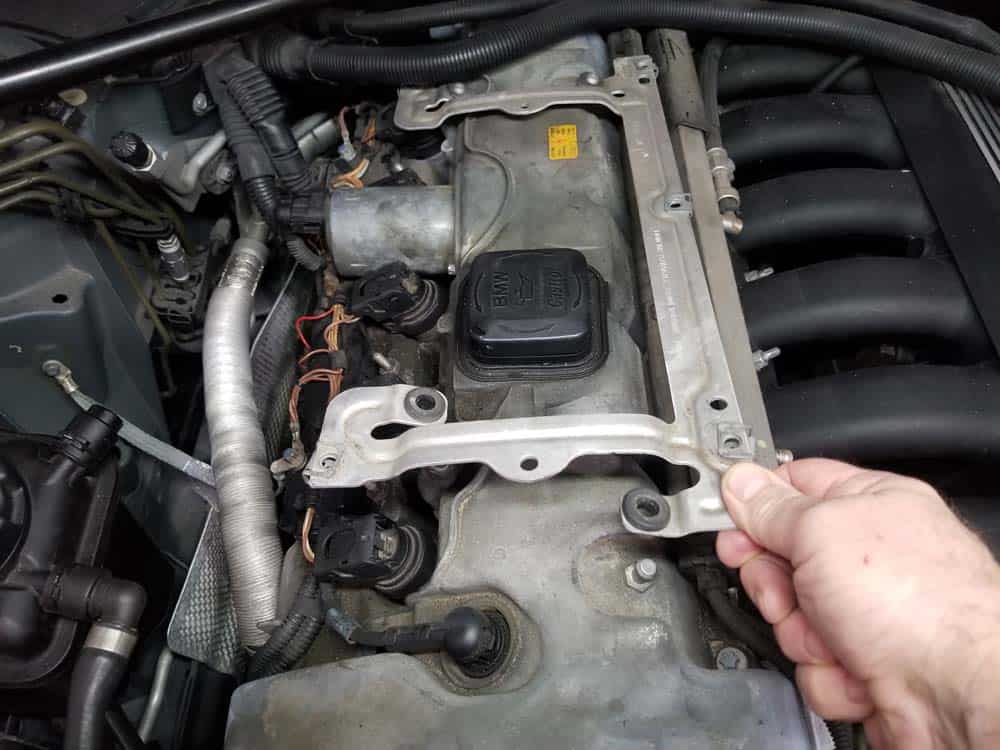
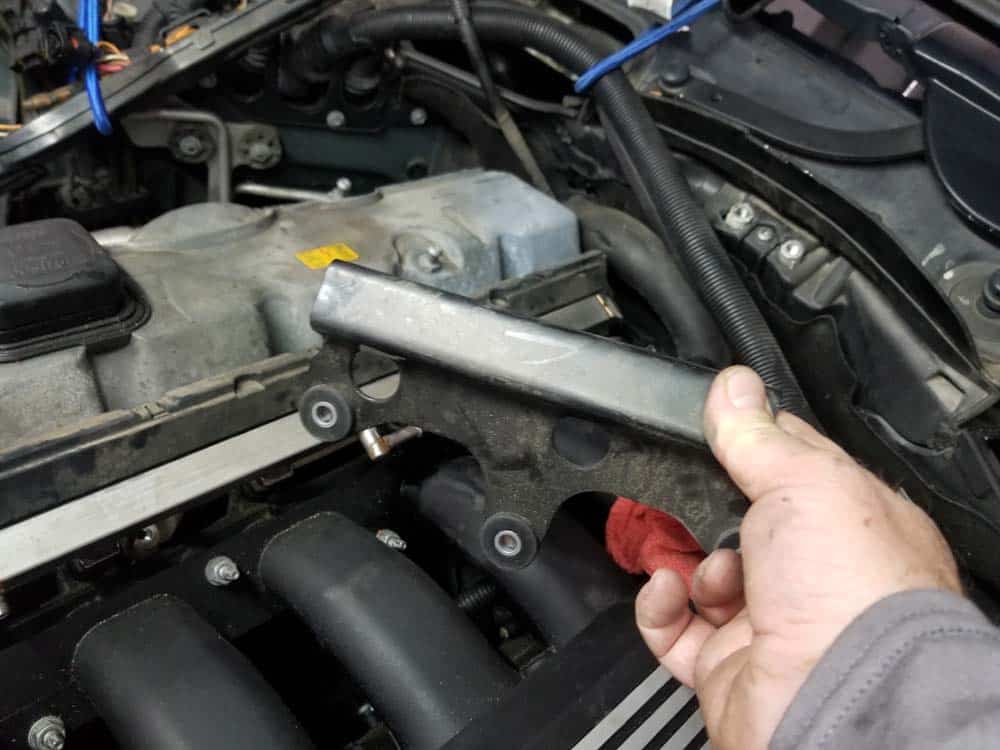
- Grasp the engine cover bracket and pull it loose from the valve cover. Remove from vehicle.
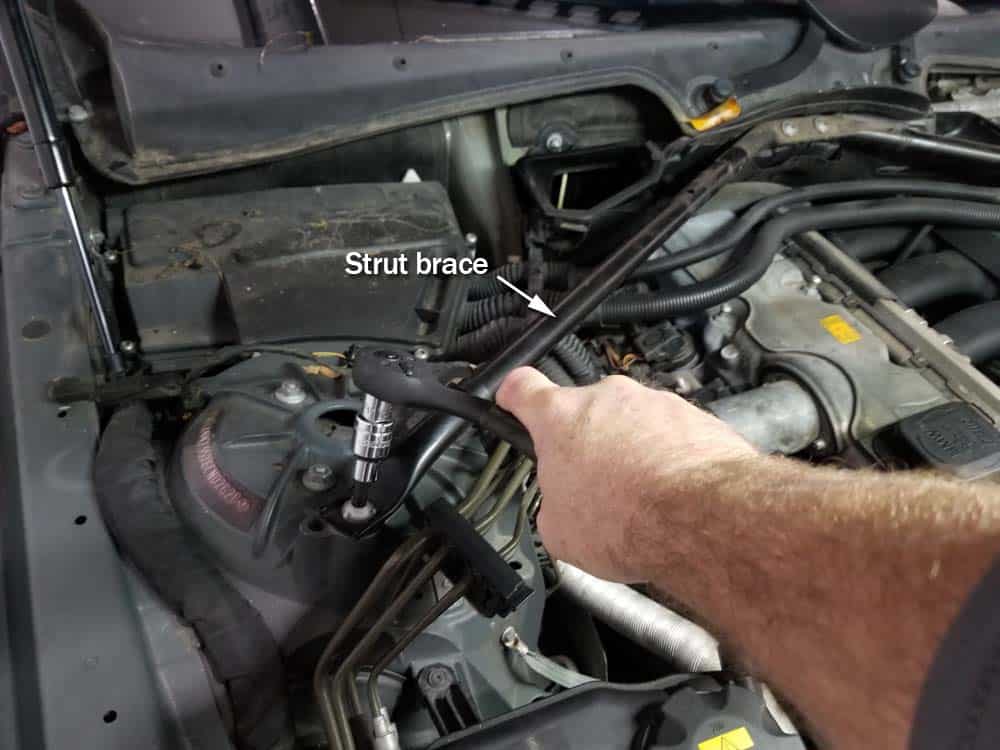
- Take out the steel strut brace by removing the four T45 torx bolts anchoring it to the frame of the vehicle. The strut brace must be removed to access to the rear valve cover bolts.
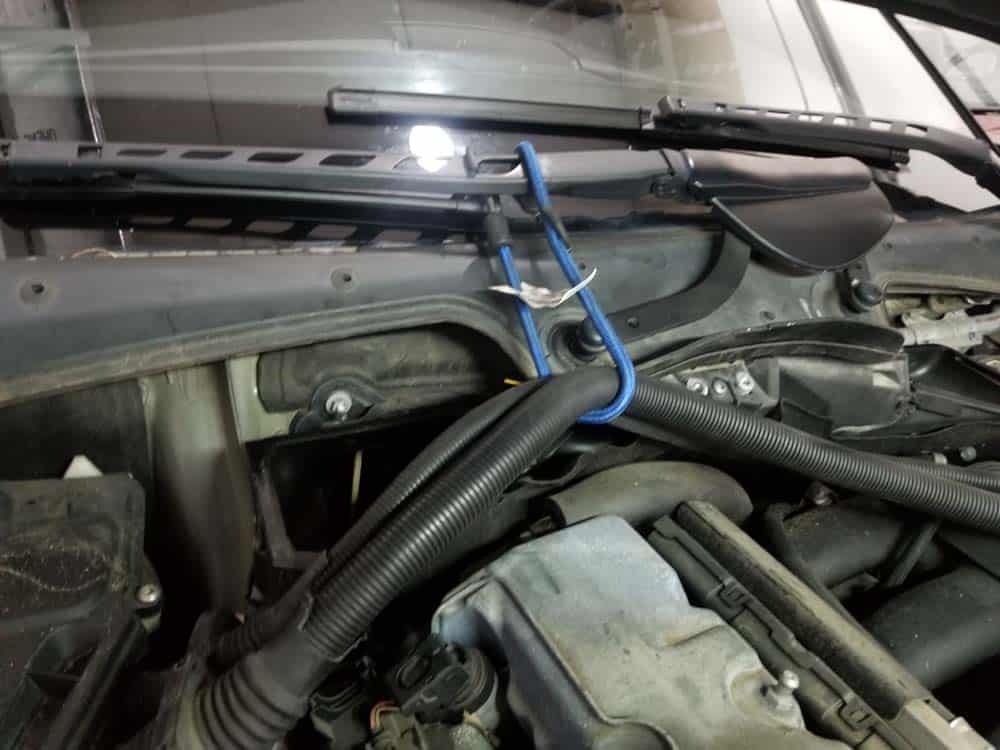
- Pull the two rear wiring harnesses loose and tuck away. A bungee cord comes in very handy for this.
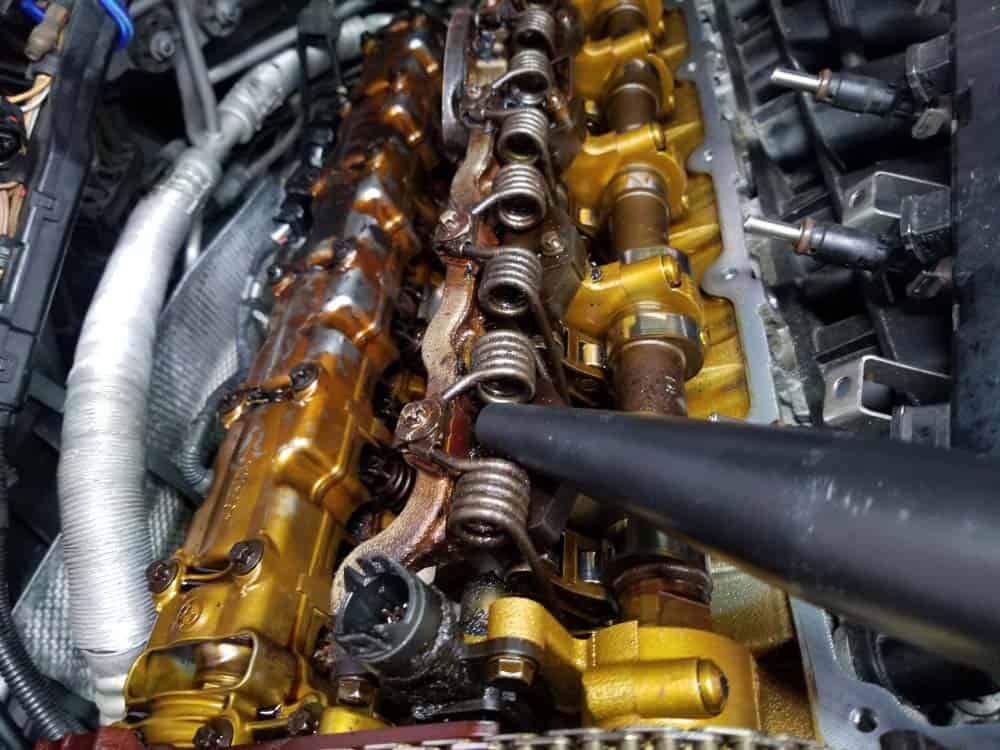
- Remove the six coil packs from the engine by unsnapping the plastic clips, removing the electrical connector and then pulling the coil out of the spark plug tube with the aid of a socket extension. Notice the oil on the end of coil number one in our BMW 530xi...this is from a leaking valve cover gasket and is what was causing our engine misfire!
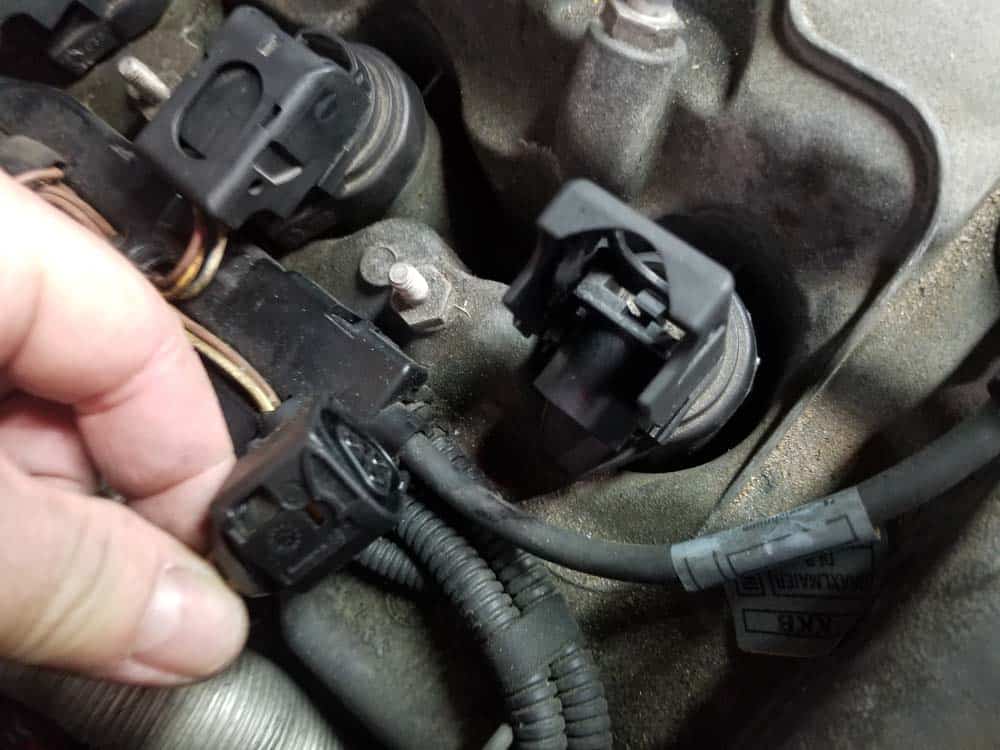
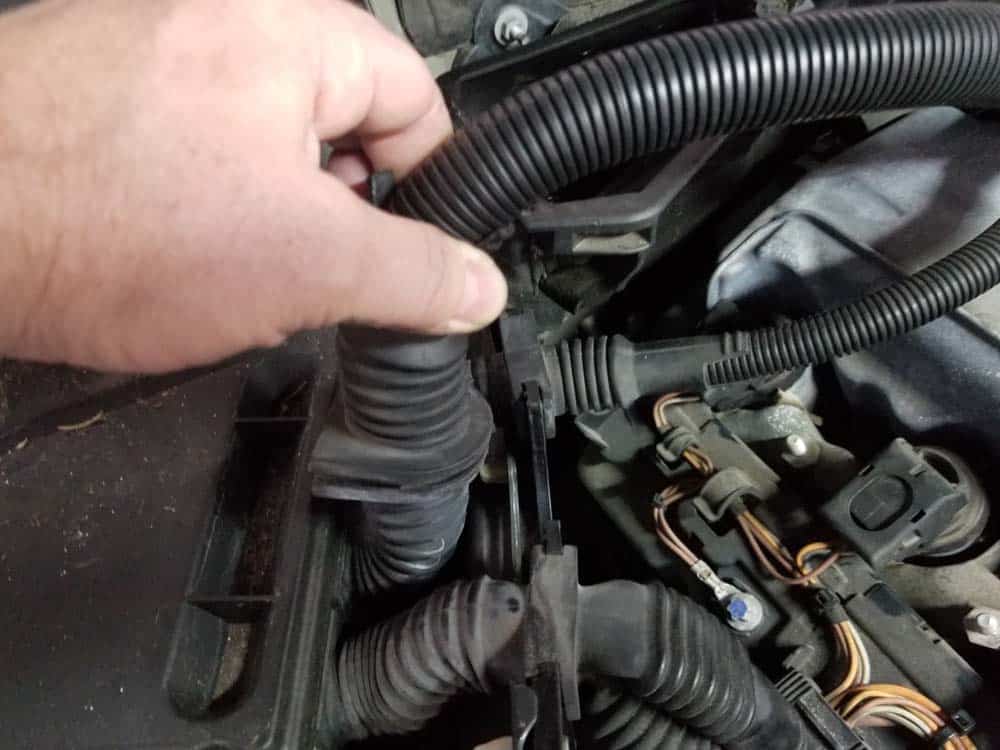
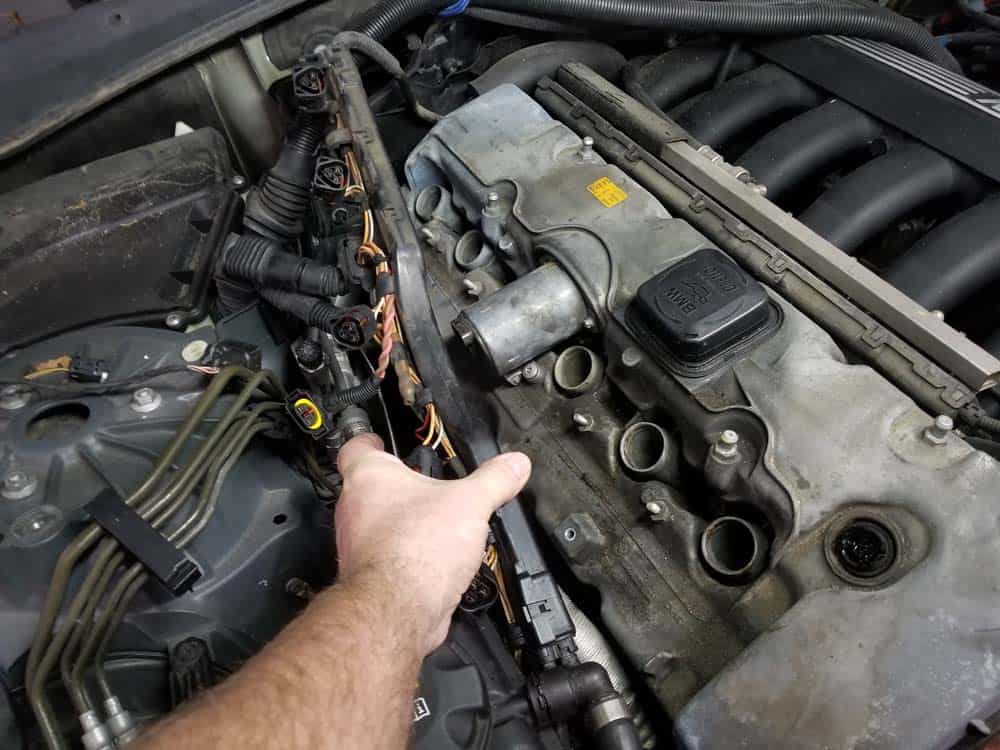
- Pull the wiring connector loose from the Valvetronic motor on right side of valve cover.

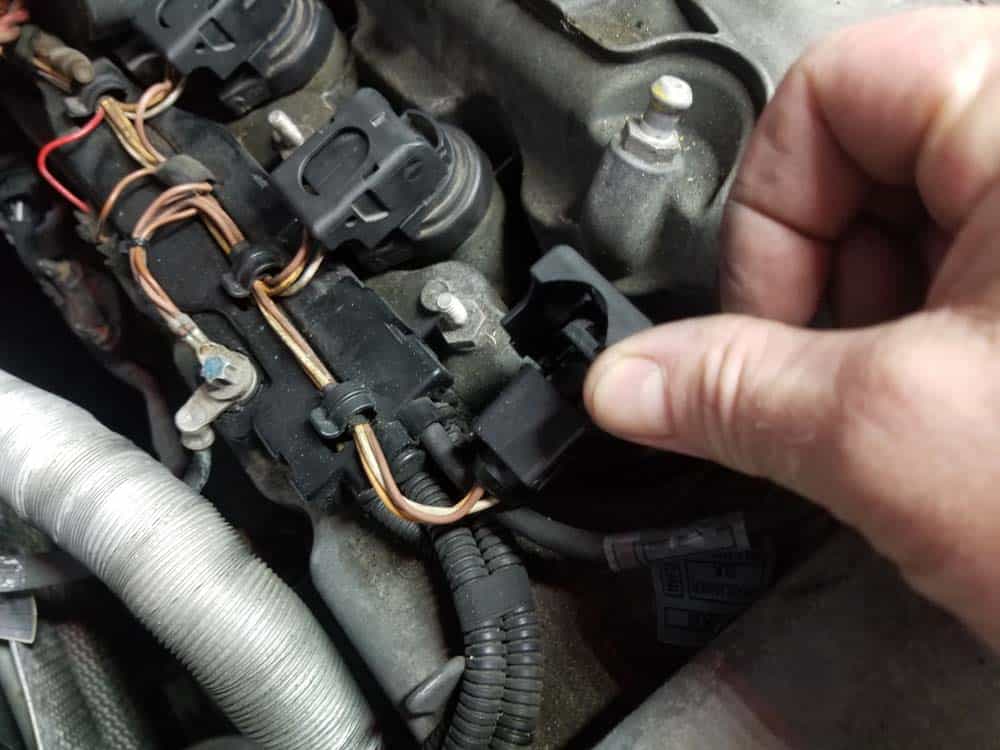
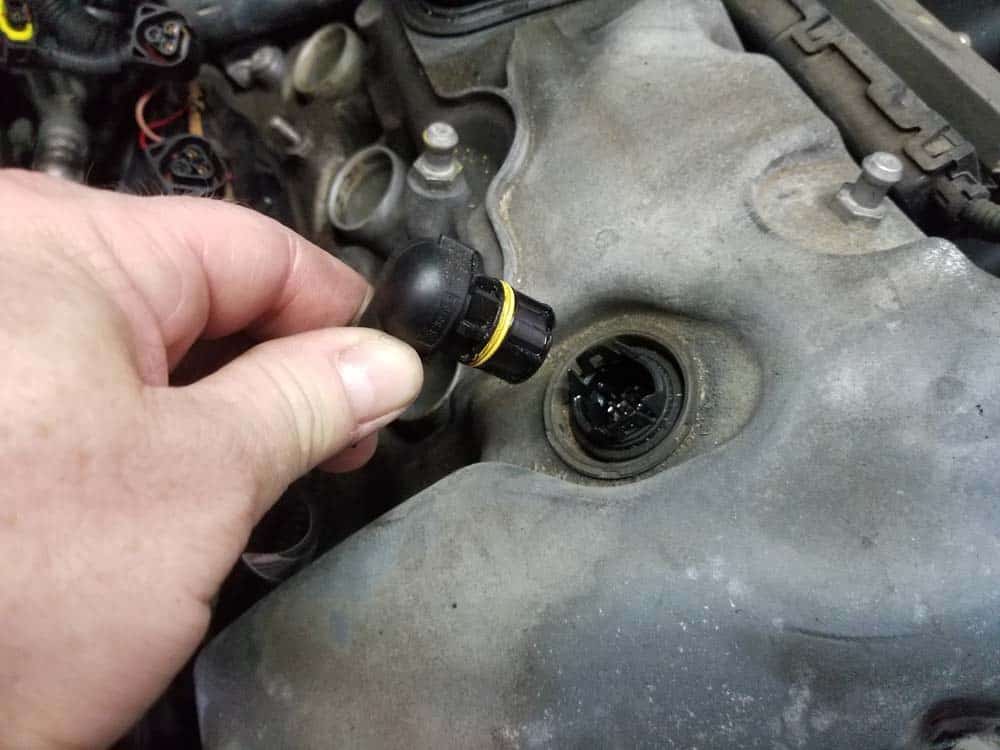
- Remove the electrical connection from the eccentric valve sensor mounted to the right side of the valve cover.
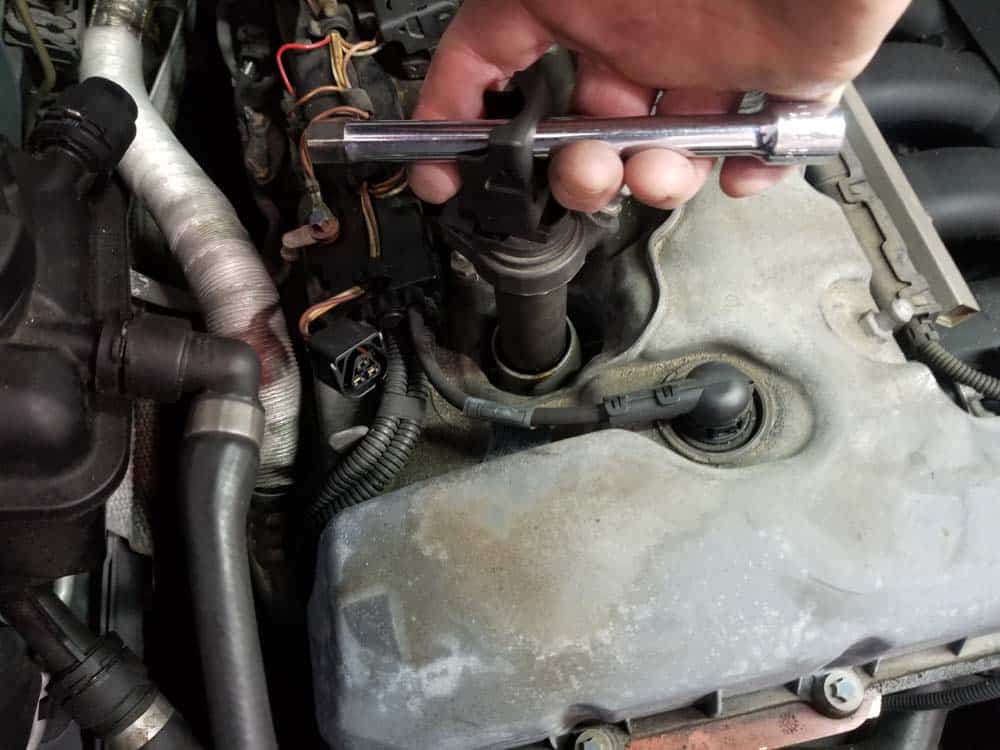
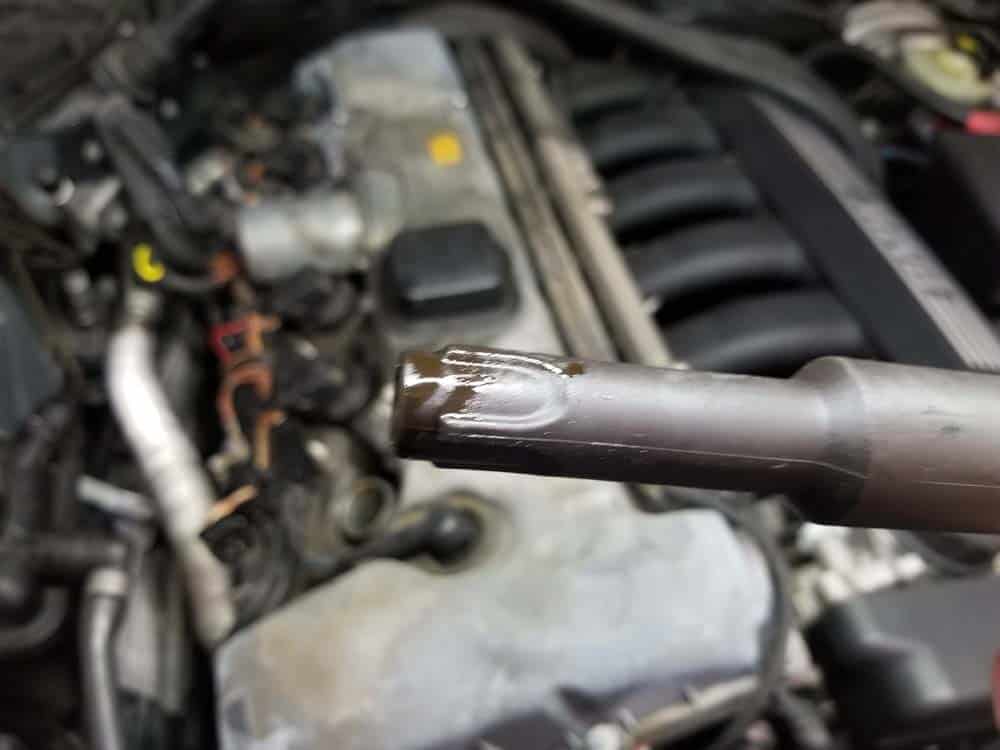
- Use an E10 torx socket to remove the two bolts attaching the engine grounding straps to the valve cover. These bolts also anchor the cable harness to the valve cover. Grasp the cable harness and gently move to the side. Use a bungee cord to secure it out of the way.
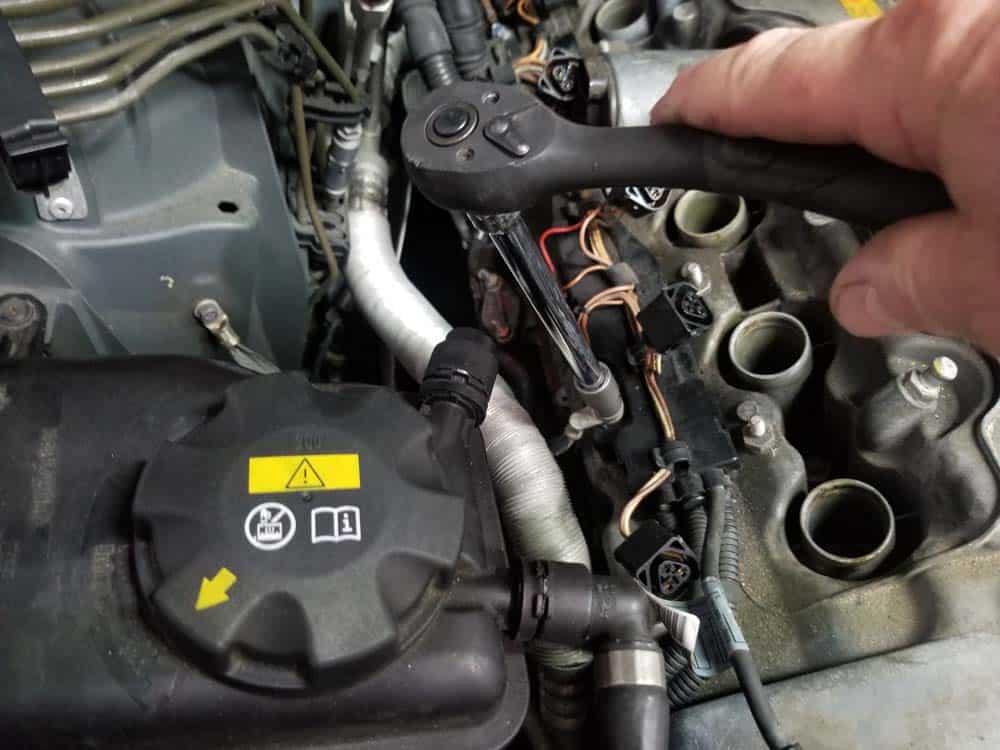
- Remove the crankcase breather hose from the back of the valve cover by squeezing the plastic ring and pulling it loose. This hose becomes very brittle from engine heat and is prone to breaking during disassembly.
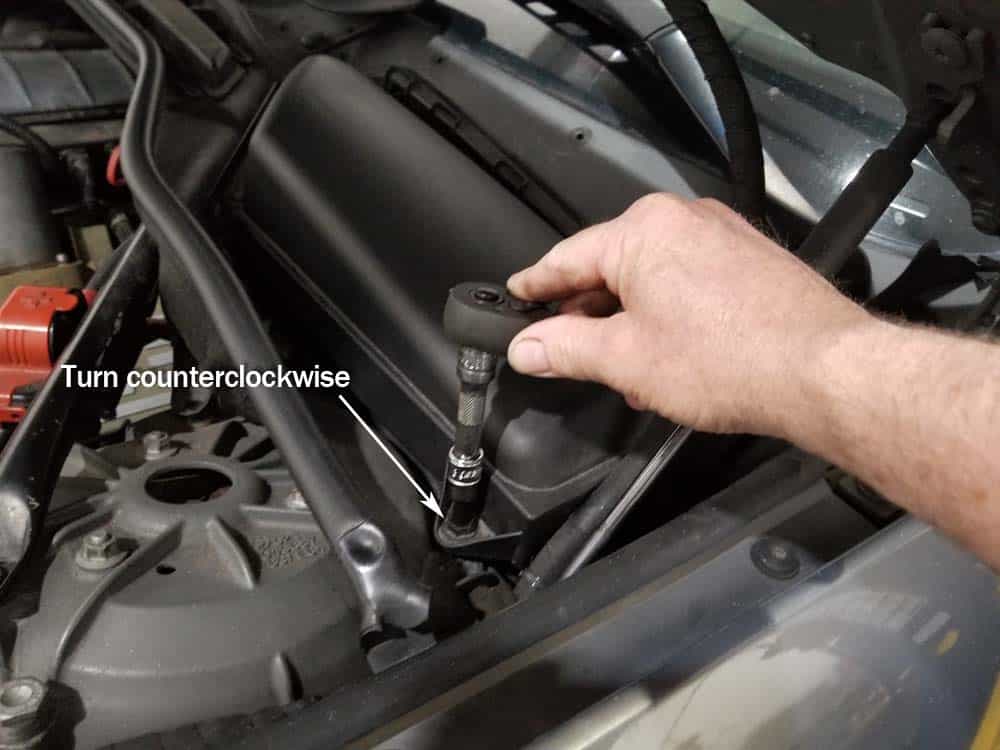
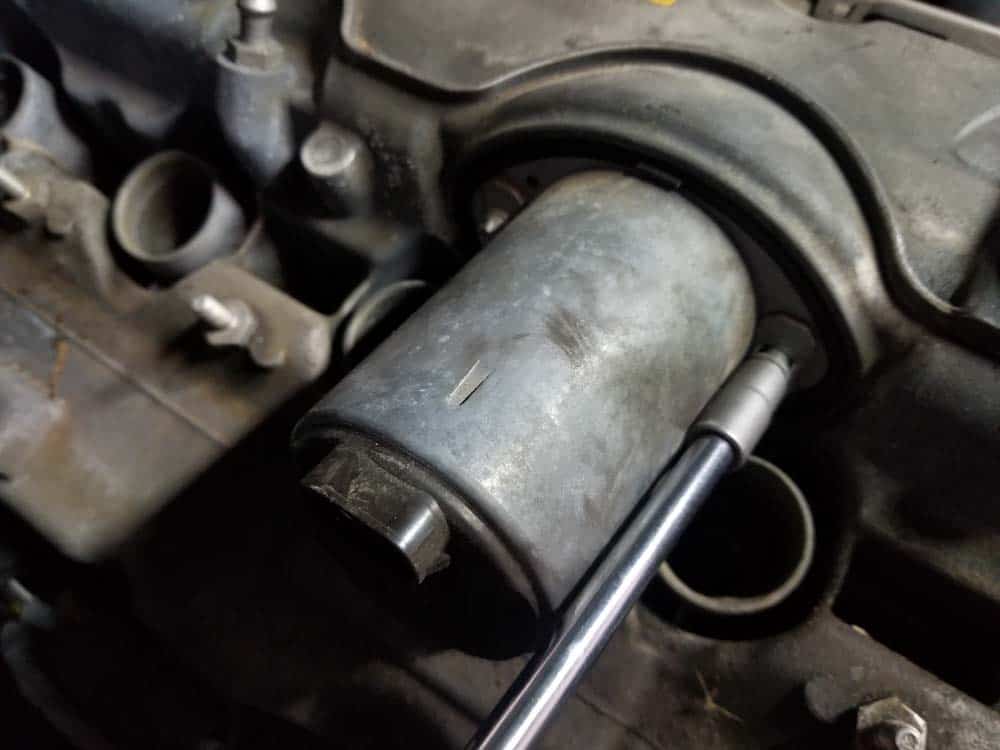
Section 2 - Removing the Valvetronic Motor
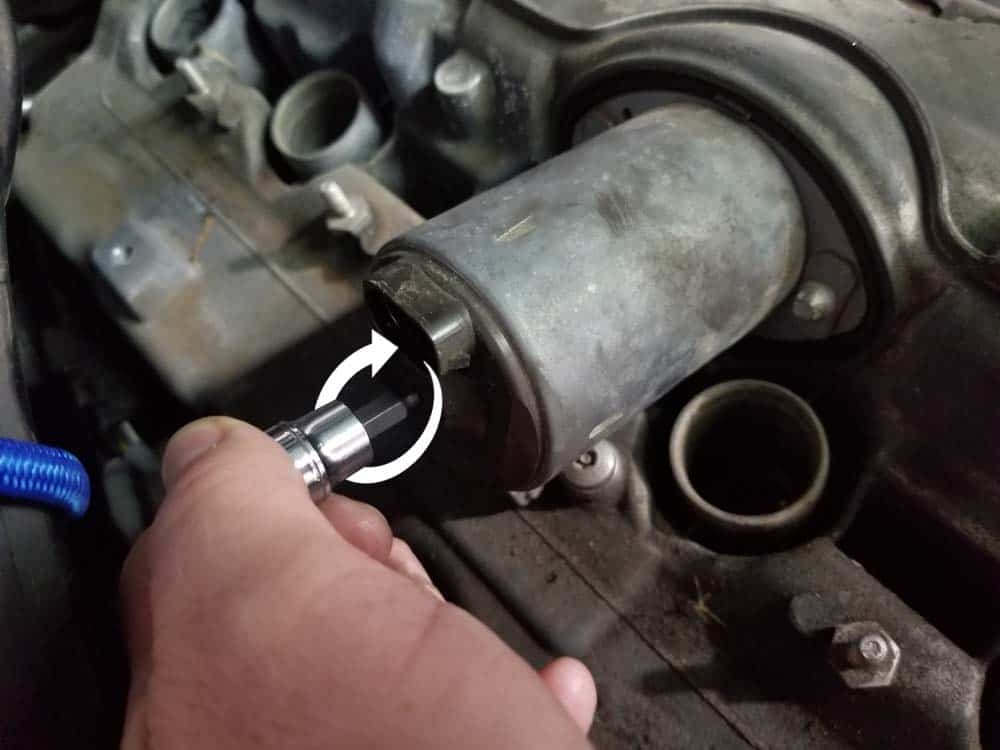
The Valvetronic motor is located on the right side of the E60 valve cover and controls the variable intake valve lift in the engine.- Using a 4mm hex socket, slowly turn the Valvetronic motor in a clockwise direction until it meets resistance. It may take up 10 to 20 turns to achieve this. DO NOT force the motor past the point of meeting resistance.
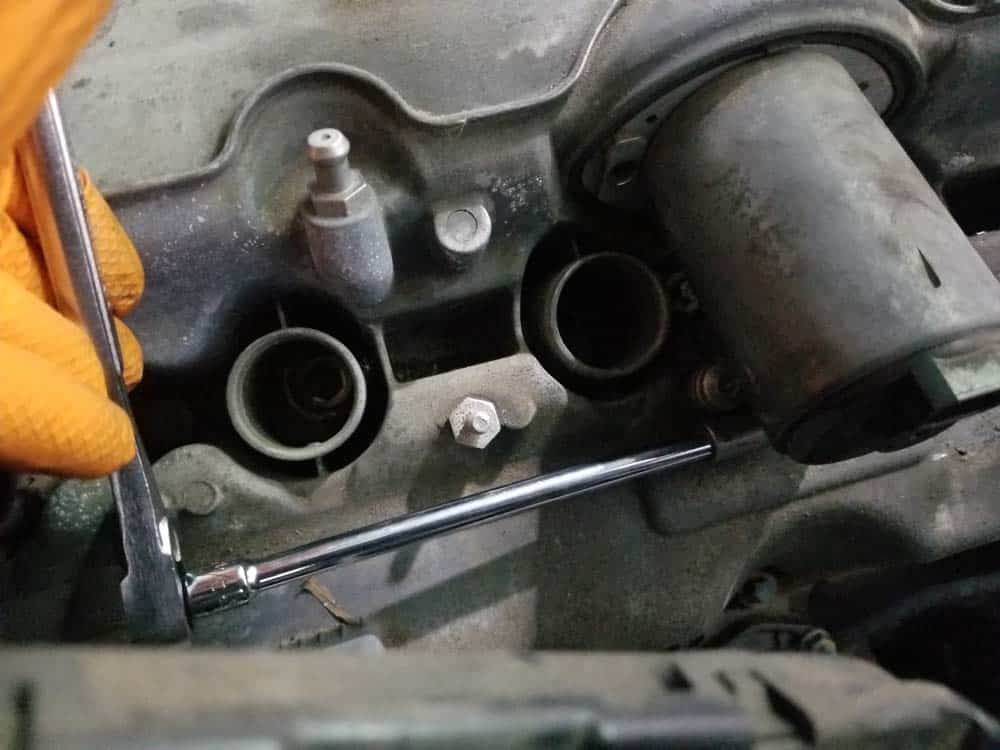
- Remove the three Valvetronic mounting bolts using an E7 torx socket. The side bolts are easy to get to...the bottom bracket bolt is a little tricky. Use a socket extension to get to it from the rear of the motor. (see images below).
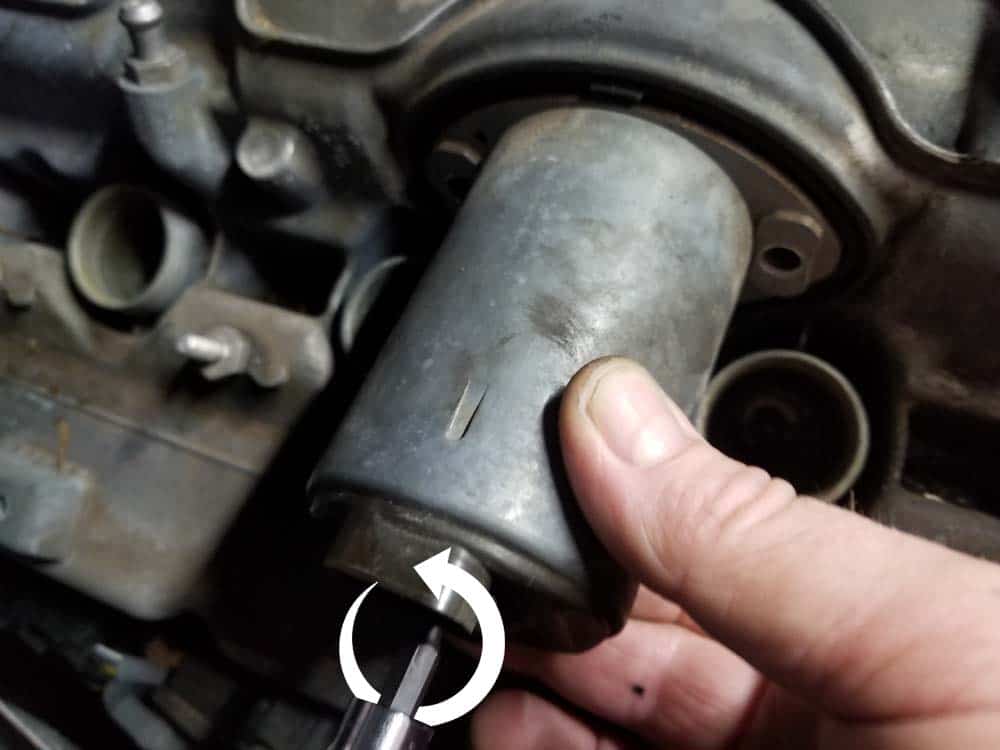
- Grasp the Valvetronic unit and slowly screw the motor in a counter-clockwise direction while gently pulling. Remove the Valvetronic motor from the valve cover. Don't forget to remove the backing plate which is probably still attached to the cover.
Section 3 - Removing the Fuel Rail
The fuel rail must be removed from the left side of the valve cover in order to access the mounting bolts. Don't be intimidated by this...it is an extremely easy procedure on the N52 engine and does not require any special tools.- Remove the cap from the schrader valve on the fuel rail. The schrader valve is like the air valve on the wheels of your car.
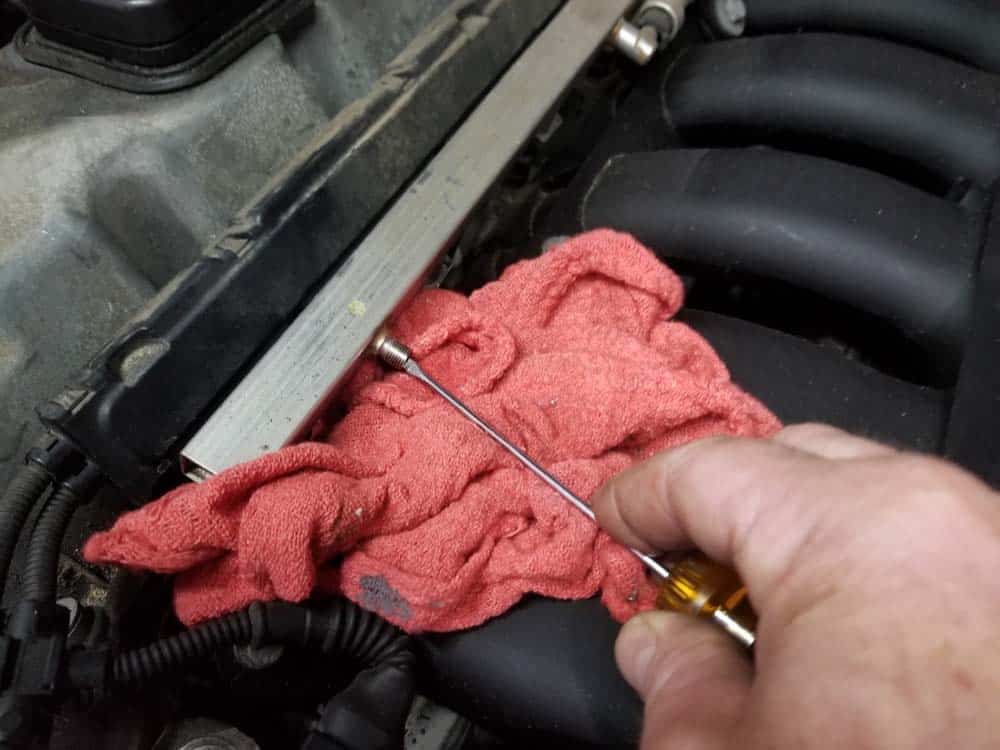
- Lay some shop rags under the schrader valve. Using a small flat blade screwdriver, release the pressure in the fuel rail. There will be a small amount of fuel released into the rag when you do this.
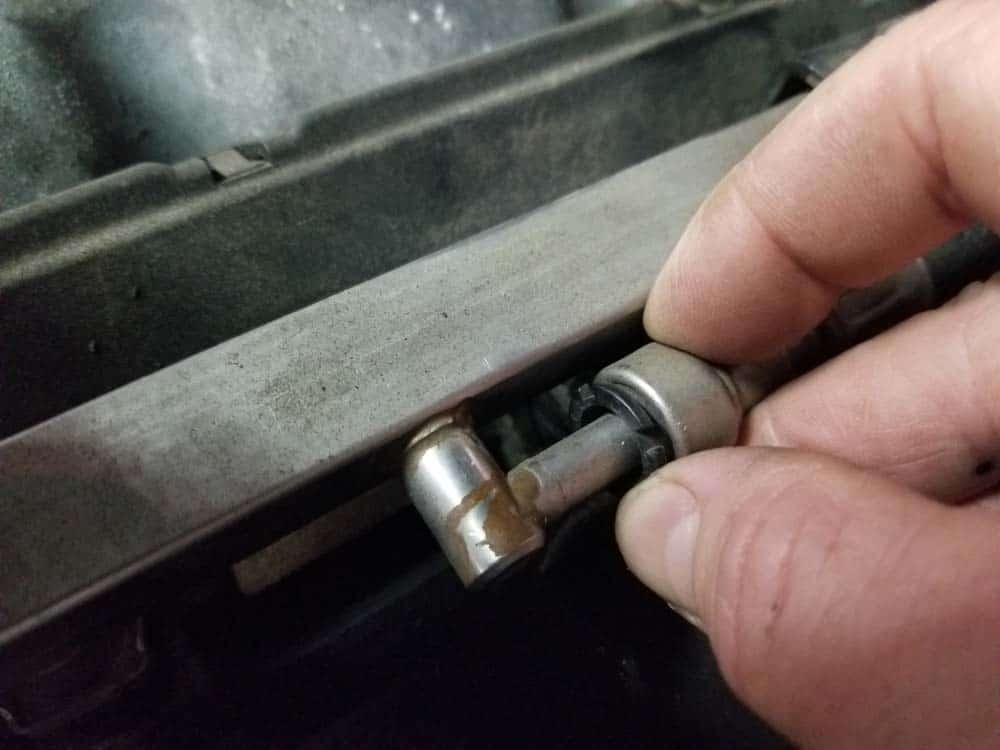
- Remove the fuel line by squeezing the quick disconnect and pulling it free from the fuel rail. Sometimes it's easier to use two hands when doing this. Have some rags ready...a small amount of fuel will be discharged.
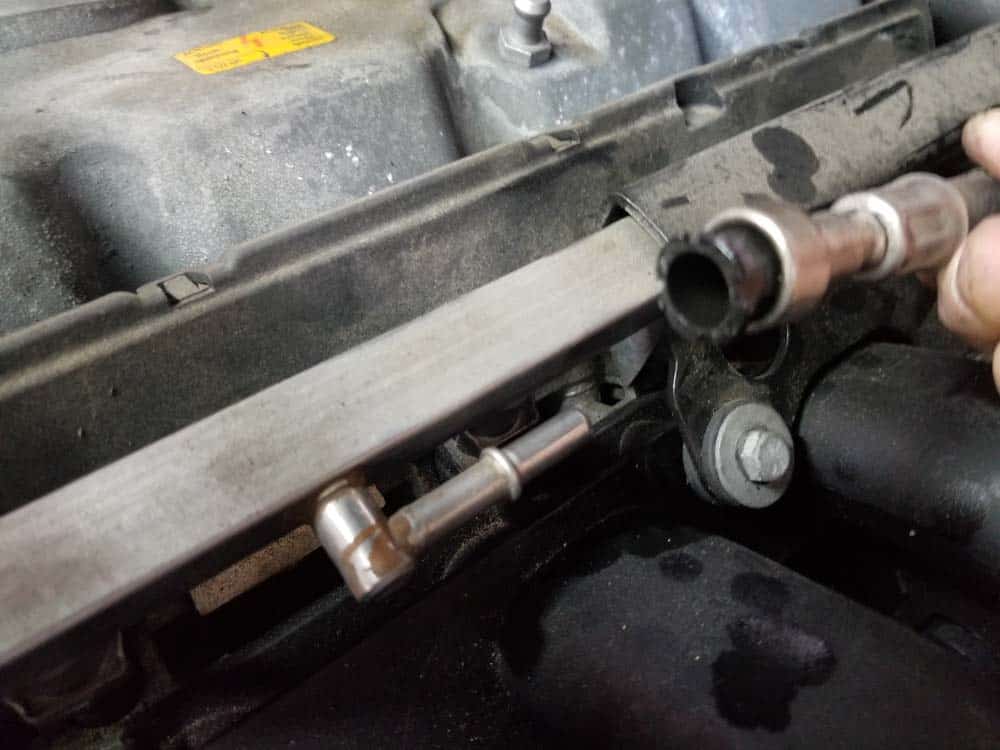
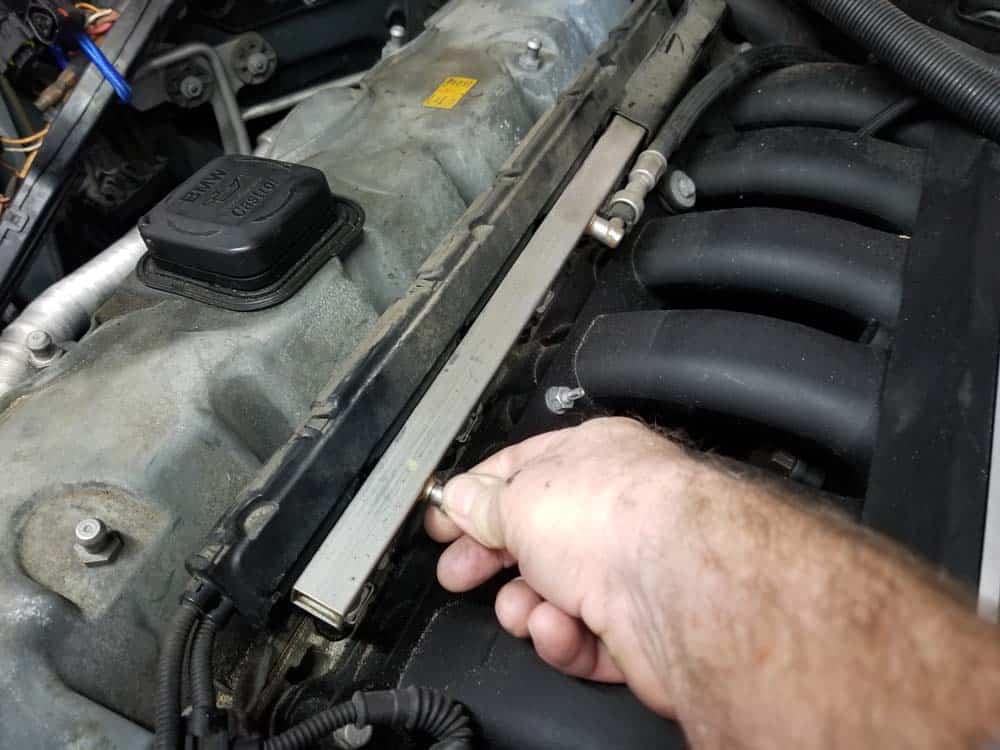
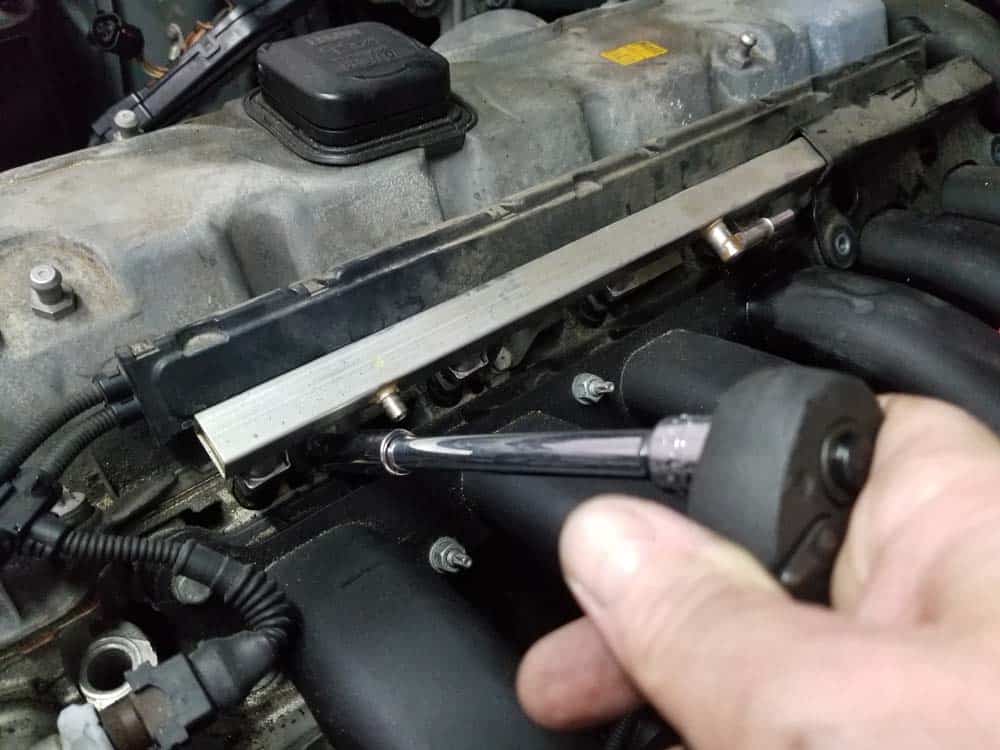
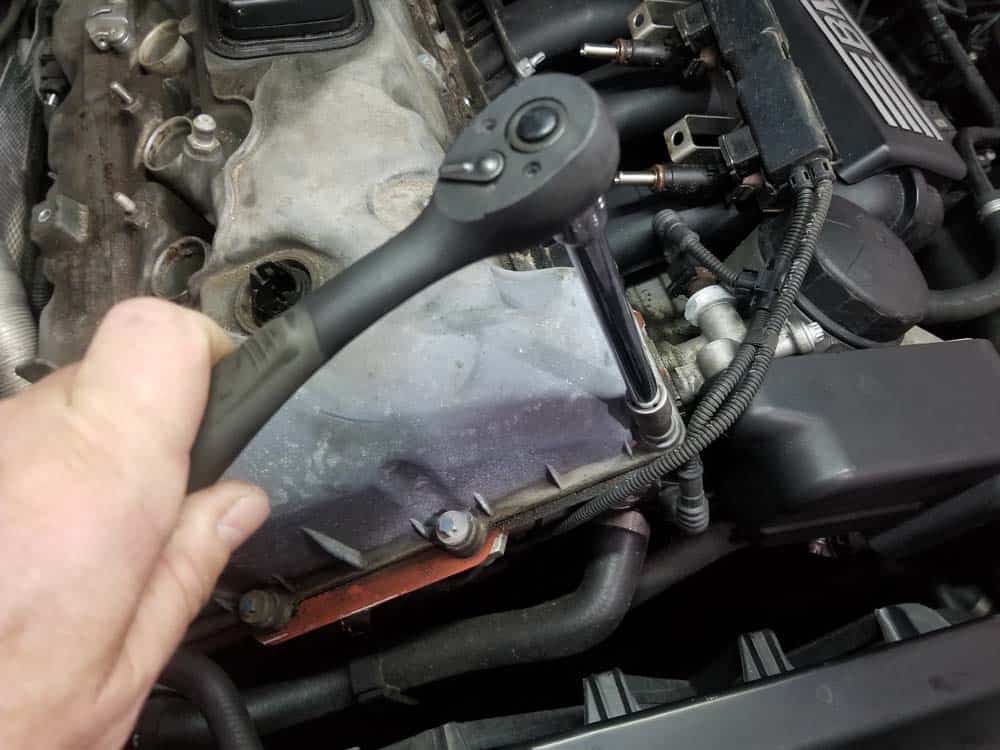
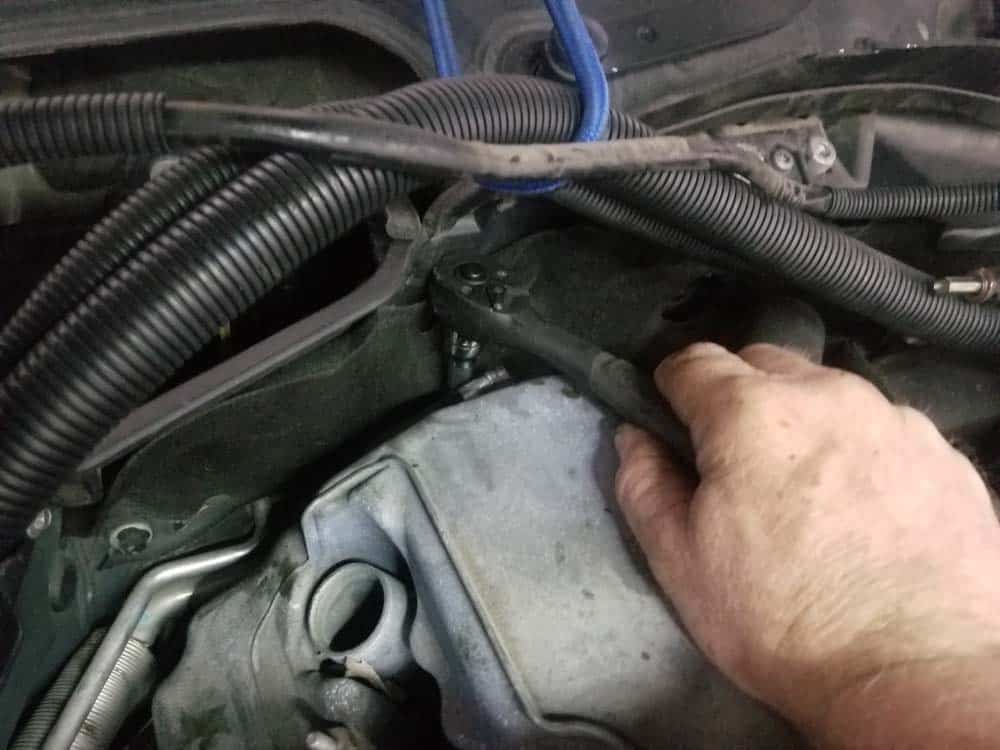
- Using an 11mm socket wrench, remove the three fuel rail mounting bracket bolts at the rear of the engine. Remove the fuel rail bracket.
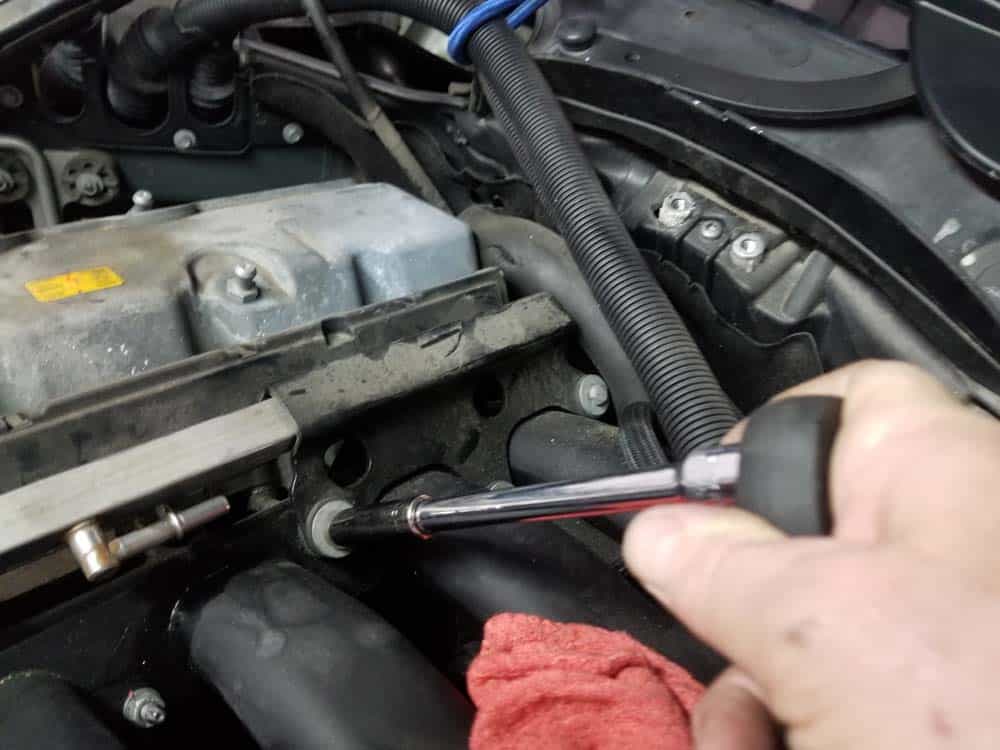
- Use a 10mm socket wrench to remove the four bolts anchoring the fuel rail to the engine.
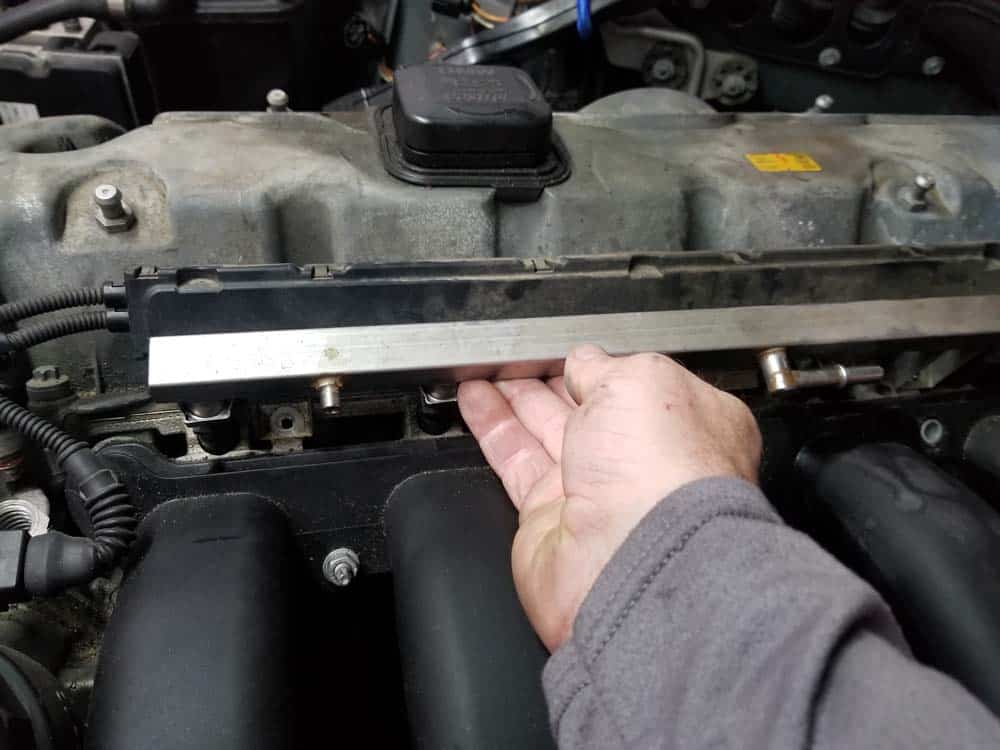
- Grasp the fuel rail and GENTLY pull until all six fuel injectors release from the engine block. Carefully lay the fuel rail and injectors to the side.
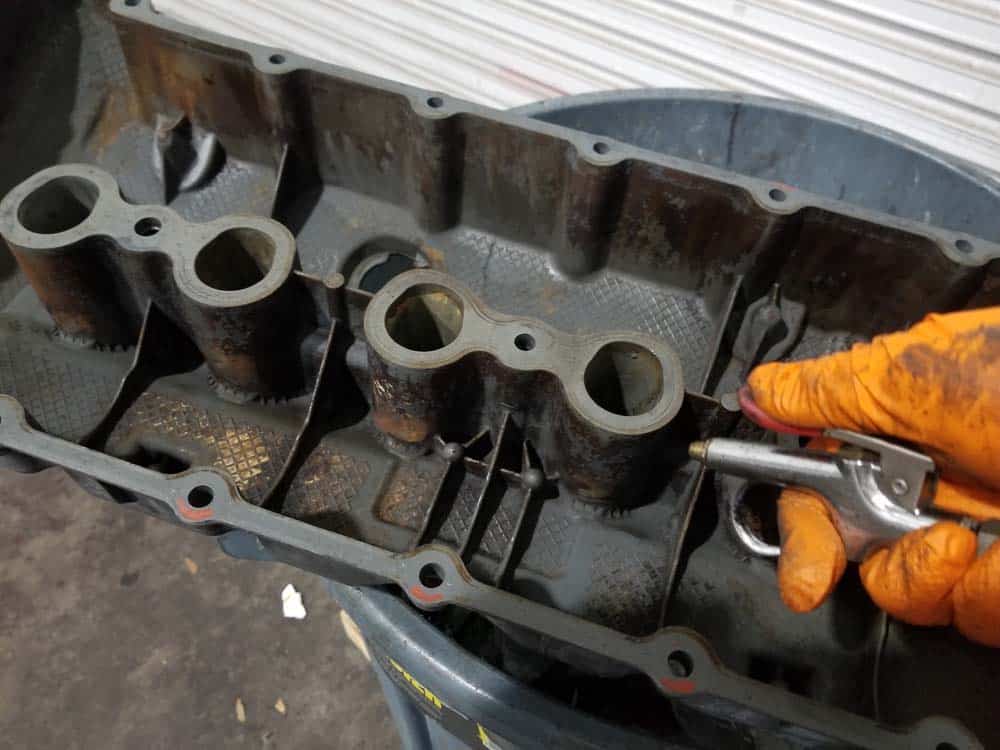
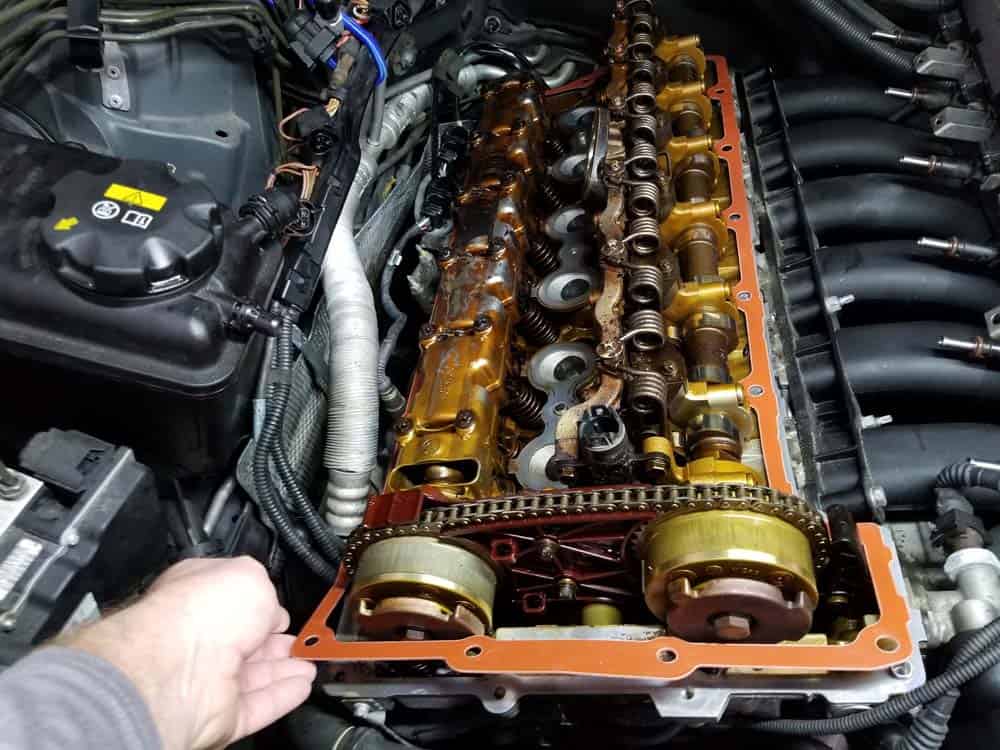
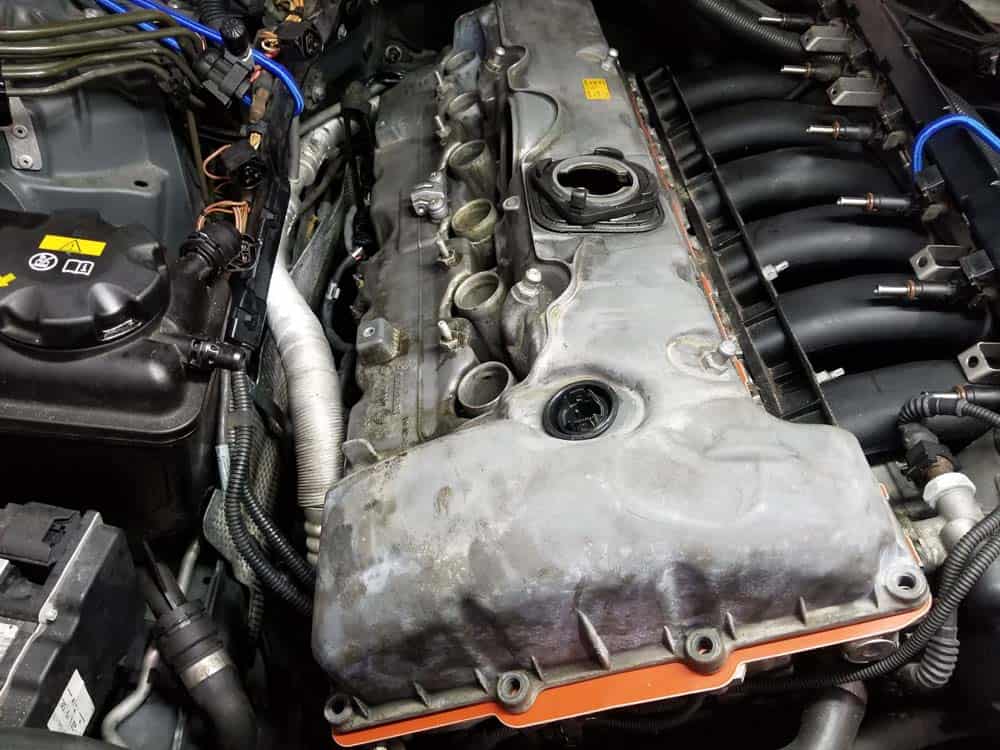
Section 4 - Removing the E60 Valve Cover
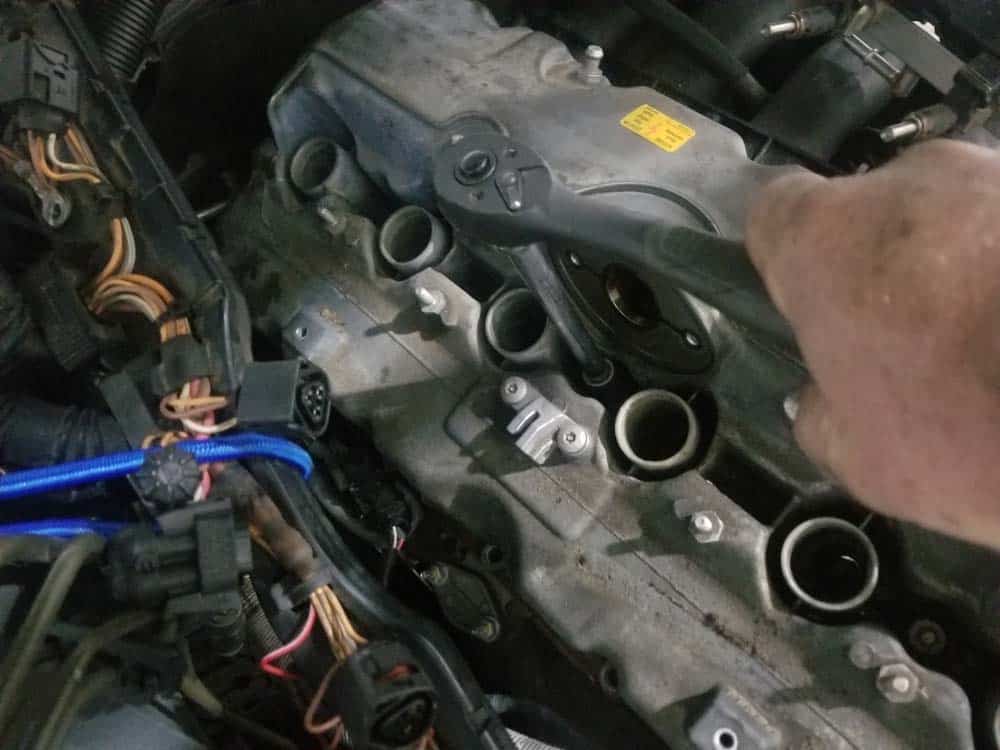
As previously discussed in this article, there are two different valve covers on the BMW E60 depending on what model car you have. The instructions below are for replacing a metal gasket for a magnesium valve cover. The instructions for replacing the rubber gasket on a plastic valve cover are nearly the same barring minor differences which are pointed out in the repair article.- Using an E10 torx socket, remove the nineteen perimeter bolts securing the valve cover to the engine head. Don’t forget the two hidden on the back of the valve cover...you can’t see them…use your hands to find them.
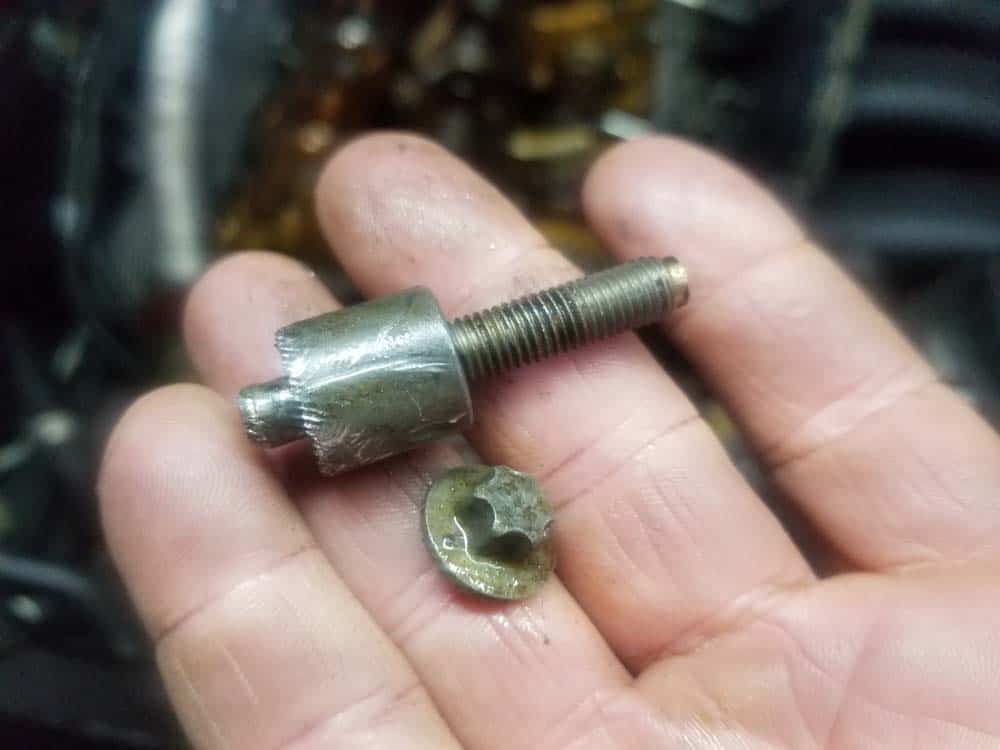
- Next, remove the three interior valve cover bolts. Notice that the front aluminum bolt in ours has snapped in half...a common issue with the magnesium valve covers and the reason we had a misfire in cylinder number 1.
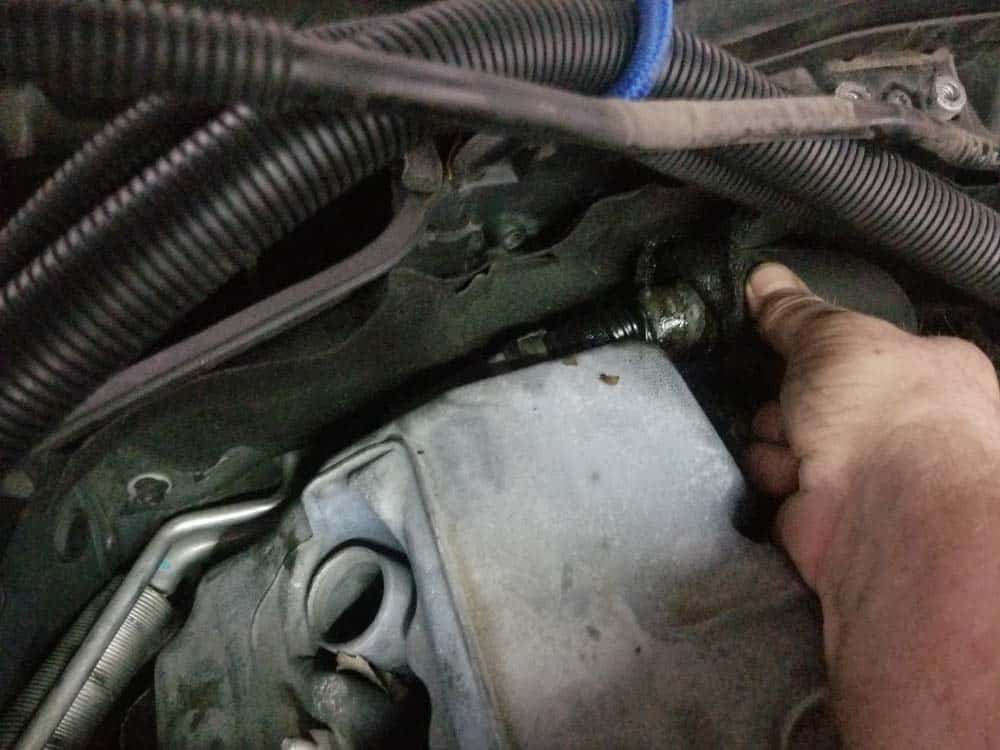
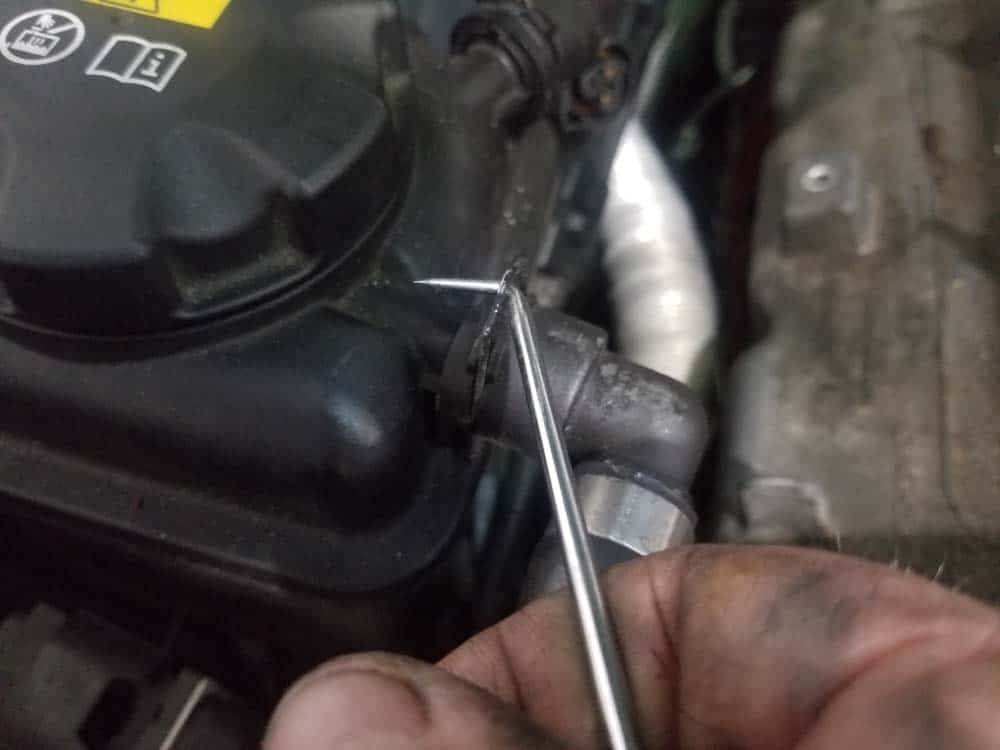
- Use a metal pick to release the clip connecting the radiator coolant line to the coolant reservoir. Remove the line and tuck it out of the way.

- Grasp the valve cover and pull it loose from the engine head. DO NOT force it loose by prying or hitting it with a mallet. It should pull loose with very little force. If it doesn’t then you have most likely missed a bolt.
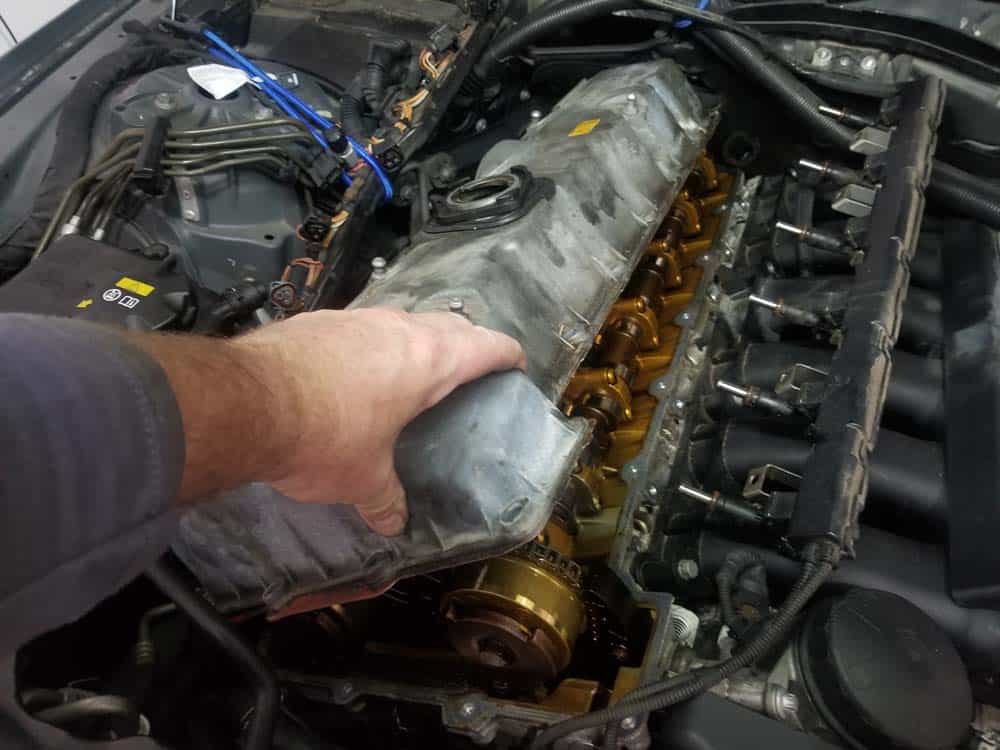
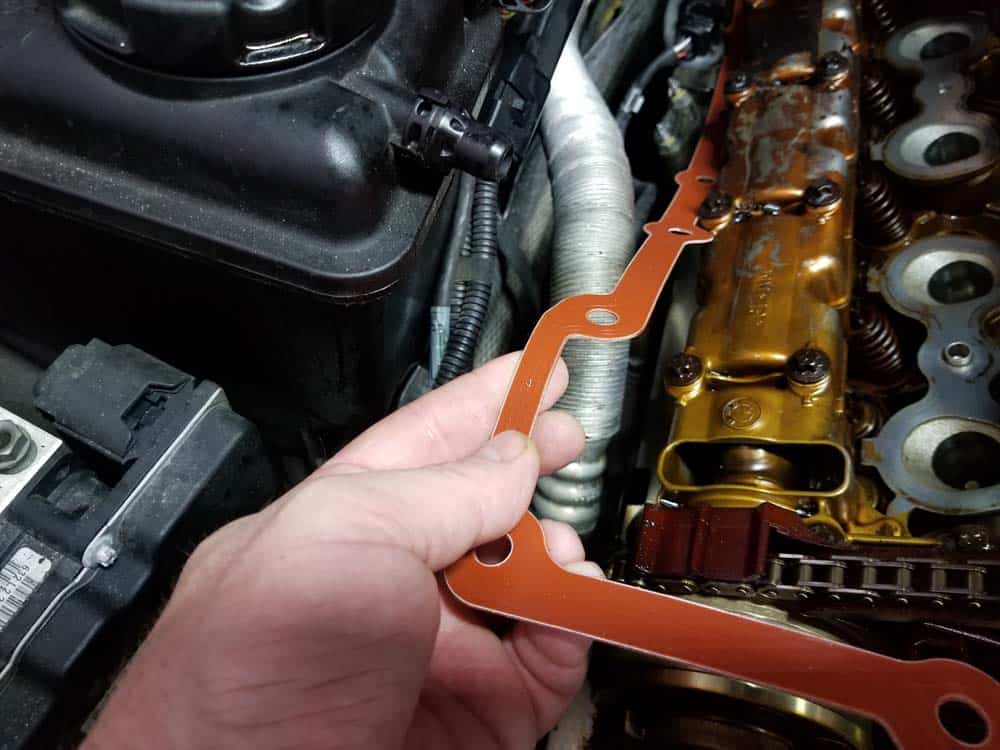
- Remove the valve cover from the engine by raising the rear of it first then negotiating it out of the engine compartment. With magnesium valve covers, remove the old metal gaskets from the engine head. Plastic valve covers have their rubber gaskets installed in grooves on their bottom side...simply pull them loose and discard them.
Section 5 - Preparing the E60 Valve cover and Engine for new Gaskets
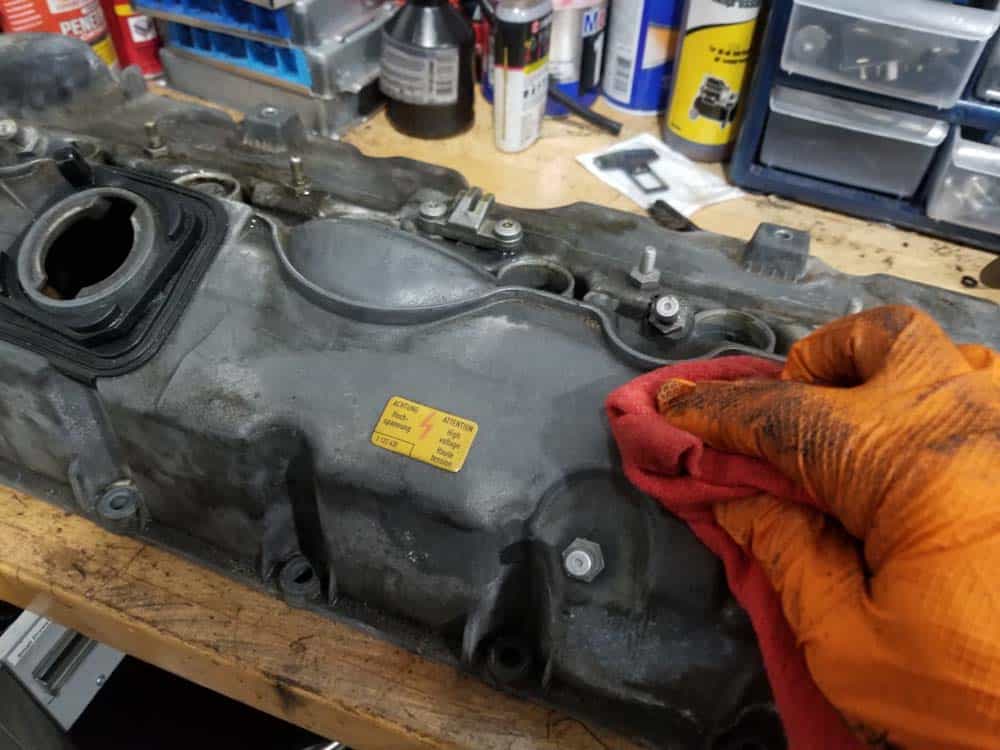
- The valve cover and engine head surface must be thoroughly cleaned before installing the new gaskets. Use CRC Brakleen liberally with a rag to clean the surfaces, removing any oil, dirt and grime. Taking a few extra minutes to clean will save you a lot of headaches down the line. Now is also a great time to also clean the outside (top) of your cover while it's off the engine.

- Thoroughly clean the engine gasket surfaces with CRC Brakleen making sure to remove any old oil residue. Make sure to also thoroughly clean the Valvetronic mounting plate.
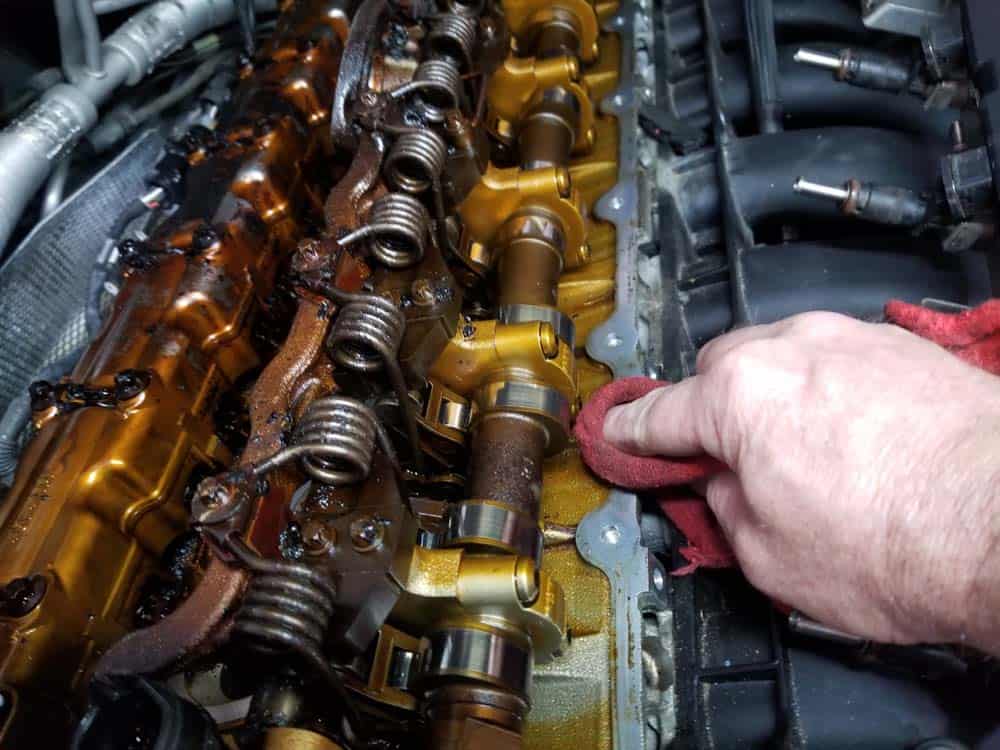

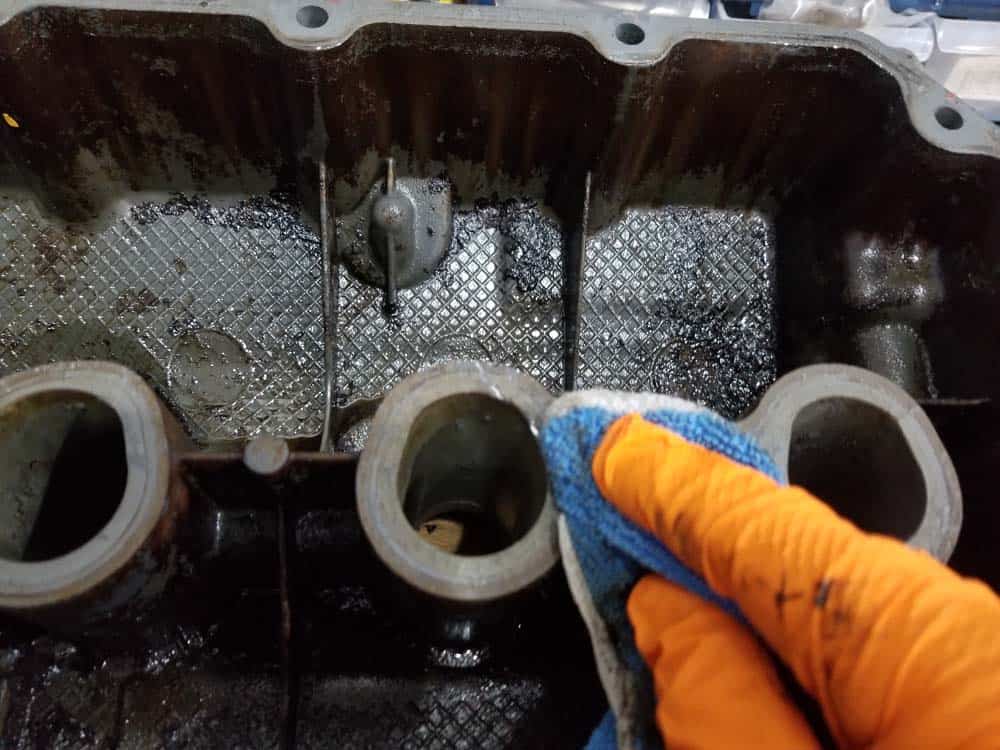
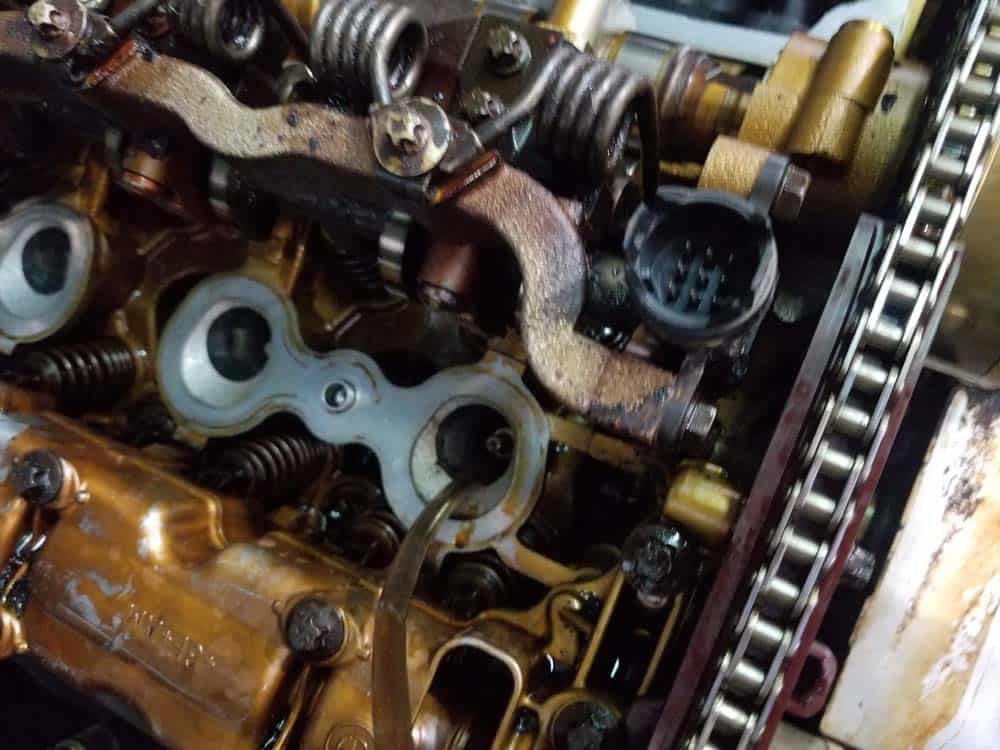
- If you have any sludge or carbon buildup on your camshafts and valves, use a vacuum with a micro tool to remove as much of it as you can. NEVER scrape sludge deposits or use compressed air on the engine head...pieces of sludge can get caught in your lubrication system wreaking havoc on your engine. Only use a vacuum to remove deposits...whatever you can’t vacuum out just leave in the engine. Most sludge deposits are due to oil changes not being performed regularly or using cheap oils that are not BMW certified. The following images show sludge and carbonization in the engine of our 2006 530xi. It’s a sad situation that could have been prevented with proper maintenance.

- If your engine had leakage in one or more of the spark plug tubes, use a vacuum pump to suck out the oil. We will clean the spark plugs in section 7 below.
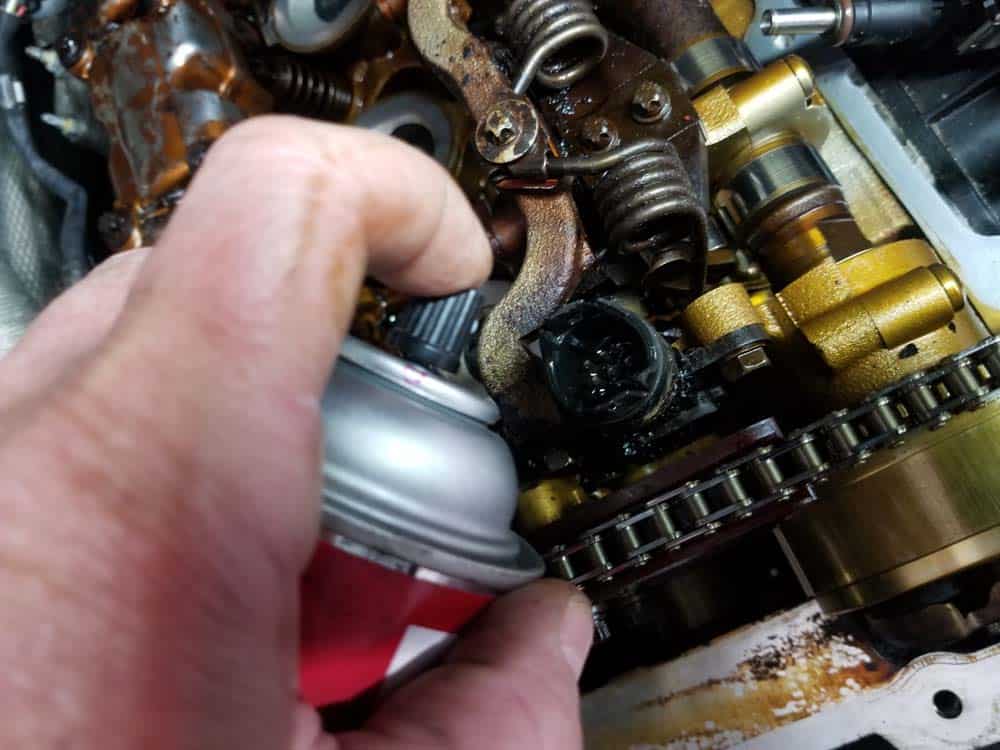
- It’s also good practice to spray the eccentric valve sensor connection with CRC Electronics cleaner and dry with compressed air.
Section 6 - Installing the new Gaskets and Valve Cover
- If working on a vehicle with a magnesium valve cover, place the new metal gaskets on the cylinder head. Make small bends in the metal if needed, adjusting the gasket so it lays perfectly flat on the surface. If working on a vehicle with a plastic valve cover, install the new rubber gaskets directly into the groove in the bottom of the valve cover (image not shown).

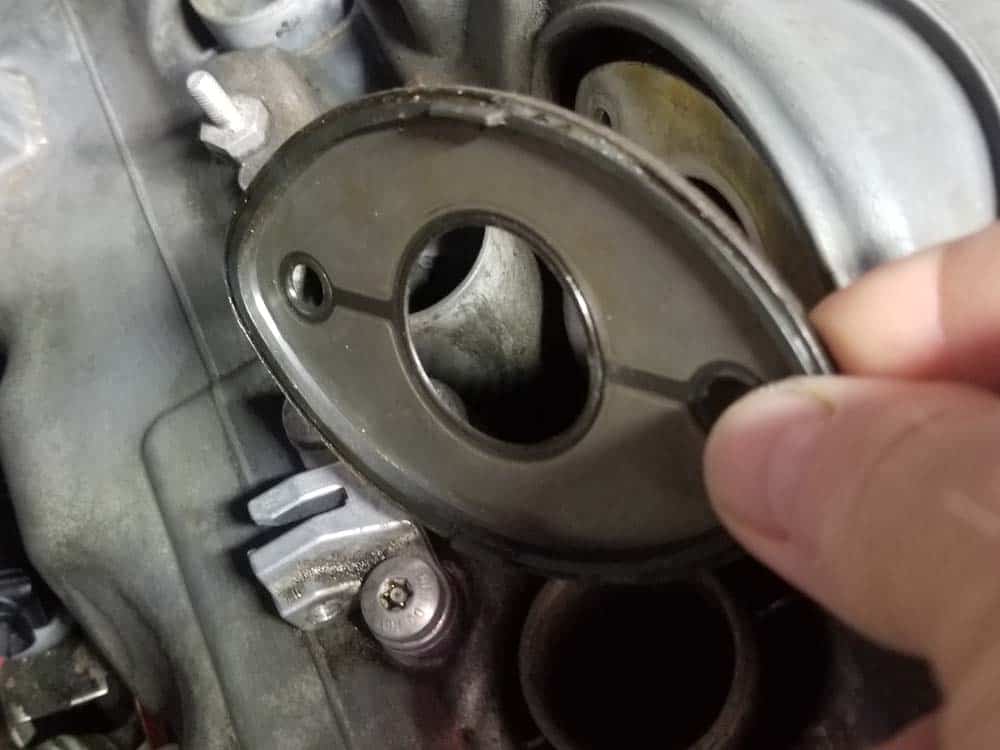
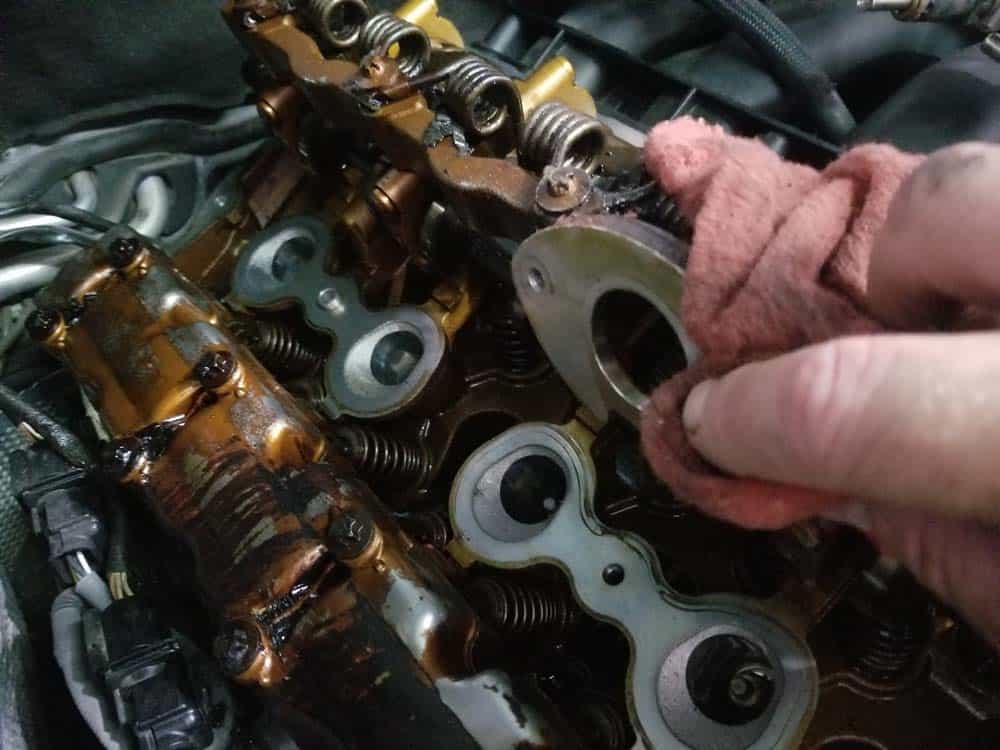
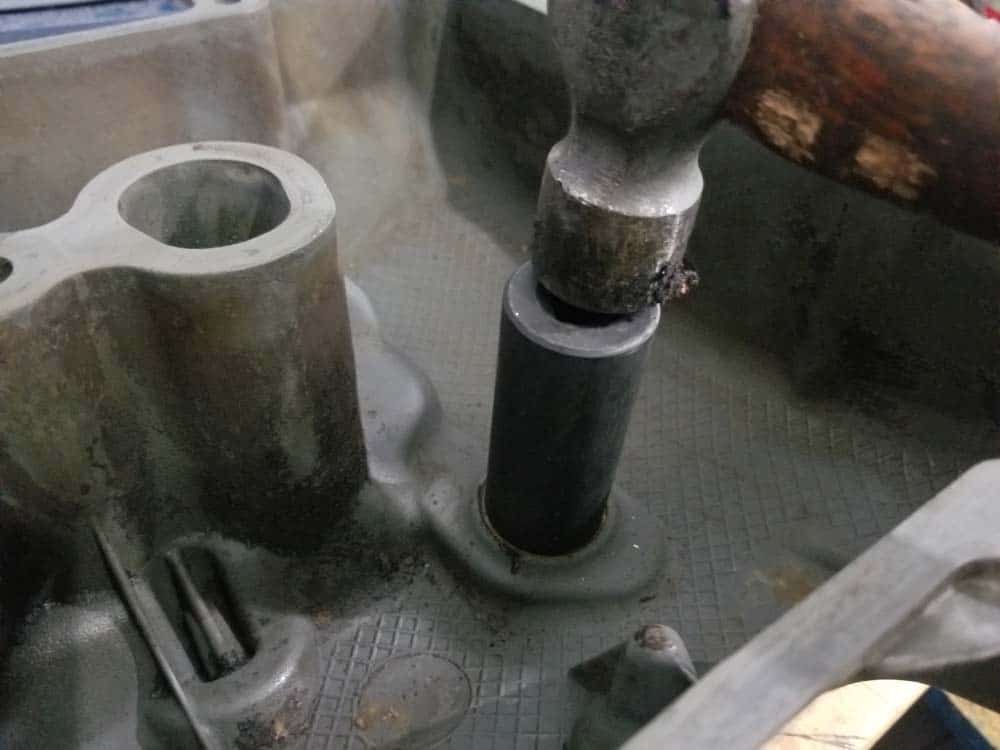
- Remove the old eccentric valve sensor gasket from the valve cover. The gasket actually has a metal liner covered with rubber. The best way to remove it is to use a 24mm socket and gently punch it out from the bottom of the valve cover. DO NOT use this technique on plastic valve covers...you can crack the plastic. Once you have removed the old gasket, thoroughly clean the hole with CRC Brakleen. Coat the new gasket with liquid dish detergent and press back into the cover with your fingers.


- Carefully install the valve cover back onto the engine. Make sure you don’t pinch any of the oxygen sensor wires located on the rear of cover...this is a common mistake that can cause electrical issues down the line. Also make sure the eccentric valve sensor and Valvetronic plate line up correctly in their openings.
- Insert all of the new aluminum bolts (old steel bolts if reinstalling a plastic cover) and hand tighten. Check...then double check...to make sure you have every bolt installed. Note the three interior bolts have longer washers on them than the perimeter bolts...don't mix them up.
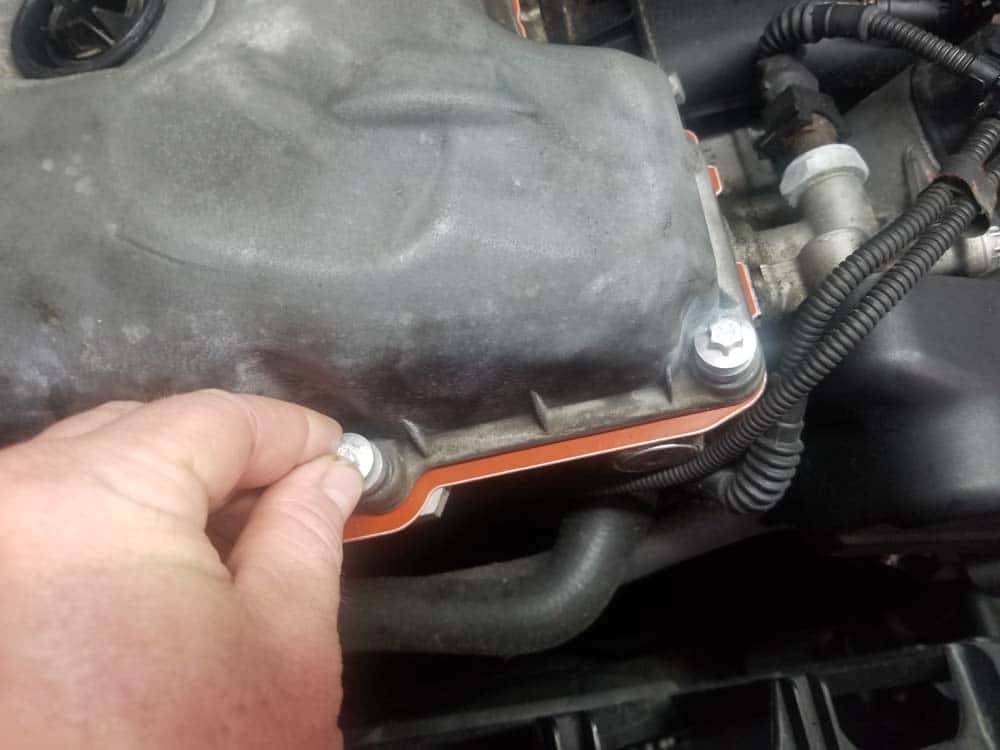
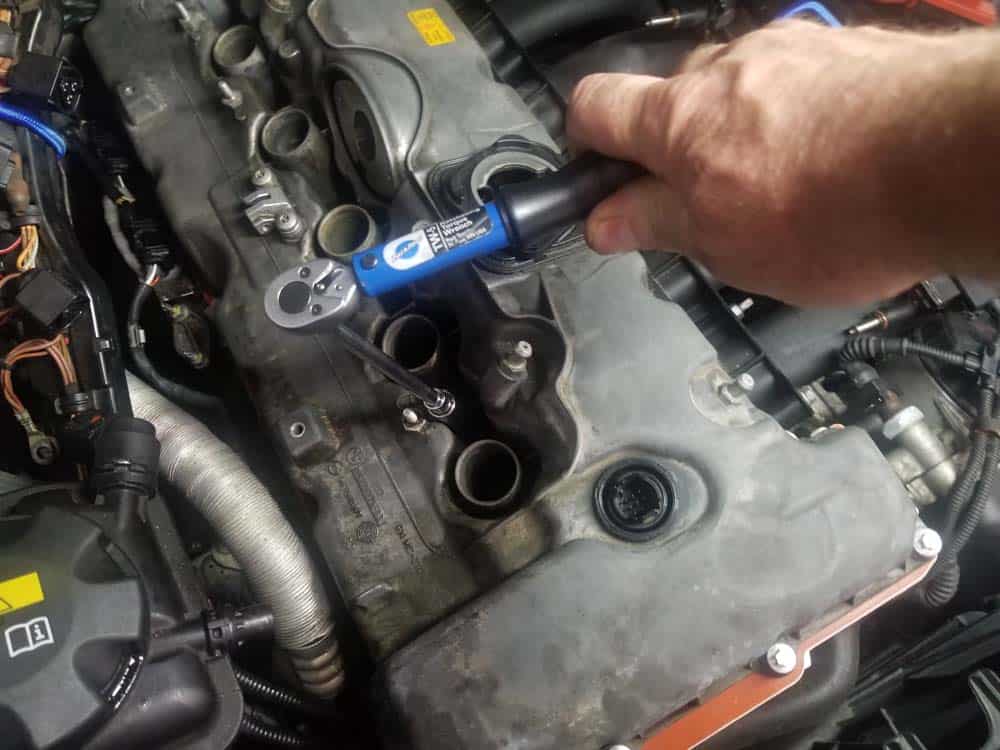
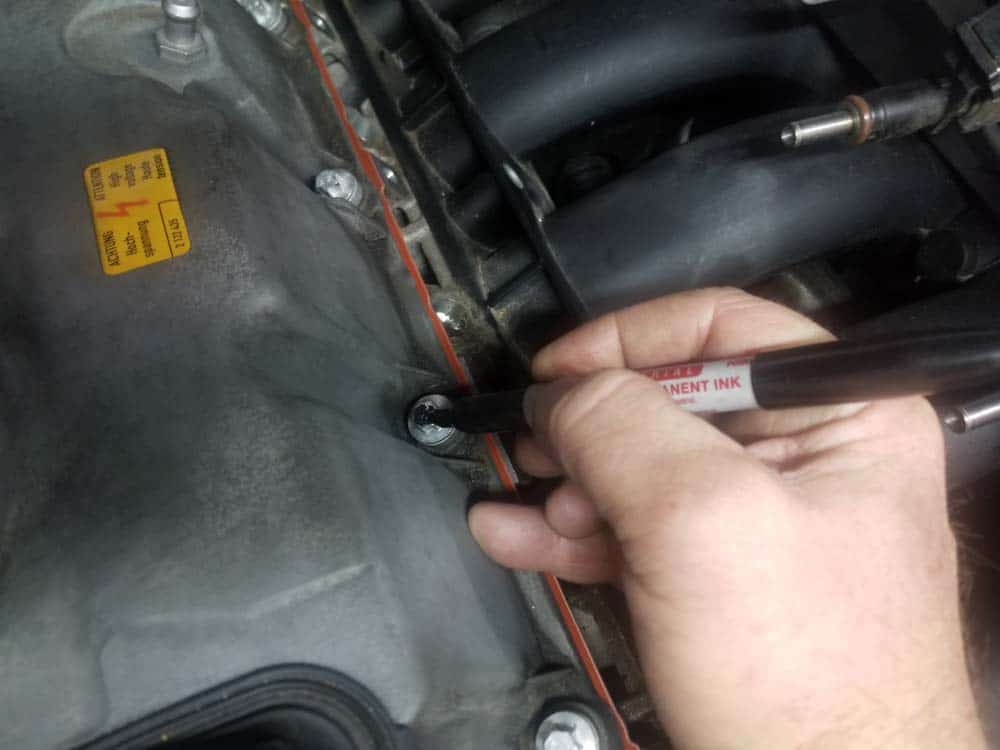
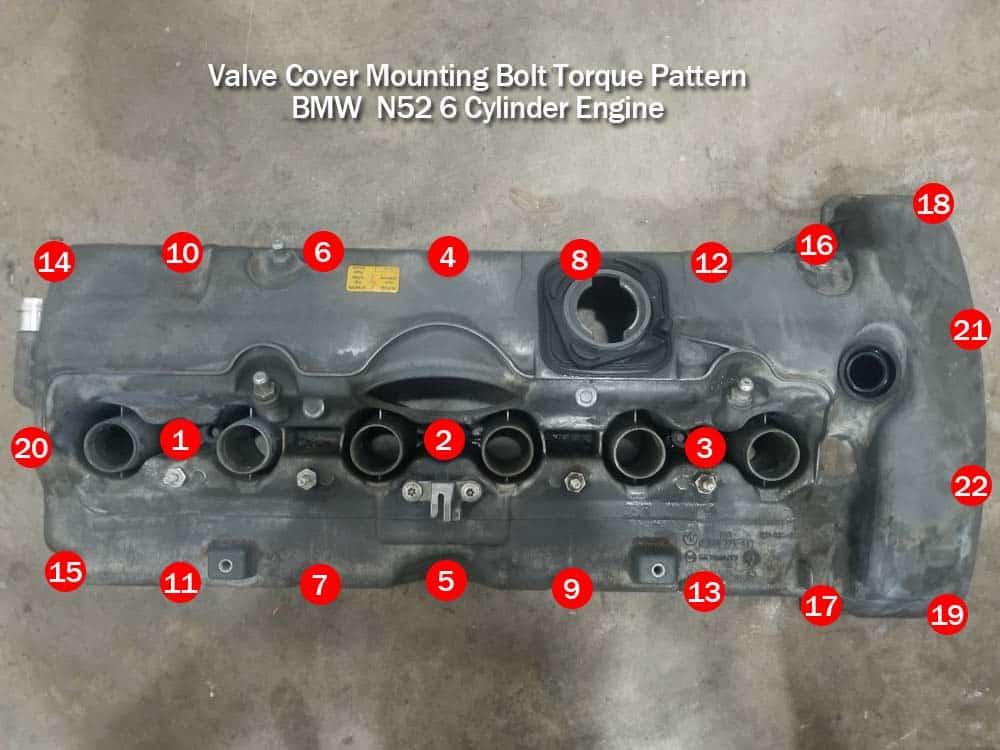
- When you are sure everything is lined up correctly and the valve cover is properly seated on the new gasket, tighten the mounting bolts following a "criss-cross" pattern as shown in the following diagram. As you torque the bolts to their final values, mark them with a magic marker or Sharpie so you know they are done...it is very easy to get confused and not fully tighten a bolt! (Note - always turn aluminum bolts an additional 90 degrees after reaching their initial torque value - see below). Aluminum mounting bolts (magnesium valve cover) - 7Nm (5 ft-lb) + 90 degrees Steel mounting bolts (plastic valve cover) - 9Nm (7 ft-lb)
Section 7 - Initial Reassembly - BMW E60 Valve Cover Gasket Replacement Completion
The initial reassembly is to get the vehicle put back together just enough so the car can be checked for proper operation and to make sure their are no fuel or oil leaks. We highly recommend NOT installing the cabin filter assembly or engine cover until everything is thoroughly checked.- Reattach the radiator coolant line to the coolant reservoir. Make sure to hear the “click” when you push it on so you know it is secure.
- Reattach the crankcase breather hose to the back of the valve cover.
- Carefully install the fuel rail back into the engine head. Push down firmly to make sure all of the injectors are seated correctly. Install the fuel rail mounting bracket and the fuel rail mounting bolts. Torque all bolts to 10Nm (7 ft-lb).
- Reinstall the fuel line. Make sure to hear it “click” into its locking position.
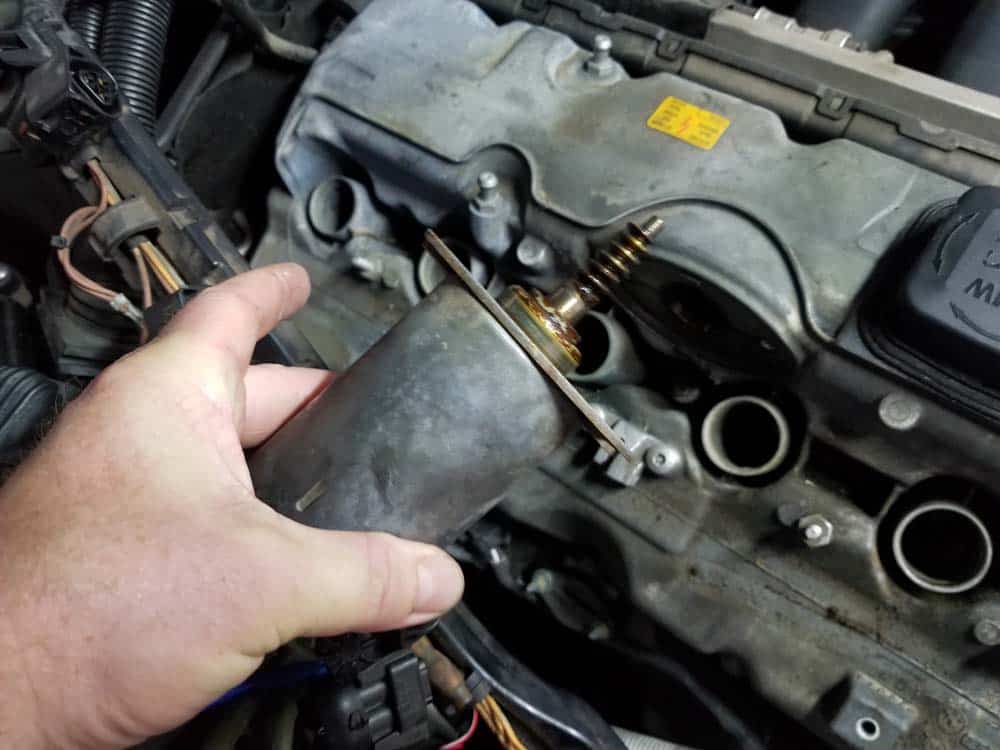
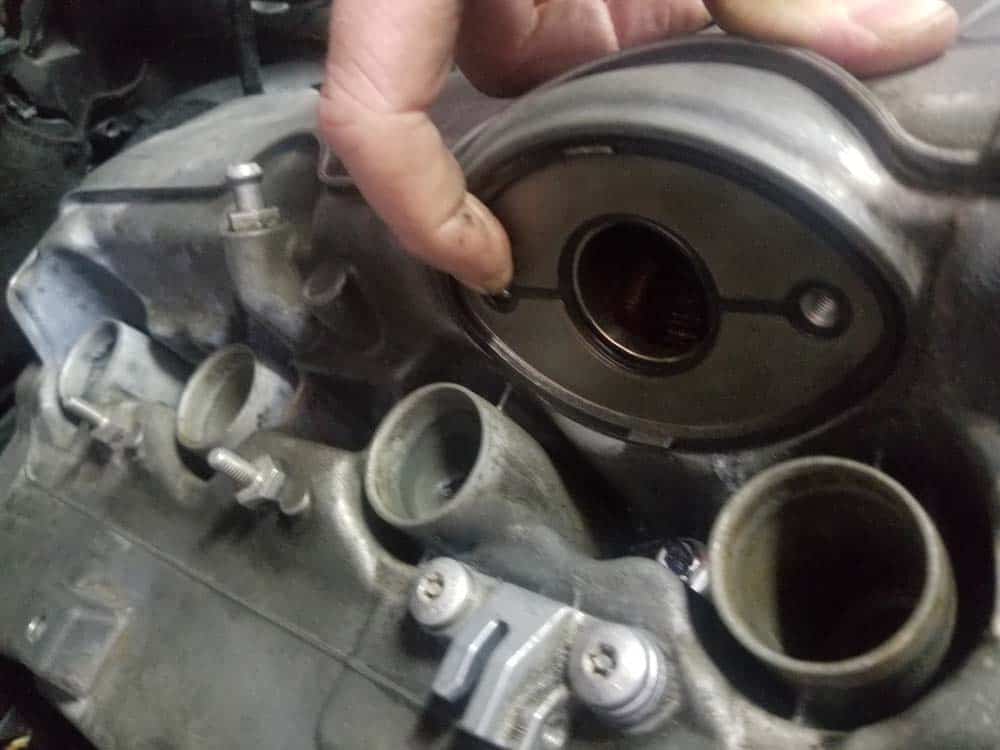
- Install the Valvetronic gasket plate back into the valve cover. Make sure the correct side is facing out (see image below).

- Install the Valvetronic unit back into the engine by turning the motor clockwise with a 4mm hex socket and guiding it into the plate. Turning the motor clockwise will "pull" the Valvetronic into the engine. Reinstall the three Valvetronic mounting bolts and torque to 4 Nm (3 ft-lb).
- Install the Valvetronic and eccentric valve sensor electrical connections. Reinstall the cable harness and the grounding strap bolts. Torque the grounding strap bolts to 4 Nm (3 ft-lb).
- If you had any oil infiltration into the spark plug tubes, you will need to thoroughly clean the affected coils and plugs to prevent a misfire when you start the engine. Use a 5/8" spark plug socket to remove spark plugs that were affected by the leak. Soak them with CRC Electronic cleaner and clean with a rag. Reinstall the spark plug and torque to 24Nm (18 ft-lb). Soak the coils with CRC Electronics Cleaner and clean thoroughly with a rag. Pay special attention to where the coil mounts to the plug, making sure to remove any oil residue.
- Reinstall all of the coil packs back into the spark plug tubes. Make sure they are seated firmly on the top of the spark plugs.
- Connect the negative terminal back onto the battery.
- Turn the ignition on (don't start car) and allow it to sit for about 30 seconds. This will allow the Valvetronic unit to reset itself.
- Start the vehicle and check to make sure everything is operating correctly and there are no oil or fuel leaks. Pay extra attention to the fuel rail and the fuel hose connection.
- You will most likely have several error messages on your iDrive screen as well as dashboard lights, depending on what model vehicle you have. These are usually related to disconnecting the battery, and will reset themselves as soon as you take the car for a spin around the block.
Section 8 - Final reassembly
When you are satisfied the vehicle is running normally and there are no leaks, you can finish reassembling the vehicle.- Reinstall the strut brace and torque the bolts to 30.5 Nm (22 ft-lb)
- Reinstall the engine cover and cabin filter assembly following Section 1 steps 3-9 in reverse.
BMW E60 Valve Cover Gasket Replacement Finished