Charge Air Line Replacement – BMW B46/B48 Turbo 4 Cylinder Engine
Step 1 - Purchase Parts
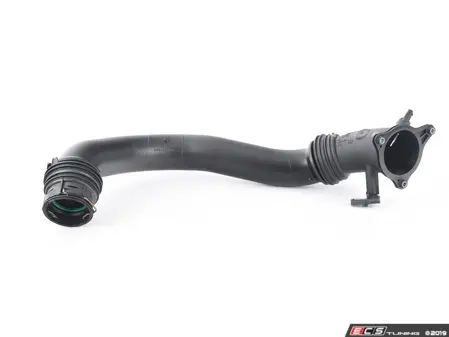
Charge Air Line
Cracking a charge air line in BMW turbocharged engines unfortunately happens, usually by a mechanic not paying attention to what they are doing. Once damaged, the engine will not run correctly...the pipe must be replaced. This is a bitter pill to swallow for BMW owners because the pipe is just down right expensive. But there's a reason why...a Genuine BMW charge pipe is a factory part that is built to an exponentially higher level than cheap aftermarket knock offs. Don't waste your money and time buying "imported" junk from Amazon and Ebay. This Genuine BMW charge pipe is the same one installed at the dealership - it will return that original performance to your vehicle that it was delivered from the factory with.

Temperature Sensor
It is generally accepted as good practice to replace the temperature sensor when installing a new charge air pipe in your BMW. One thing we have learned here at the BMW Repair Guide is to NEVER install aftermarket sensors anywhere in your engine...only install Genuine BMW. Frankly put, they cost more, but always work.
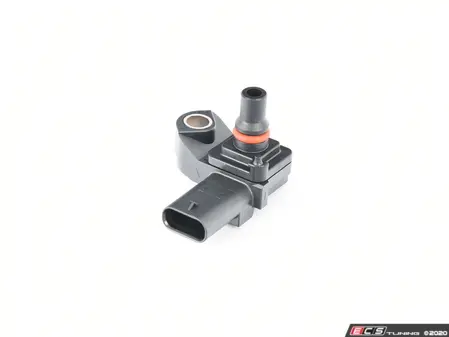
Charge Air Pressure (MAP) Sensor
The BMW Repair Guide always recommends replacing the sensors when installing a new charge air pipe into your vehicle. This is a Genuine BMW part and is the same sensor that would be installed at the factory.
Step 2 - Repair Procedure

- Remove the acoustic engine cover by pulling it up until it releases from its rubber grommets.

- Remove the radiator cover (1) by pulling it up until it releases from its rubber grommets.
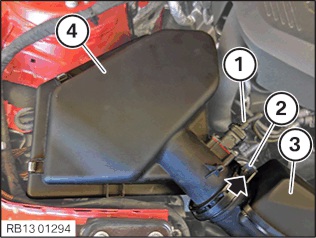
- Disconnect the hot-film air mass meter (1) from the intake muffler (4).
- Loosen the hose clamp (2) connecting the intake silencer to the clean air pipe (3).
- Grasp the intake muffler and pull it loose from its rubber grommets and remove from vehicle.
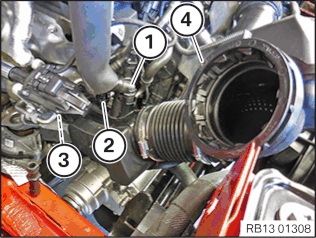
- Next, remove the clean air pipe (4) by first disconnecting the vent pipes (1) and (2).
- Unlock the spring clip (3) and pull the clean air pipe free from the turbocharger.
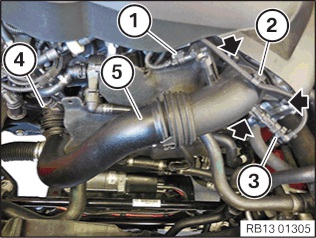
- Unplug the charge air pressure sensor (1) and the temperature sensor (3).
- Remove the three torx screws anchoring the charge air line to the throttle body.
- Release the locking clamp (4) and pull the charge air line free from the turbocharger.
- Remove the charge air line from the engine compartment.
If you are having issues getting the new charge pipe to properly lock lock to the turbocharger during installation, try rubbing some liquid dish detergent (like Dawn) around the inside of the pipe on the sealing rigns. The dish detergent acts like a lubricant and will in no way damage any of the parts!

- When installing a new charge air pipe, it is important to replace the sealing ring on the throttle body. Not replacing the sealing ring could cause a vacuum leak and error message(s).
- Make sure when reinstalling the charge air pipe to the turbocharger you audibly hear the locking clamp snap into place. If the pipe is loose or not connected correctly, you will get an error message and a rough running engine.
- Charge pipe to throttle body torx screws torque to 8 Nm (6 ft-lb).